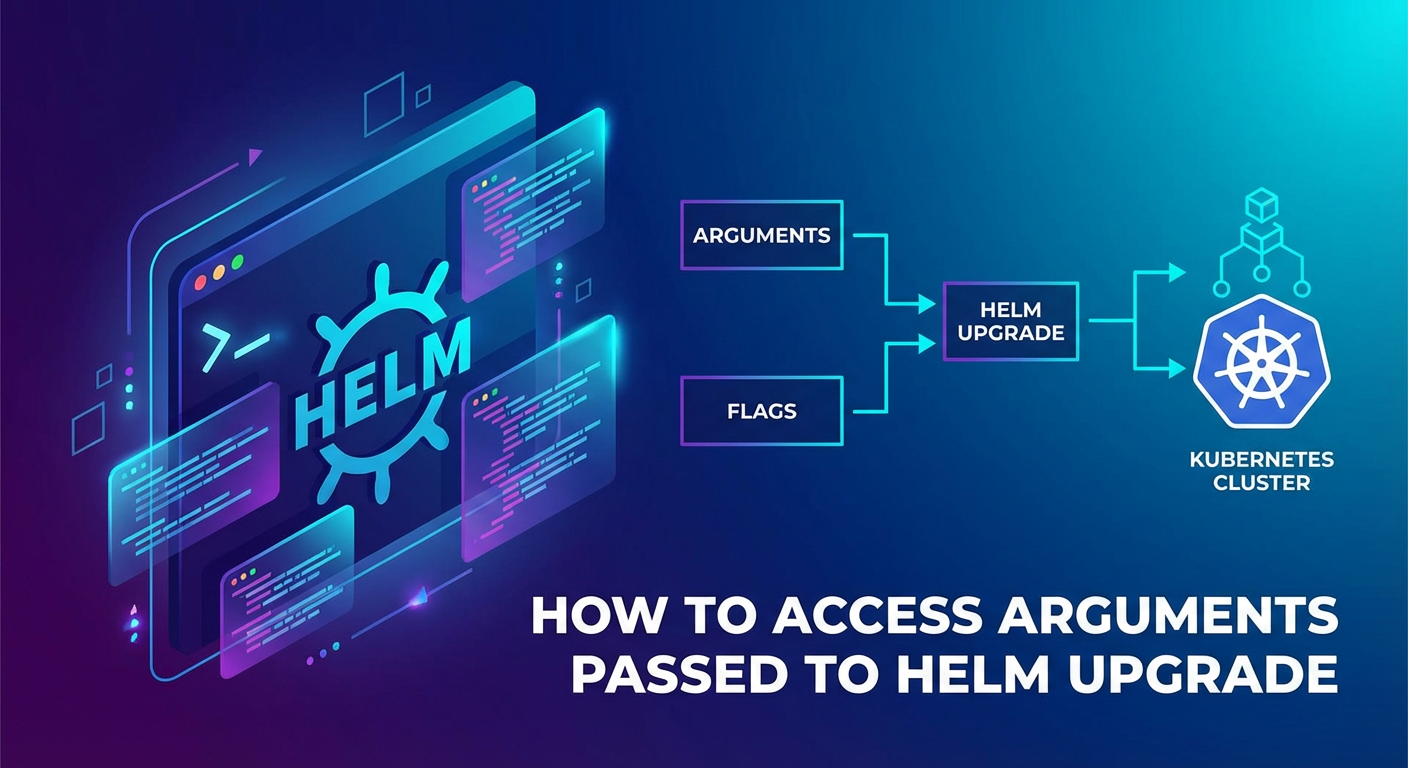
How to Access Arguments Passed to Helm Upgrade


In the rapidly evolving landscape of cloud-native application deployment, Kubernetes has emerged as the de facto standard for orchestrating containerized workloads. Within this ecosystem, Helm stands out as the package manager for Kubernetes, simplifying the deployment and management of complex applications. Helm allows developers and operators to define, install, and upgrade even the most intricate applications using "charts" – predefined packages of Kubernetes resources. The helm upgrade command is central to the operational lifecycle of any application managed by Helm, enabling seamless updates to deployed releases. It's a powerful tool, yet understanding how to effectively access and utilize the arguments passed to this command within your Helm charts is paramount for creating flexible, robust, and maintainable deployments. This comprehensive guide will delve deep into the mechanics of helm upgrade arguments, demonstrating how to retrieve and leverage them to craft dynamic and intelligent Kubernetes manifests.
The Foundation: Understanding Helm and helm upgrade
Before we explore argument access, it's crucial to solidify our understanding of Helm's core principles and the specific role of the helm upgrade command. Helm charts are collections of files that describe a related set of Kubernetes resources. They serve as a template for deploying an application, allowing users to define configurations and parameters that can be customized at deployment time. These customizations are typically provided through "values," which are key-value pairs that override default settings defined within the chart.
The helm upgrade command is used to update an existing release of a Helm chart. When you execute helm upgrade, Helm performs several critical steps: 1. Retrieves the current release state: It fetches the previously installed chart, its values, and the rendered Kubernetes manifests. 2. Applies new values: It takes the new chart version (if specified) and any new values provided via the command line or value files. 3. Renders templates: Using the new chart and combined values, it re-renders all the Kubernetes resource templates. 4. Compares and Patches: It compares the newly rendered manifests with the currently deployed resources and calculates the necessary changes. 5. Applies changes: Finally, it applies these changes to the Kubernetes cluster, often using a three-way strategic merge patch for efficient updates.
The power of helm upgrade lies in its ability to accept various arguments that dictate how the upgrade should proceed and what configurations should be applied. These arguments are the primary mechanism through which users inject dynamic data into their Helm charts, enabling everything from environment-specific configurations to feature toggles. Accessing these arguments consistently and predictably within your chart's templates is the cornerstone of advanced Helm usage.
Dissecting Helm Upgrade Arguments: The Various Flavors of Values
When performing a helm upgrade, you have several ways to pass configuration data, each with its own characteristics and precedence. Understanding these methods is fundamental to knowing where your values come from and how they are ultimately processed by Helm.
1. --set and --set-string: Direct Key-Value Overrides
The --set flag is perhaps the most common way to pass individual key-value pairs directly from the command line. It's ideal for quick overrides or setting specific parameters without needing to create a separate file.
--set key=value: Sets a simple string, number, or boolean. Helm attempts to infer the type.- Example:
helm upgrade my-release my-chart --set replicaCount=3
- Example:
--set key={value1,value2}: Sets a list of strings.- Example:
helm upgrade my-release my-chart --set mylist={item1,item2}
- Example:
--set key.subkey=value: Sets a nested value.- Example:
helm upgrade my-release my-chart --set image.tag=v1.2.3
- Example:
The --set-string flag is similar but explicitly treats the value as a string, preventing Helm from attempting type conversion. This is particularly useful when values might otherwise be interpreted as numbers, booleans, or other types, leading to unexpected behavior.
--set-string key=value: Forces the value to be a string.- Example:
helm upgrade my-release my-chart --set-string image.tag="01.00.00"(if01.00.00might otherwise be treated as a number or float).
- Example:
2. --set-file: Injecting File Contents as Values
For more extensive or multi-line values, such as certificates, scripts, or configuration snippets, --set-file allows you to read the content of a local file and set it as a value.
--set-file key=path/to/file: Reads the file content and assigns it tokey.- Example:
helm upgrade my-release my-chart --set-file configmap.data.my-script=./script.sh
- Example:
This is invaluable for injecting large blocks of text without cluttering the command line.
3. --values (or -f): The Power of Value Files
For managing a significant number of configurations, especially across different environments (e.g., development, staging, production), using --values (or its shorthand -f) is the preferred approach. This flag allows you to specify one or more YAML files containing your configuration values.
--values path/to/values.yaml: Specifies a single values file.- Example:
helm upgrade my-release my-chart -f values-prod.yaml
- Example:
--values path/to/values1.yaml --values path/to/values2.yaml: Multiple value files can be specified. Helm merges them in order, with later files overriding earlier ones.
Value files provide a structured, version-controllable way to manage configurations. They are the backbone of robust Helm deployments, allowing for clear separation of concerns and easier collaboration.
4. --reuse-values: Preserving Previous Configurations
Sometimes, you want to upgrade a chart but only apply a few specific changes while retaining all previously set values. The --reuse-values flag does exactly this. It tells Helm to use the values from the previous release, and then any new --set or --values flags will override those reused values.
- Example:
helm upgrade my-release my-chart --reuse-values --set image.tag=v2.0.0
This is extremely useful for iterative development or making minor adjustments without redefining an entire configuration set.
5. --atomic, --install, --timeout, etc.: Command-Specific Flags
Beyond configuration values, helm upgrade accepts numerous flags that control the upgrade process itself, such as --atomic (rollback on failure), --install (install if not present), --timeout (set a maximum time for the upgrade), --wait (wait for all resources to be in a ready state), and many more. While these flags don't directly inject values into your templates, they significantly impact the deployment's operational behavior and success. Understanding their purpose is critical for reliable upgrades.
The Order of Precedence: When Values Collide
With so many ways to provide values, conflicts are inevitable. Helm defines a clear order of precedence, determining which value "wins" if the same key is defined in multiple places. This order is crucial for debugging and predicting chart behavior:
- Values from
values.yamlinside the chart: These are the default values shipped with the chart. - Values from dependency charts'
values.yaml: Dependencies can also define their own default values. - Values from
--values(or-f) files: These are processed from left to right, so the last specified file takes precedence for conflicting keys. - Values from
--setand--set-stringflags: These command-line flags have the highest precedence, overriding any values defined invalues.yamlor value files.
Understanding this hierarchy is vital. If a value isn't behaving as expected, checking the precedence chain is often the first step in troubleshooting.
Accessing Arguments Within Helm Templates: The .Values Object
The core mechanism for accessing any argument passed to helm upgrade (or helm install) within your Helm templates is through the global .Values object. This object is a dictionary-like structure that contains all the merged and processed values for the current release. Every template file (.tpl or .yaml) in your Helm chart has access to this object.
Basic Access: Simple Keys
To access a top-level key from your values.yaml or a --set flag, you use the dot notation:
{{ .Values.keyName }}
For example, if you set replicaCount=3 via --set or defined replicaCount: 3 in a values file:
values.yaml:
replicaCount: 1
deployment.yaml template:
apiVersion: apps/v1
kind: Deployment
metadata:
  name: {{ include "my-chart.fullname" . }}
spec:
  replicas: {{ .Values.replicaCount }}
  selector:
    matchLabels:
      {{ include "my-chart.selectorLabels" . | nindent 6 }}
  template:
    metadata:
      {{- with .Values.podAnnotations }}
      annotations:
        {{- toYaml . | nindent 8 }}
      {{- end }}
    spec:
      containers:
        - name: {{ .Chart.Name }}
          image: "{{ .Values.image.repository }}:{{ .Values.image.tag }}"
          imagePullPolicy: {{ .Values.image.pullPolicy }}
          ports:
            - name: http
              containerPort: 80
              protocol: TCP
Nested Access: Deep Dive into Configurations
For more complex configurations, values are often nested. Helm's .Values object handles this seamlessly:
{{ .Values.parentKey.childKey.grandchildKey }}
Consider the common pattern for defining an image:
values.yaml:
image:
  repository: nginx
  tag: stable
  pullPolicy: IfNotPresent
To access these within a template:
image: "{{ .Values.image.repository }}:{{ .Values.image.tag }}"
imagePullPolicy: {{ .Values.image.pullPolicy }}
Using default for Robustness
It's good practice to provide default values in your chart's values.yaml file. However, sometimes you might want to provide a fallback directly in the template if a value is missing or explicitly nil. The default function is perfect for this:
image: "{{ .Values.image.repository | default "my-default-repo" }}:{{ .Values.image.tag | default "latest" }}"
This ensures that even if image.repository or image.tag are not provided, your template will still render valid output. While it's often better to rely on values.yaml for defaults, default in templates offers an additional layer of safety.
Conditional Logic with if/else
Helm templates leverage Go's templating language, which supports powerful control flow. You can use if statements to conditionally include or modify parts of your Kubernetes manifests based on the values passed.
Example: Only include an ingress resource if ingress.enabled is set to true.
ingress.yaml template:
{{- if .Values.ingress.enabled }}
apiVersion: networking.k8s.io/v1
kind: Ingress
metadata:
  name: {{ include "my-chart.fullname" . }}
  labels:
    {{- include "my-chart.labels" . | nindent 4 }}
  {{- with .Values.ingress.annotations }}
  annotations:
    {{- toYaml . | nindent 4 }}
  {{- end }}
spec:
  {{- if .Values.ingress.className }}
  ingressClassName: {{ .Values.ingress.className }}
  {{- end }}
  rules:
    {{- range .Values.ingress.hosts }}
    - host: {{ .host | quote }}
      http:
        paths:
          {{- range .paths }}
          - path: {{ .path }}
            pathType: {{ .pathType }}
            backend:
              service:
                name: {{ include "my-chart.fullname" $ }}
                port:
                  number: 80
          {{- end }}
    {{- end }}
  {{- with .Values.ingress.tls }}
  tls:
    {{- toYaml . | nindent 4 }}
  {{- end }}
{{- end }}
This allows you to dynamically enable or disable features based on deployment arguments.
Iterating Over Lists and Maps with range
When you have a list of items or a map that needs to be processed, the range function is invaluable.
Example: Creating multiple environment variables from a list in values.yaml.
values.yaml:
envVars:
  - name: MY_VAR_1
    value: "value1"
  - name: MY_VAR_2
    value: "value2"
deployment.yaml template snippet:
        env:
        {{- range .Values.envVars }}
          - name: {{ .name }}
            value: {{ .value | quote }}
        {{- end }}
This flexibility allows charts to generate highly dynamic and complex resource configurations based entirely on the arguments provided during helm upgrade.
Advanced Argument Handling and Chart Best Practices
While simple access to .Values covers most scenarios, advanced Helm chart development incorporates several best practices and functions for more robust argument handling.
1. The _helpers.tpl File: Encapsulating Logic
The _helpers.tpl file is a special file in your chart that stores reusable template partials (named templates) and functions. This is where you should encapsulate complex logic that uses .Values to derive other values or generate common labels.
Example _helpers.tpl snippet:
{{- define "my-chart.labels" -}}
helm.sh/chart: {{ include "my-chart.chart" . }}
{{ include "my-chart.selectorLabels" . }}
{{- if .Chart.AppVersion }}
app.kubernetes.io/version: {{ .Chart.AppVersion | quote }}
{{- end }}
app.kubernetes.io/managed-by: {{ .Release.Service }}
{{- end }}

{{- define "my-chart.selectorLabels" -}}
app.kubernetes.io/name: {{ include "my-chart.name" . }}
app.kubernetes.io/instance: {{ .Release.Name }}
{{- end }}
Then, in your deployment.yaml:
metadata:
  labels:
    {{- include "my-chart.labels" . | nindent 4 }}
By centralizing these definitions, you ensure consistency and simplify maintenance, especially when values are derived from multiple sources.
2. The required Function: Enforcing Mandatory Values
For critical configuration parameters, you might want to ensure that they are always provided. The required function allows you to fail the Helm installation or upgrade if a specific value is missing.
# In a template, or often in _helpers.tpl
{{- $secretName := required "A database secret name is required for this deployment." .Values.database.secretName }}
If database.secretName is not provided, Helm will stop the upgrade with the specified error message, preventing incomplete or misconfigured deployments. This is especially useful for production deployments where certain configurations are non-negotiable.
3. Accessing the .Capabilities Object
While not an argument passed to helm upgrade directly, the .Capabilities object provides access to information about the Kubernetes cluster and Helm version. This is incredibly useful for writing conditional templates that adapt to different cluster environments.
Example: Deploying networking.k8s.io/v1beta1 Ingress on older clusters and networking.k8s.io/v1 on newer ones.
{{- if .Capabilities.APIVersions.Has "networking.k8s.io/v1" }}
apiVersion: networking.k8s.io/v1
{{- else }}
apiVersion: extensions/v1beta1 # Or networking.k8s.io/v1beta1 for older Helm versions
{{- end }}
kind: Ingress
This allows your chart to be more portable across different Kubernetes versions, gracefully handling API version changes without requiring manual intervention during upgrades.
4. Post-Upgrade Hooks and Jobs
Sometimes, accessing arguments isn't about rendering manifests, but about triggering actions after the upgrade based on configurations. Helm supports hooks, which are special annotations that tell Helm to run certain Kubernetes resources (like Jobs) at specific points in the release lifecycle.
You can create a Kubernetes Job that runs post-upgrade. This Job's Pod definition can access values (e.g., secret names, configuration parameters) via environment variables or mounted ConfigMaps, which are themselves rendered using .Values.
Example: A post-upgrade job that runs database migrations.
# templates/db-migration-job.yaml
{{- if .Values.database.runMigrationsOnUpgrade }}
apiVersion: batch/v1
kind: Job
metadata:
  name: {{ include "my-chart.fullname" . }}-db-migrate-{{ randAlphaNum 5 | lower }}
  annotations:
    "helm.sh/hook": post-upgrade,post-install
    "helm.sh/hook-delete-policy": before-hook-creation,hook-succeeded
  labels:
    {{- include "my-chart.labels" . | nindent 4 }}
spec:
  template:
    metadata:
      labels:
        {{- include "my-chart.selectorLabels" . | nindent 6 }}
    spec:
      restartPolicy: OnFailure
      containers:
        - name: migrator
          image: "{{ .Values.database.migrationImage.repository }}:{{ .Values.database.migrationImage.tag }}"
          env:
            - name: DB_HOST
              value: {{ .Values.database.host }}
            - name: DB_USER
              valueFrom:
                secretKeyRef:
                  name: {{ .Values.database.secretName }}
                  key: username
            - name: DB_PASSWORD
              valueFrom:
                secretKeyRef:
                  name: {{ .Values.database.secretName }}
                  key: password
          # ... other migration specific commands
{{- end }}
This demonstrates how values passed to helm upgrade (like database.runMigrationsOnUpgrade, database.migrationImage, database.host, database.secretName) can drive not just the primary application deployment but also auxiliary operations.
Debugging and Verifying Values During an Upgrade
Knowing how to access arguments is one thing; verifying that they are being correctly interpreted and applied is another. Helm provides excellent tools for debugging your charts and inspecting the final rendered output.
1. helm get values <release-name>
After an helm upgrade command has been executed, you can retrieve the effective values that were used for that specific release:
helm get values my-release
helm get values my-release -a # -a to show all values, including defaults
This command will output the combined YAML values for the specified release, reflecting the original chart defaults merged with any overrides provided via --values files or --set flags during the upgrade. This is the first diagnostic step if your application isn't behaving as expected.
2. helm template: Local Rendering for Verification
The helm template command allows you to render a chart locally without deploying it to a Kubernetes cluster. This is invaluable for testing changes and verifying how arguments translate into manifests.
helm template my-release my-chart/ --values values-prod.yaml --set image.tag=v2.0.0
You can direct the output to a file and inspect it:
helm template my-release my-chart/ -f values-prod.yaml --set image.tag=v2.0.0 > rendered-manifests.yaml
This gives you a complete picture of the Kubernetes resources that would be created or updated, allowing you to catch templating errors or incorrect value interpretations before they reach your cluster.
3. helm diff upgrade: Previewing Changes
Before committing to an upgrade, helm diff upgrade provides a crucial safety net. It shows a diff of the changes that helm upgrade would apply to your cluster.
helm diff upgrade my-release my-chart/ --values values-prod.yaml --set image.tag=v2.0.0
This command helps prevent unexpected changes, highlighting precisely which Kubernetes resources will be added, modified, or deleted based on your new values. It's an indispensable tool in a CI/CD pipeline or for manual review.
4. Inspecting Deployed Kubernetes Resources
Ultimately, the source of truth is the Kubernetes cluster itself. After an upgrade, you can use kubectl to inspect the deployed resources and confirm that the values have taken effect as intended.
kubectl get deployment my-release-my-app -o yaml
Look for fields that should have been set by your Helm values, such as replica counts, image tags, environment variables, or labels.
Strategies for Complex Deployment Scenarios
Leveraging arguments passed to helm upgrade effectively becomes even more critical in complex enterprise environments.
Managing Multiple Environments with Different Value Files
A common pattern is to maintain separate value files for each environment (development, staging, production).
values.yaml: Chart defaults.values-dev.yaml: Overrides for development.values-stg.yaml: Overrides for staging.values-prod.yaml: Overrides for production.
When upgrading, you simply specify the relevant file:
# Deploy to Development
helm upgrade my-app my-chart -f values-dev.yaml --namespace dev

# Deploy to Production
helm upgrade my-app my-chart -f values-prod.yaml --namespace prod
This approach, often combined with GitOps principles, ensures that configurations are consistent, version-controlled, and environment-specific.
Using Secrets for Sensitive Arguments
Never pass sensitive information (like database passwords, API keys, or private keys) directly via --set or even in plaintext values.yaml files committed to a repository. Instead, Helm best practices involve:
- Referring to existing Kubernetes Secrets: Pass the name of a pre-existing Kubernetes Secret as a value. Your chart then uses this name to reference the Secret in
envFromorvolumeMounts.- Example:
--set database.secretName=my-db-credentials - Template:
yaml envFrom: - secretRef: name: {{ .Values.database.secretName }}
- Example:
- Using external secret management systems: Tools like HashiCorp Vault, AWS Secrets Manager, Azure Key Vault, or Google Secret Manager can integrate with Kubernetes via external secret operators (e.g., External Secrets Operator) to inject secrets into the cluster without them ever touching your Helm charts or value files directly. Your Helm chart might deploy the necessary
ExternalSecretresource, again referencing a value for the remote secret identifier. - Sealed Secrets: An open-source solution that allows you to encrypt your secrets into a
SealedSecretKubernetes resource, which can be safely committed to Git. Only the controller running in your cluster can decrypt them. Your Helm chart would then simply deploy thisSealedSecretresource.
This separation of concerns ensures that sensitive data is handled securely while still allowing your Helm charts to be flexible and configurable.
Integrating with CI/CD Pipelines
In automated CI/CD workflows, helm upgrade commands are often executed programmatically. Arguments are typically constructed based on pipeline variables, environment-specific configurations, or configuration files managed within the CI/CD system.
A typical CI/CD step for deploying an application might look like this:
# Example GitLab CI/CD stage
deploy_production:
  stage: deploy
  script:
    - export KUBECONFIG=/path/to/prod-kubeconfig
    - helm upgrade my-app ./charts/my-app \
        --install \
        --atomic \
        --wait \
        --timeout 5m \
        -f ./config/prod-values.yaml \
        --set image.tag=$CI_COMMIT_SHORT_SHA \
        --namespace production
  environment:
    name: production
    url: https://my-app.production.example.com
  only:
    - main
Here, the image.tag is dynamically set by a CI/CD variable ($CI_COMMIT_SHORT_SHA), demonstrating how arguments can be truly dynamic and tied to the software development lifecycle. For larger deployments, especially those involving many microservices, managing the api interactions between services can be complex. An AI Gateway might be deployed as part of this ecosystem, potentially itself managed by a Helm chart where its specific configurations (e.g., rate limits, routing rules, integrated api gateway features) are passed as arguments.
Introducing APIPark: Streamlining API Management in Kubernetes
In these complex Kubernetes environments, especially those dealing with microservices, AI models, and a proliferation of APIs, deploying services with Helm is just one piece of the puzzle. The ongoing management, governance, and security of these APIs become a significant challenge. This is where specialized API Gateway and API management platforms become indispensable.
Consider a scenario where your Helm chart deploys a suite of microservices, some of which might expose internal API endpoints, while others are designed to serve as an AI Gateway for various machine learning models. Managing the entire lifecycle of these APIs, ensuring their security, monitoring their performance, and making them easily discoverable for other teams can be daunting.
This is precisely the problem that APIPark addresses. As an open-source AI gateway and API management platform, APIPark complements Helm's deployment capabilities by providing a robust layer for managing, integrating, and deploying both AI and traditional REST services. While Helm focuses on deploying the infrastructure and application components, APIPark steps in to manage the API lifecycle itself.
Imagine deploying your backend services using Helm, passing arguments to define their initial configurations. Once these services are up and running, you might then use APIPark to: * Quickly integrate and unify access to 100+ AI Models: If your services interact with AI models, APIPark can act as a central AI Gateway, standardizing invocation formats and providing unified authentication and cost tracking, regardless of how those models were deployed (or if they are external services). * Encapsulate prompts into REST APIs: This allows developers to combine AI models with custom prompts to create new, specialized APIs (e.g., sentiment analysis, translation), which can then be managed and exposed through APIPark. * Manage the end-to-end API Lifecycle: From design and publication to invocation and decommissioning, APIPark helps regulate API management processes, handling traffic forwarding, load balancing, and versioning of published APIs. This is crucial for microservice architectures where services are constantly evolving. * Enhance API Security: Features like independent API and access permissions for each tenant, and subscription approval, ensure that access to your APIs is controlled and secure, preventing unauthorized calls.
In essence, while you're meticulously defining Helm upgrade arguments to configure your deployments, APIPark provides the platform to manage the outcomes of those deployments – the APIs themselves – offering enterprise-grade performance, detailed call logging, and powerful data analysis capabilities. It's a natural fit for organizations leveraging Kubernetes to deploy and manage a diverse portfolio of services, from traditional REST APIs to cutting-edge AI functionalities.
Pitfalls and Common Mistakes
Even with a solid understanding, certain pitfalls can lead to frustrating debugging sessions.
1. Incorrect Value Types (--set vs. --set-string)
A frequent mistake is relying on Helm's automatic type inference for --set when a specific type is required.
--set replicaCount=01: Helm might interpret01as the number1, but if a string"01"is truly needed (e.g., for a version number), it might cause issues.- Solution: Always use
--set-stringwhen a string type is critical, or explicitly quote string values in YAML files.
2. Order of Precedence Issues
Forgetting the precedence order can lead to values not being applied as expected. If you're using a --values file and then trying to override a key with a --set flag, ensure the --set flag is correctly formatted and targets the exact key path. If your values.yaml already has a value and you try to override it with a --values file that lists the same value, the last file specified on the command line will win.
3. Forgetting to Update Values Files
In dynamic environments, it's easy to make a change via --set on the command line and forget to persist that change back into your version-controlled values.yaml files. This leads to inconsistent deployments. * Solution: Adopt a "GitOps" approach where all configuration changes are made in source control and propagated via CI/CD.
4. Misunderstanding Template Context (., $, $.Release)
When working with named templates, range loops, or with blocks, the current context (.) can change. This is a common source of "value not found" errors.
- Inside a
rangeloop,.refers to the current item in the iteration, not the global chart context. To access global values (like.Valuesor.Release), you need to use$or explicitly pass the global context to your named template. - Example:
{{ include "my-chart.fullname" $ }}passes the top-level context$to thefullnamehelper.
5. Overly Complex Templating
While powerful, over-engineering templates with too much logic can make charts hard to read, debug, and maintain. * Solution: Keep templates focused on rendering Kubernetes manifests. Use _helpers.tpl for reusable logic. Break down complex resources into separate template files. Prioritize readability.
A Comparative Look at Value Definition Methods
To summarize the different ways arguments are passed and accessed, let's look at a comparative table.
| Method | Purpose | Precedence | Typical Usage | Pros | Cons |
|---|---|---|---|---|---|
values.yaml |
Chart defaults, baseline configuration | Lowest | Standard configurations, default settings for the chart | Version-controlled, clear defaults, structured | Can be verbose for quick changes, not environment-specific |
--values (-f) |
Environment-specific overrides, complex configurations | Medium | Staging/Production settings, large sets of overrides, CI/CD pipelines | Environment-specific, structured, can merge multiple files | Can become numerous, order matters for merging |
--set |
Ad-hoc overrides, single value changes | Highest | Quick testing, temporary changes, dynamic values from CI/CD | Convenient for small changes, overrides everything | Not version-controlled (unless in script), prone to typos, command history |
--set-string |
Explicit string overrides | Highest | Values that might be misinterpreted as other types (e.g., 0.1, true) |
Guarantees string type, avoids type inference issues | More verbose than --set for simple strings |
--set-file |
Injecting file contents (e.g., scripts, certs) | Highest | Large blocks of text, multi-line values, secrets from local files | Handles large content, keeps command line clean | Files must be locally accessible, not ideal for sensitive data (plaintext) |
--reuse-values |
Retaining previous release values | Special | Iterative updates, making minor changes to existing deployments | Simplifies upgrades, avoids re-specifying all values | Requires careful consideration of what is being overridden |
This table highlights that while all these methods ultimately feed into the .Values object, their intended use cases and implications for deployment management differ significantly. Choosing the right method depends on the nature of the argument, its sensitivity, and the context of the deployment.
Conclusion
Accessing arguments passed to helm upgrade is a fundamental skill for anyone managing Kubernetes applications with Helm. By mastering the .Values object, understanding the precedence of different argument sources, and leveraging advanced templating features, you can create incredibly flexible, robust, and maintainable Helm charts. Whether you're configuring a simple web application or orchestrating a complex microservice architecture that includes AI Gateway components and numerous api endpoints, the principles remain the same: provide clear, configurable parameters, and design your charts to intelligently consume them.
Tools like Helm provide the infrastructure deployment capabilities, and for managing the complexities of the APIs themselves, platforms like APIPark offer the necessary api gateway and management features. By combining these powerful tools and adhering to best practices, you can streamline your cloud-native deployments, ensuring efficiency, security, and scalability across your entire application landscape. The journey into advanced Helm usage is continuous, but with a solid grasp of argument access, you are well-equipped to tackle the challenges of modern application deployment.
Frequently Asked Questions (FAQs)
1. What is the primary way to access arguments passed to helm upgrade within a Helm chart? The primary way to access arguments is through the global .Values object within your Helm templates. For example, if you pass image.tag=v1.2.3, you can access it as {{ .Values.image.tag }}. This object holds all the merged configuration values from the chart's values.yaml, --values files, and --set flags.
2. What is the difference between --set and --set-string, and when should I use each? --set infers the data type of the value (e.g., string, number, boolean). For example, --set key=1 would set key as an integer. --set-string, on the other hand, explicitly treats the value as a string, regardless of its content. You should use --set-string when you need to guarantee that a value is interpreted as a string, even if it looks like a number or boolean (e.g., --set-string version="0.10", or for values that might otherwise cause parsing issues).
3. How does Helm resolve conflicts when the same value is defined in multiple places (e.g., values.yaml and --set)? Helm follows a strict order of precedence. Values from --set and --set-string flags have the highest precedence. Next come values from --values files (processed from left to right, so the last file specified wins for conflicts). Finally, default values defined in the chart's values.yaml file have the lowest precedence. This hierarchy ensures predictable behavior when values collide.
4. Can I use Helm arguments to enable or disable entire sections of my Kubernetes manifests? Yes, absolutely. You can use Go's templating if statements in your Helm templates, conditional on values passed via helm upgrade. For example, {{- if .Values.ingress.enabled }} block would only render the Ingress resource if the ingress.enabled value is set to true, providing dynamic control over your deployed infrastructure.
5. What are best practices for handling sensitive arguments like passwords during a helm upgrade? Never pass sensitive information directly via --set or commit it to plaintext values.yaml files in a version control system. Instead, pass the name of a pre-existing Kubernetes Secret as a Helm value, and have your chart reference that Secret name. Alternatively, integrate with external secret management systems (like Vault) or use solutions like Sealed Secrets to encrypt secrets securely within your Git repository.
🚀You can securely and efficiently call the OpenAI API on APIPark in just two steps:
Step 1: Deploy the APIPark AI gateway in 5 minutes.
APIPark is developed based on Golang, offering strong product performance and low development and maintenance costs. You can deploy APIPark with a single command line.
curl -sSO https://download.apipark.com/install/quick-start.sh; bash quick-start.sh

In my experience, you can see the successful deployment interface within 5 to 10 minutes. Then, you can log in to APIPark using your account.

Step 2: Call the OpenAI API.