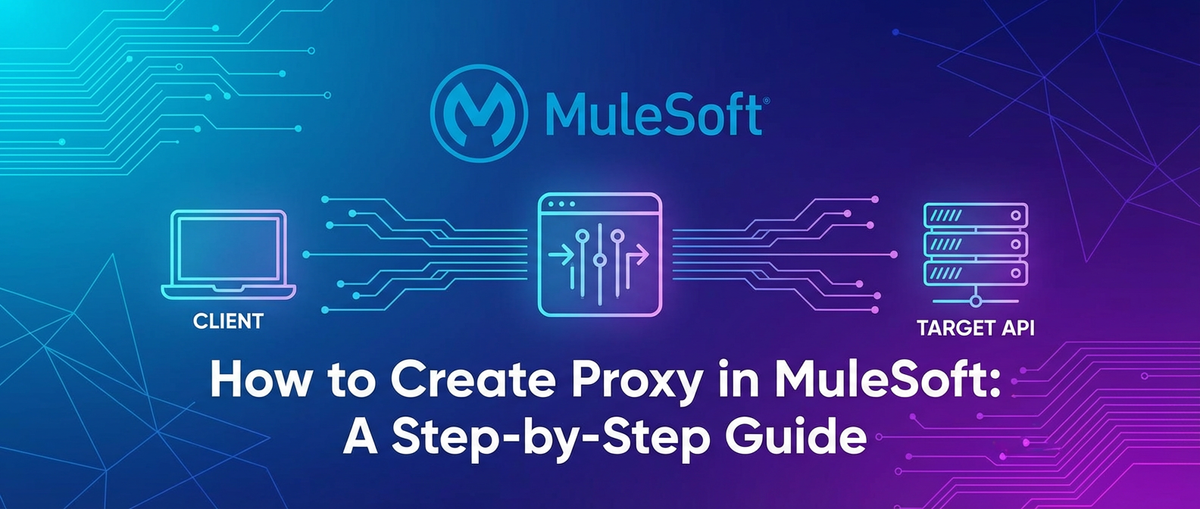
How to Create Proxy in MuleSoft: A Step-by-Step Guide


In the rapidly evolving landscape of digital connectivity, Application Programming Interfaces (APIs) have become the bedrock of modern application development and enterprise integration. They facilitate seamless communication between disparate systems, enabling organizations to unlock new efficiencies, foster innovation, and deliver superior customer experiences. However, as the number and complexity of APIs grow, so does the imperative for robust management, enhanced security, and optimized performance. This is where the concept of an API proxy—a fundamental component of any sophisticated API gateway strategy—enters the picture.
MuleSoft, with its Anypoint Platform, stands as a leading force in the realm of enterprise integration, offering a comprehensive suite of tools designed to connect applications, data, and devices, whether in the cloud or on-premises. Central to MuleSoft's powerful capabilities is its ability to act as a highly configurable and scalable API gateway, enabling organizations to design, build, deploy, manage, and secure APIs throughout their entire lifecycle. Creating an API proxy in MuleSoft is not merely a technical exercise; it's a strategic move that significantly enhances control, boosts security, and streamlines the management of backend services, ultimately transforming how businesses expose and consume their digital assets.
This extensive guide will embark on a detailed journey to demystify the process of creating an API proxy in MuleSoft. We will meticulously break down each step, from understanding the core concepts and setting up your development environment to implementing advanced features like policy enforcement, security protocols, and performance optimizations. Our goal is to equip you with a profound understanding and practical skills, enabling you to leverage MuleSoft's formidable capabilities to build resilient, secure, and high-performing API solutions. Whether you are a seasoned MuleSoft developer looking to deepen your expertise or a newcomer eager to grasp the intricacies of API management, this guide promises to be an invaluable resource in mastering the art of API proxy creation within the Anypoint Platform. By the end, you'll not only know how to build a proxy but also why it's a crucial component of a successful api strategy.
Chapter 1: Understanding API Proxies and MuleSoft's Role
Before diving into the practical steps of creating an API proxy in MuleSoft, it is crucial to establish a solid conceptual foundation. Grasping the "what" and "why" behind API proxies and understanding MuleSoft's strategic positioning in this domain will illuminate the immense value these components bring to modern integration architectures.
1.1 What is an API Proxy? The Intermediary for Digital Communication
At its core, an API proxy is a server-side application that acts as an intermediary or façade for backend services. Instead of client applications directly invoking the backend service, they interact with the proxy. The proxy, in turn, forwards the request to the actual backend service, receives the response, and then relays it back to the client. This seemingly simple indirection offers a multitude of powerful benefits, transforming a direct, often vulnerable, connection into a managed, secure, and performant interaction.
Think of an API proxy as a highly sophisticated concierge service for your digital operations. When a guest (client application) wants to access a specific amenity (backend service) within a sprawling hotel (your enterprise ecosystem), they don't directly approach the service provider. Instead, they go through the concierge (the API proxy). The concierge knows exactly where to direct the request, can apply hotel policies (security, access control), provide additional services (caching, logging), and present a consistent, branded experience, regardless of the complexity or frequent changes happening behind the scenes. This layer of abstraction is fundamental; it decouples the consumer of the API from the actual implementation of the backend service. This decoupling means that changes to the backend, such as refactoring, migration, or even replacement, can occur with minimal or no impact on the consuming applications, as long as the API contract exposed by the proxy remains consistent.
The proxy's functions extend beyond simple forwarding. It can transform requests and responses, adding, modifying, or removing headers, converting data formats (e.g., XML to JSON), or enriching payloads with additional information. It can also enforce security policies, such as validating API keys, authenticating users, or checking authorization tokens, before any request reaches the sensitive backend. Furthermore, proxies are instrumental in traffic management, allowing for rate limiting, spike arrest, and even routing requests to different backend versions or instances based on various criteria. This centralized control point is what elevates an API proxy from a mere forwarder to a critical component of enterprise api management.
1.2 Why Use an API Proxy? Key Benefits of Strategic Intermediation
The decision to implement an API proxy is rarely a casual one; it's driven by a strategic need to enhance various facets of API consumption and exposure. The benefits derived from employing an API proxy are multifaceted and directly contribute to more secure, efficient, and governable digital ecosystems.
- Enhanced Security Posture: Security is arguably the most compelling reason to implement an API proxy. By placing a proxy in front of backend services, organizations can shield their sensitive systems from direct public exposure. The proxy becomes the first line of defense, capable of enforcing a wide array of security policies. This includes authentication mechanisms (e.g., API keys, OAuth 2.0, JWT validation), authorization checks, IP whitelisting/blacklisting, and threat protection against common attack vectors like SQL injection or XML External Entities (XXE). This centralizes security management, making it easier to audit and update policies without modifying backend code. It acts as a dedicated security gateway that filters malicious traffic before it can even touch the core services.
- Improved Performance and Scalability: An API proxy can significantly boost the performance and scalability of your APIs. Caching policies, for instance, allow the proxy to store frequently requested responses and serve them directly to clients, reducing the load on backend systems and drastically decreasing response times. Rate limiting and spike arrest mechanisms prevent service overloads by controlling the number of requests a client can make within a given period, ensuring fair usage and system stability. Furthermore, proxies can facilitate load balancing across multiple instances of a backend service, dynamically distributing traffic to optimize resource utilization and ensure high availability. This ability to absorb and manage traffic surges is a hallmark of an effective api gateway.
- Robust Management and Governance: As organizations expand their API footprint, effective management becomes paramount. An API proxy provides a centralized point for governing API behavior. It enables granular control over API versions, allowing for seamless transitions between different iterations of a service without disrupting client applications. Comprehensive analytics and monitoring capabilities can be implemented at the proxy layer, providing invaluable insights into API usage patterns, performance metrics, and error rates. This data is critical for understanding API consumption, identifying bottlenecks, and making informed decisions about API evolution. Moreover, policies can be applied consistently across multiple APIs, ensuring adherence to organizational standards and regulatory requirements.
- Backend Abstraction and Decoupling: One of the most powerful benefits of an API proxy is its ability to abstract the complexities of backend services. Client applications interact only with the well-defined interface exposed by the proxy, remaining completely oblivious to the underlying implementation details. This means backend services can undergo significant architectural changes, be migrated to new platforms, or even be replaced entirely, all without requiring any modifications to the consuming applications, provided the proxy's public interface remains stable. This architectural flexibility accelerates development cycles, reduces maintenance overhead, and future-proofs your integration strategy.
- Enabling Monetization and Tiered Access: For organizations looking to monetize their APIs, proxies are indispensable. They enable the implementation of tiered access models, where different client subscriptions are granted varying levels of access (e.g., different rate limits, access to premium features). The proxy can track usage, enforce subscription agreements, and collect data necessary for billing purposes. This transforms your APIs from mere integration points into potential revenue streams, managed effectively at the gateway layer.
1.3 MuleSoft as an API Gateway Solution: Unifying Connectivity and Control
MuleSoft's Anypoint Platform is an exceptionally powerful and comprehensive solution that inherently functions as a sophisticated API gateway. It extends far beyond merely forwarding requests, offering a holistic environment for the entire API lifecycle. This platform empowers organizations to design, build, deploy, manage, and secure APIs and integrations with unparalleled flexibility and control.
At the heart of MuleSoft's API gateway capabilities lies a synergy of several key components:
- Anypoint API Manager: This is the central hub for managing all aspects of your APIs. API Manager allows you to register your APIs, apply predefined or custom policies (such as rate limiting, security, caching, QoS), track analytics, and enforce service level agreements (SLAs). When you deploy a Mule application that acts as a proxy, API Manager effectively transforms that application into a managed gateway endpoint. It provides a user-friendly interface to configure and monitor policies, enabling granular control without writing additional code. This component is crucial for centralizing the governance and security of your exposed digital assets, making it a true api gateway powerhouse.
- Mule Runtime Engine: This is the lightweight, Java-based runtime that executes your Mule applications. Whether deployed on CloudHub, Runtime Fabric, or on-premises, the Mule Runtime is where your proxy logic lives and breathes. It processes incoming requests, applies any configured policies, executes transformation logic, and orchestrates calls to backend services. Its event-driven architecture makes it highly scalable and performant, capable of handling significant loads. The runtime's flexibility allows developers to build intricate proxy logic, from simple pass-through proxies to complex orchestration layers, solidifying MuleSoft's standing as a versatile api gateway.
- Anypoint Exchange: This serves as a marketplace and repository for all your internal and external APIs and integration assets. Once an API proxy is developed and registered in API Manager, it can be published to Exchange. This promotes discoverability and reusability within your organization, allowing different teams to easily find, understand, and consume available APIs. Exchange also facilitates documentation, providing a centralized location for API specifications, examples, and usage instructions, thereby enhancing collaboration and accelerating development across the enterprise.
- Anypoint Studio: This is the integrated development environment (IDE) used by developers to build Mule applications. Studio provides a rich graphical interface and a comprehensive set of connectors and components that simplify the creation of complex integration flows, including API proxies. It allows developers to configure HTTP listeners, define forwarding logic, implement data transformations, and handle error scenarios with intuitive drag-and-drop functionality, making the development of api solutions highly efficient.
When a Mule application is configured to act as an API proxy, it essentially becomes a programmable gateway endpoint. It leverages the Mule Runtime's processing capabilities to receive requests, and through Anypoint API Manager, it inherits a layer of management and policy enforcement. This symbiotic relationship ensures that APIs are not just connected but also deeply governed, secure, and optimized for performance. MuleSoft's integrated approach means that an organization doesn't need separate tools for integration and API management; instead, it offers a unified platform that covers the entire spectrum, making it an ideal choice for enterprises navigating the complexities of their digital transformation journey. The consistent application of these capabilities ensures that every API, regardless of its backend complexity, presents a unified, secure, and high-performing interface to its consumers.
Chapter 2: Prerequisites and Setup for MuleSoft Proxy Development
Embarking on the journey to create an API proxy in MuleSoft necessitates a properly configured development environment and a foundational understanding of the target backend service. This chapter will guide you through the essential prerequisites and setup steps, ensuring you have all the necessary tools and information before writing a single line of code. A meticulous setup process lays the groundwork for a smooth and efficient development experience, preventing common roadblocks and frustrations further down the line.
2.1 Anypoint Platform Account: Your Gateway to MuleSoft's Ecosystem
The Anypoint Platform is the central nervous system for all MuleSoft development and operations. To create, deploy, and manage API proxies, a valid Anypoint Platform account is an absolute necessity. This cloud-based platform provides access to crucial components such as API Manager, Runtime Manager, Exchange, and Monitoring, which are integral to the lifecycle of any API built with MuleSoft.
- Obtaining an Account: If you don't already have one, you can sign up for a free Anypoint Platform trial account on MuleSoft's official website. The trial typically offers sufficient access and resources to complete basic development tasks, including building and deploying proxies. For enterprise-level development and production deployments, a commercial subscription will be required, offering enhanced support, scalability, and advanced features.
- Navigating the Platform: Once logged in, familiarize yourself with the Anypoint Platform's interface. Pay particular attention to:
- API Manager: This is where you will define and manage your APIs, apply policies, and track their performance. It's the primary interface for transforming your Mule application into a managed API gateway.
- Runtime Manager: This component allows you to deploy and monitor your Mule applications (including proxies) to various environments, such as CloudHub, Runtime Fabric, or customer-hosted servers.
- Exchange: Your organization's central repository for discovering and sharing APIs, templates, and assets.
- Access Management: Where you manage users, roles, and permissions within your organization.
- Why it's Crucial: Without an Anypoint Platform account, you cannot leverage the full capabilities of MuleSoft as an API gateway, particularly for applying runtime policies, monitoring, and deploying applications to CloudHub, which is MuleSoft's preferred cloud deployment model. It's the control plane for your entire api landscape.
2.2 Anypoint Studio Installation: Your Integrated Development Environment
Anypoint Studio is an Eclipse-based integrated development environment (IDE) specifically tailored for building Mule applications. It provides a rich set of features, including a graphical design canvas, code editor, debugging tools, and a connector palette, which collectively streamline the development of integration flows and API proxies.
- Downloading Anypoint Studio: You can download the latest stable version of Anypoint Studio directly from the MuleSoft website (Anypoint Platform > Downloads tab, or via the Anypoint Exchange). Ensure you download the version compatible with your operating system (Windows, macOS, or Linux).
- Installation Steps:
- Extract the Archive: Anypoint Studio typically comes as a compressed archive (zip or tar.gz). Extract its contents to a directory on your local machine, preferably one with a short path and no spaces (e.g.,
C:\MuleSoft\AnypointStudio). - Launch Studio: Navigate to the extracted directory and run the executable file (e.g.,
AnypointStudio.exeon Windows). - Workspace Selection: Upon the first launch, Studio will prompt you to select a workspace. Choose a dedicated directory for your Mule projects (e.g.,
C:\MuleSoft\Workspace). This workspace will store all your project files, configurations, and metadata. - Initial Setup: Studio might download additional components or update itself during the first launch. Ensure you have an active internet connection.
- Extract the Archive: Anypoint Studio typically comes as a compressed archive (zip or tar.gz). Extract its contents to a directory on your local machine, preferably one with a short path and no spaces (e.g.,
- Key Configurations and Considerations:
- JVM: Anypoint Studio bundles its own Java Development Kit (JDK), so you typically don't need to configure one separately unless you have specific requirements. However, ensure your system meets the minimum memory requirements for Studio, as it can be resource-intensive, especially with large projects.
- Proxy Settings (if applicable): If your development environment is behind a corporate proxy, you'll need to configure Studio's network proxy settings (Window > Preferences > Network Connections) to allow it to download connectors and updates.
- Updates: Regularly check for updates (Help > Check for Updates) to ensure you have the latest features, bug fixes, and security patches for Studio and its components.
- Anypoint Platform Credentials: While not strictly part of the initial Studio setup, you will eventually link your Studio instance to your Anypoint Platform account. This allows for seamless deployment to CloudHub and interaction with API Manager and Exchange directly from your IDE.
A well-installed and configured Anypoint Studio is your primary tool for crafting the intricate logic that forms the backbone of your API proxy. It provides the visual and textual environment to build your api flows.
2.3 Understanding the Backend Service: The Target of Your Proxy
Before you can proxy a service, you must thoroughly understand the service you intend to proxy. This involves gathering critical information about its endpoints, expected request formats, and anticipated responses. Without this clear understanding, your proxy will essentially be blind, unable to correctly forward requests or interpret responses.
- Identify the Backend Endpoint:
- Base URL: What is the root URL of the backend service? (e.g.,
https://api.example.com/v1/products). - Specific Paths: Which specific resource paths will your proxy expose? (e.g.,
/products,/products/{id},/orders). - HTTP Methods: Which HTTP methods does the backend service support for each path (GET, POST, PUT, DELETE, etc.)?
- Base URL: What is the root URL of the backend service? (e.g.,
- Request Format and Requirements:
- Headers: Does the backend require specific HTTP headers (e.g.,
Authorization,Content-Type, custom headers)? Your proxy will need to forward or inject these. - Query Parameters: Are there any required or optional query parameters? (e.g.,
?category=electronics&limit=10). - Body/Payload: For POST, PUT, and PATCH requests, what is the expected format of the request body (e.g., JSON, XML, form-data)? Provide a sample payload if possible.
- Authentication: How does the backend authenticate requests? (e.g., API key in header, OAuth token, basic authentication). Your proxy might need to handle this authentication before forwarding the request.
- Headers: Does the backend require specific HTTP headers (e.g.,
- Response Format and Expectations:
- Status Codes: What HTTP status codes does the backend return for success and various error conditions (e.g., 200 OK, 201 Created, 400 Bad Request, 401 Unauthorized, 404 Not Found, 500 Internal Server Error)?
- Response Body: What is the structure of the response body for successful calls and error scenarios? Provide sample response payloads.
- Headers: Does the backend return any specific headers that clients might need?
- Hypothetical Backend Service Example: Let's assume we want to proxy a simple REST API that manages a list of hypothetical "widgets":
- Base URL:
https://my-internal-widgets-api.com/api/v2 - Endpoints:
GET /widgets: Retrieves all widgets.GET /widgets/{id}: Retrieves a specific widget by ID.POST /widgets: Creates a new widget. Requires a JSON body like{"name": "New Widget", "description": "A great new widget"}.PUT /widgets/{id}: Updates an existing widget. Requires a JSON body.DELETE /widgets/{id}: Deletes a widget.
- Authentication: Requires an
X-API-KEYheader for all requests. - Response: JSON format for all successful responses. Error responses typically include a
statusandmessagefield.
- Base URL:
A thorough understanding of the backend service is the cornerstone of designing an effective API proxy. It ensures that your proxy correctly interprets client requests, accurately communicates with the backend, and faithfully relays responses. This foundational knowledge prevents misconfigurations and ensures that the proxy behaves exactly as expected, providing a reliable gateway to your valuable backend services.
2.4 Basic MuleSoft Concepts Refresher (Brief): Laying the Conceptual Bricks
Even for experienced developers, a quick refresher on fundamental MuleSoft concepts can solidify understanding, especially when approaching a task like building an API proxy. These core building blocks are essential for navigating Anypoint Studio and constructing robust integration flows.
- Flows and Sub-flows:
- Flow: The primary execution unit in a Mule application. A flow defines a sequence of message processors that handle a specific integration task. Every incoming request to your proxy will initiate a flow.
- Sub-flow: A reusable sequence of message processors encapsulated within a flow. Sub-flows are often used to organize complex logic, promote reusability, and improve readability. For instance, common error handling logic or transformation steps might be placed in a sub-flow.
- Message Processors:
- These are the individual building blocks within a flow that perform specific actions on a message. MuleSoft provides a vast library of processors for various tasks, including data transformation, routing, error handling, and security.
- Examples relevant to a proxy:
- HTTP Listener: The inbound endpoint that receives incoming HTTP requests from clients. It's the front door of your proxy.
- HTTP Request: The outbound endpoint used to send HTTP requests to external services, which in our case will be the backend API you are proxying.
- Set Payload: Modifies the main content of the message (the body).
- Set Variable: Stores data in a variable for later use within the flow.
- Logger: Outputs messages to the console or logs, invaluable for debugging and monitoring.
- Transform Message (DataWeave): A powerful language for transforming data between different formats (e.g., JSON to XML, or manipulating existing JSON structures). Crucial for canonicalizing requests or responses.
- Connectors:
- Specialized message processors designed to interact with specific systems or protocols. MuleSoft offers hundreds of pre-built connectors (e.g., Salesforce, SAP, databases, JMS, FTP).
- For an API proxy, the HTTP Listener and HTTP Request are the most critical connectors, enabling communication over HTTP.
- The Mule Message:
- In MuleSoft, data is transported through flows in a standardized structure called the Mule Message. Each message consists of:
- Payload: The main content of the message (e.g., the JSON body of a request or response).
- Attributes: Metadata about the message, such as HTTP headers, query parameters, URI parameters, and file properties.
- Variables: Custom data points that you can define and manipulate within a flow.
- Understanding how to access and modify these components is fundamental to building effective proxies that correctly forward and transform requests and responses.
- In MuleSoft, data is transported through flows in a standardized structure called the Mule Message. Each message consists of:
- Error Handling:
- MuleSoft provides robust error handling mechanisms. You can define specific error handlers within flows or globally to gracefully manage exceptions.
- On Error Propagate: When an error occurs, the error message is propagated up the flow hierarchy to the calling flow or until it reaches the default error handler. This stops the current flow execution.
- On Error Continue: Catches the error, executes a defined set of processors (e.g., logging, setting a custom error response), and then continues the flow execution, effectively treating the error as a handled event.
- For a proxy, appropriate error handling ensures that client applications receive meaningful error messages instead of generic system errors, even when the backend service fails.
These fundamental concepts form the vocabulary and grammar of MuleSoft development. A clear understanding of how flows process messages, how connectors facilitate communication, and how errors are managed will significantly aid in the construction of an effective and resilient API proxy, leveraging MuleSoft as a powerful and flexible api gateway.
Chapter 3: Step-by-Step Guide to Creating a Simple API Proxy in MuleSoft
With our development environment configured and a clear understanding of the backend service, we are now ready to embark on the practical journey of creating our first API proxy in MuleSoft. This chapter will walk you through the process, from setting up a new project in Anypoint Studio to configuring the core proxy logic and conducting initial local tests. By the end of this section, you will have a functional, basic API proxy that transparently forwards requests to your chosen backend service.
3.1 Project Creation in Anypoint Studio: Laying the Foundation
Every Mule application begins with a project. Anypoint Studio provides a straightforward wizard to create new Mule projects, setting up the basic directory structure and configuration files necessary for your application.
- Launch Anypoint Studio: Open Anypoint Studio from your installation directory.
- Navigate to File > New > Mule Project: This will launch the "New Mule Project" wizard.
- Configure Project Details:
- Project Name: Choose a descriptive name for your project, following standard naming conventions (e.g.,
widgets-api-proxy,my-backend-gateway). For this guide, let's useWidgetsAPIGatewayProxy. - Mule Runtime: Select the desired Mule Runtime version. It's generally recommended to use the latest stable version available in Studio, or a version compatible with your deployment environment (e.g., CloudHub or Runtime Fabric). Let's select
4.4.0or higher. - Project Location: This will default to your chosen workspace. You can change it if necessary, but it's usually best to keep it within the workspace.
- Mule Palette Configuration (Optional): Ensure the "Mule Palette" view is visible (Window > Show View > Mule Palette). This is where you'll find all the connectors and components.
- Click Finish: Studio will now create the project, including a
src/main/mulefolder where your main configuration XML file (widgetsapigatewayproxy.xmlby default) resides, and apom.xmlfile for Maven dependencies.
- Project Name: Choose a descriptive name for your project, following standard naming conventions (e.g.,
Once the project is created, you'll see it listed in the "Package Explorer" view, and the main canvas will display the widgetsapigatewayproxy.xml file, ready for you to drag and drop components and define your integration flows. This project will serve as our custom api gateway for the backend.
3.2 Configuring the HTTP Listener: The Entry Point for Client Requests
The HTTP Listener is the most critical component for any API proxy, as it is the first point of contact for incoming client requests. It effectively defines the public-facing endpoint of your API gateway.
- Drag and Drop HTTP Listener: From the Mule Palette, search for "HTTP Listener" and drag it onto the canvas of your
widgetsapigatewayproxy.xmlfile. It will automatically create a new flow. - Configure HTTP Listener Global Element:
- Click on the HTTP Listener component on the canvas. In the "Properties" view below, click the green "plus" icon next to the "Connector configuration" field to create a new HTTP Listener configuration.
- Name:
HTTP_Listener_config(default is usually fine). - Protocol:
HTTP(or HTTPS if you're configuring SSL/TLS, but for a simple proxy, HTTP is sufficient for local testing). - Host:
0.0.0.0(listens on all available network interfaces) orlocalhost(listens only on the local machine). For development,0.0.0.0is robust. - Port: Choose an available port, typically
8081or8082. Let's use8081. - Click OK.
- Configure HTTP Listener Path:
- Back in the "Properties" view for the HTTP Listener, set the "Path" field. This path defines the root context for your proxy.
- Path:
/widgets-proxy/* - The
/*is crucial. It acts as a wildcard, meaning the listener will capture any request that starts with/widgets-proxy/and includes any subsequent path segments (e.g.,/widgets-proxy/api/v2/widgets,/widgets-proxy/api/v2/widgets/123). This allows your proxy to handle dynamic routing for various backend resources.
At this point, your Mule application is configured to listen for incoming HTTP requests on http://localhost:8081/widgets-proxy/*. This is the public api endpoint for your proxy.
3.3 Implementing the Proxy Logic: Forwarding to the Backend
The core of an API proxy is its ability to forward incoming requests to the designated backend service and then return the backend's response to the client. This is achieved using the HTTP Request connector.
- Drag and Drop HTTP Request: From the Mule Palette, search for "HTTP Request" and drag it onto the canvas, placing it directly after the HTTP Listener within the same flow.
- Configure HTTP Request Global Element:
- Click on the HTTP Request component. In the "Properties" view, click the green "plus" icon next to the "Connector configuration" field to create a new HTTP Request configuration.
- Name:
HTTP_Request_Backend_config - Protocol:
HTTPS(as our hypothetical backend ishttps://my-internal-widgets-api.com). - Host:
my-internal-widgets-api.com(the hostname of your backend API). - Port:
443(standard HTTPS port). - Base Path:
/api/v2(the base path of your backend API, as per our hypothetical example). This will be prefixed to the path defined in the specific HTTP Request operation. - Click OK.
- Configure HTTP Request Operation Details:
- Back in the "Properties" view for the HTTP Request component, configure the operation:Let's refine the Path:
#[attributes.relativePath]assumes the listener captures the entire remainder of the path. If your listener is/widgets-proxy/*and a request comes in as/widgets-proxy/items/123,attributes.relativePathwould likely be/items/123. This is what we want.- Method: This needs to dynamically match the incoming request's HTTP method. Set it to
#[attributes.method]. This DataWeave expression accesses themethodattribute of the incoming Mule message, ensuring that GET requests are forwarded as GET, POST as POST, and so on. - Path: This needs to dynamically capture the remainder of the incoming path after
/widgets-proxy/and append it to the backend's base path. Set it to#[attributes.requestPath]- Correction for path handling: The
attributes.requestPathwould typically capture the full path including the context/widgets-proxy/. To get the path relative to the proxy's context, we need to strip off the/widgets-proxy. - A more robust way for the
Pathwould be:#[attributes.requestUri[('/widgets-proxy' as String).length() to -1]]or more simply, if the HTTP Listener path is configured as/widgets-proxy/*, theattributes.uriParams.pathmight work, or we can useattributes.relativePath. Let's assumeattributes.relativePathfor simplicity. So, thePathshould be#[attributes.relativePath]. - If
attributes.relativePathdoes not capture the full backend path segments dynamically, another common approach is to use aSet Variablebefore the HTTP Request to reconstruct the path correctly, or configure the listener's path as/{path}and then useattributes.uriParams.path. For a simple wildcard proxy,attributes.relativePathis usually the most direct for*in the listener.
- Correction for path handling: The
- Method: This needs to dynamically match the incoming request's HTTP method. Set it to
- Headers: Crucially, we need to forward all incoming headers, and potentially add new ones (like the
X-API-KEYfor our backend).- Click the "Add" button in the "Headers" section.
- Name:
X-API-KEY - Value:
#[p('api.key')](Assuming you'll store your backend API key securely as a property, which is a best practice. More on this later). - To forward all other headers from the incoming request, add another entry:
- Name:
#[payload](This is incorrect. We need to forward original headers, not payload as header name.) - The most straightforward way to forward all incoming headers (except for a few problematic ones like
Host,Connection,Content-Length) is to iterate throughattributes.headers. However, for a simple proxy, MuleSoft often handles forwarding common headers implicitly, or you can explicitly pass#[attributes.headers]as theHeadersmap. - Let's keep it simple for now, focusing on the specific backend API key. If other headers are critical, we'd add them manually or use a DataWeave transform to construct the headers map.
- For dynamic headers: You can add an entry with
key: value. ForX-API-KEY, we putX-API-KEY: #[p('api.key')]. If you wanted to forward all client headers, you would typically use aTransform Messagecomponent to convertattributes.headersinto the expected format for the HTTP Request connector. However, for a pass-through proxy, Mule often handles common headers. For our specific backend key requirement, explicit addition is needed.
- Back in the "Properties" view for the HTTP Request component, configure the operation:Let's refine the Path:
- Handling Request Body (Payload):
- The HTTP Request connector automatically forwards the incoming request's payload as its own request body. No explicit configuration is usually needed here, unless you need to transform the payload before sending it to the backend.
- Setting up a Property File for the API Key:
- To keep credentials out of your main configuration file, create a new properties file.
- Right-click on
src/main/resourcesin your project. - Select
New > File. - File name:
dev.properties(for development environment). - Add the following line to
dev.properties:properties api.key=YOUR_ACTUAL_BACKEND_API_KEY_HERE - Reference the Properties File: In
src/main/mule/widgetsapigatewayproxy.xml, right-click on the canvas, selectGlobal Elements, click "Create", search forConfiguration properties, and clickAdd. - Location:
dev.properties(orsrc/main/resources/dev.properties). - Now
#[p('api.key')]will correctly resolve the value fromdev.properties.
Your flow now looks like: HTTP Listener -> HTTP Request
This forms the basic backbone of your pass-through API proxy. Any request received by the HTTP Listener will have its method, path, headers (including the injected API key), and body forwarded to the configured backend service. The response from the backend will then be automatically sent back to the original client. This is the simplest form of an api gateway.
3.4 Basic Error Handling (Initial): Graceful Failure Management
Even the simplest proxy needs a mechanism to handle errors gracefully. If the backend service is unavailable, returns an error, or there's a problem with the proxy itself, the client should receive a meaningful response, not a generic system error.
- Add a
TryScope (Recommended): To encapsulate the main proxy logic and provide specific error handling, drag a "Try" scope from the Mule Palette and place it around your HTTP Request component. - Add an Error Handler to the
TryScope:- Click on the
Tryscope. In its "Properties" view, go to the "Error Handling" tab. - Drag an "On Error Propagate" component from the Mule Palette into the "Error Handling" section of the
Tryscope.
- Click on the
- Configure
On Error Propagate:- Click on the
On Error Propagatecomponent. - Type: You can leave it blank to catch all errors, or specify
HTTP:CONNECTIVITYfor connection issues, orANYfor all. For a simple proxy, catchingANYis often a good start. - Add a Logger: Drag a "Logger" component into the
On Error Propagateblock.- Message:
#[ "Error occurred in proxy: " ++ error.description] - Level:
ERROR
- Message:
- Set a Custom Error Response (Optional but Recommended): Drag a "Set Payload" component after the Logger in the
On Error Propagateblock.- Value:
json #[%dw 2.0 output application/json --- { "status": attributes.statusCode default 500, "message": error.description, "proxyError": true }]This DataWeave expression creates a JSON error response, providing the HTTP status code (defaulting to 500 if not available), the error description, and a flag indicating it's a proxy error.
- Value:
- Set HTTP Status Code: Drag a "Set Event" component after "Set Payload" within the
On Error Propagateblock. In its properties, setstatusCodeto#[attributes.statusCode default 500]. This ensures the client receives an appropriate HTTP status code.
- Click on the
Now, if an error occurs within the Try scope (e.g., the backend service is unreachable), the On Error Propagate block will execute, log the error, set a friendly JSON payload, and return an appropriate HTTP status code to the client. This makes your api gateway more robust.
3.5 Testing the Proxy Locally: Verifying Functionality
With the basic proxy logic and error handling in place, it's time to test if our Mule application functions as expected.
- Run the Mule Application:
- Right-click on your
WidgetsAPIGatewayProxyproject in the "Package Explorer." - Select
Run project widgetsapigatewayproxy. - Anypoint Studio will build the project, deploy it to the embedded Mule Runtime, and start it. Monitor the "Console" view for messages indicating a successful deployment (e.g., "Deployed apps: widgetsapigatewayproxy").
- Right-click on your
- Use a REST Client (Postman/Insomnia/curl):
- Open your preferred REST client.
- Target URL:
http://localhost:8081/widgets-proxy/widgets(assuming your backend has a/widgetsendpoint relative to its base path/api/v2). - Method:
GET(orPOST,PUT, etc., depending on what you're testing). - Headers: If your backend requires specific headers other than
X-API-KEY(which the proxy adds), you can add them here for the client request. - Body: For
POST/PUTrequests, provide a sample JSON body matching your backend's expectations. - Send Request: Execute the request.
- Verify the Response:
- Successful Scenario: If everything is configured correctly, you should receive a response from your client that is identical to what the backend service would return directly.
- Error Scenario:
- To test error handling, you could temporarily change the
HostinHTTP_Request_Backend_configto an invalid address (e.g.,invalid.backend.com) and restart the application. - Send another request. You should now receive your custom JSON error response (e.g.,
{ "status": 500, "message": "Couldn't connect to 'invalid.backend.com:443'", "proxyError": true }).
- To test error handling, you could temporarily change the
By following these steps, you have successfully created and tested a basic API proxy in MuleSoft. This proxy acts as a transparent intermediary, forwarding requests to a backend service and returning its responses. This fundamental setup forms the bedrock upon which more advanced features and sophisticated API management policies can be built, transforming a simple forwarding mechanism into a robust api gateway.
APIPark is a high-performance AI gateway that allows you to securely access the most comprehensive LLM APIs globally on the APIPark platform, including OpenAI, Anthropic, Mistral, Llama2, Google Gemini, and more.Try APIPark now! 👇👇👇
Chapter 4: Advanced Proxy Features and Best Practices in MuleSoft
While a basic pass-through proxy is a good starting point, the true power of MuleSoft as an API gateway lies in its ability to implement advanced features that enhance security, optimize performance, and simplify governance. This chapter will delve into these sophisticated capabilities, demonstrating how to transform your simple proxy into a robust, enterprise-grade api gateway. We'll also naturally introduce APIPark as a complementary solution for specific API management needs.
4.1 Policy Enforcement via Anypoint API Manager: The Heart of API Governance
One of MuleSoft's most significant strengths is its seamless integration with Anypoint API Manager, which allows you to apply pre-built or custom policies to your deployed APIs without modifying the underlying Mule application code. This separation of concerns is critical for agile API management, enabling operators to control API behavior independent of development cycles.
4.1.1 Registering the API: Linking Your Proxy to API Manager
To apply policies, your Mule proxy application must be registered as an API instance in Anypoint API Manager. This linkage is typically achieved through "Auto-discovery."
- Create an API in API Manager:
- Log into your Anypoint Platform account and navigate to "API Manager."
- Click "Add API" or "Add API from Exchange" if you've already published a definition. For this guide, let's assume "Add API."
- API Name:
Widgets API Gateway Proxy - Asset Type:
HTTP API(or REST API, if you have an OpenAPI spec) - API Version:
v1 - Instance Label:
Production(orDevelopment,Sandbox) - Endpoint Configuration: Select
Proxyas theImplementation Type. - Implementation URI: This is the URL where your backend service is hosted (e.g.,
https://my-internal-widgets-api.com/api/v2). API Manager uses this for routing and monitoring. - Proxy Design: Choose "Deploy a proxy application" then "Mule 4 Application." Leave "Auto-discovery" selected.
- Deployment Target:
CloudHub(or Runtime Fabric, etc.). - API ID: Note down the generated API ID (e.g.,
12345678). - Click Save.
- Configure Auto-discovery in Anypoint Studio:
- In Anypoint Studio, open your
widgetsapigatewayproxy.xmlfile. - Right-click on the canvas, select
Global Elements, clickCreate, search forAPI Autodiscovery, and clickAdd. - API ID: Enter the API ID you noted from API Manager.
- Flow Name: Enter the name of your main proxy flow (the flow containing your HTTP Listener). This is typically
widgetsapigatewayproxyFlow(or whatever default name Studio gave it). - Click OK.
- In Anypoint Studio, open your
- Deploy the Application:
- Right-click on your
WidgetsAPIGatewayProxyproject in "Package Explorer." - Select
Anypoint Platform > Deploy to CloudHub(or your chosen runtime). - Follow the deployment wizard, selecting the appropriate environment and application name.
- Once deployed, navigate back to API Manager. Your API instance should now show a green status, indicating it's active and managed by the api gateway.
- Right-click on your
Now, your Mule application is effectively acting as the runtime api gateway for the API instance defined in API Manager. All policies applied in API Manager will be enforced by this deployed Mule application.
4.1.2 Applying Policies: Granular Control at the Gateway
API Manager provides a rich set of pre-built policies that can be applied to your API instance with just a few clicks. These policies address common requirements for security, traffic management, and quality of service.
- Navigate to your API in API Manager: Select your
Widgets API Gateway Proxyinstance. - Click on "Policies" tab.
- Click "Apply New Policy."
Let's explore some crucial policies:
- Rate Limiting Policy:
- Purpose: Prevents client applications from overwhelming your backend services by limiting the number of requests they can make within a specified time window. This is fundamental for maintaining backend stability and ensuring fair usage.
- Configuration:
- Choose
Rate Limiting. - Rate Limit: e.g.,
5requests. - Time Period: e.g.,
1000milliseconds (1 second). - Grouping Key:
#[attributes.headers['client_id']](limits per unique client ID, requiringclient_idheader). Alternatively, use#[attributes.remoteAddress]to limit per IP address. - Exceeded Rate Limit Response: Customize the HTTP status code (e.g., 429 Too Many Requests) and response body.
- Choose
- Impact: Any client exceeding the configured rate will receive the
429error response directly from the Mule proxy (our api gateway) before the request even reaches the backend.
- Client ID Enforcement Policy:
- Purpose: Ensures that only authorized client applications can access your API by requiring a valid
client_idandclient_secretfor each request. This is a basic but essential security measure. - Configuration:
- Choose
Client ID Enforcement. - Client ID Expression:
#[attributes.headers['client_id']](expects client ID in a header). - Client Secret Expression:
#[attributes.headers['client_secret']](expects client secret in a header). - You can also configure it to check query parameters instead of headers.
- Choose
- Impact: If a request comes without valid
client_idandclient_secret(which are managed by Anypoint Exchange and API Manager), the proxy will block it with a401 Unauthorizedor403 Forbiddenstatus.
- Purpose: Ensures that only authorized client applications can access your API by requiring a valid
- SLA-Based Policies (Client ID Based Routing/Rate Limiting):
- Purpose: Allows you to offer different service levels (e.g., varying rate limits, access to premium features) based on the client application's subscription tier.
- Configuration: This policy is linked to API contracts defined in Anypoint Exchange. Clients subscribe to an API, and based on their subscription tier, different policies (like higher rate limits) can be applied.
- Impact: A "Gold" tier client might get 100 requests/second, while a "Silver" tier gets 10 requests/second, all enforced by the same api gateway proxy instance.
- IP Whitelisting/Blacklisting Policy:
- Purpose: Controls access to your API based on the client's IP address, enhancing security by allowing only trusted IPs or blocking known malicious ones.
- Configuration:
- Choose
IP WhitelistorIP Blacklist. - List the IP addresses or CIDR ranges to allow or block.
- Choose
- Impact: Requests from non-whitelisted IPs (or blacklisted IPs) will be denied at the gateway level.
- Caching Policy:
- Purpose: Improves API performance and reduces backend load by storing responses for a specified duration and serving subsequent identical requests directly from the cache.
- Configuration:
- Choose
Caching. - Time To Live (TTL): Define how long a response should be cached (e.g.,
3600seconds for 1 hour). - Caching Key: Define how to uniquely identify a cached response (e.g.,
#[attributes.uri], which caches based on the full request URI). - Invalidation: Options for invalidating cache entries.
- Choose
- Impact: For idempotent GET requests, caching can dramatically reduce response times and save backend resources.
By applying these policies, your Mule proxy evolves from a simple forwarder into a sophisticated, policy-driven api gateway, enforcing rules and optimizing performance without requiring any code changes in Anypoint Studio. This allows for dynamic adjustments to your api governance strategy.
4.2 Security Considerations: Shielding Your Digital Assets
Beyond basic client ID enforcement, robust API security involves multiple layers of defense. MuleSoft, as an api gateway, provides ample mechanisms to secure your APIs against various threats.
- OAuth 2.0 and JWT Validation Policies: For more advanced authentication and authorization, MuleSoft offers policies to integrate with OAuth 2.0 providers (e.g., validating access tokens) and to validate JSON Web Tokens (JWTs). This is crucial for securing APIs in modern microservices architectures.
- SSL/TLS Configuration: Always configure your HTTP Listener (the public endpoint of your proxy) to use HTTPS in production. This encrypts traffic between clients and your api gateway, protecting sensitive data in transit. MuleSoft CloudHub automatically provides SSL certificates for default domains, but you can also configure custom certificates.
- Threat Protection Policies: MuleSoft offers policies to protect against common web vulnerabilities, such as SQL injection, XML External Entities (XXE), and JSON threat protection. These policies inspect incoming request payloads for malicious patterns and block them before they can reach the backend.
- Data Masking and Encryption: For sensitive data that must traverse the proxy, consider implementing data masking or encryption within your Mule flows using DataWeave or specialized security components. This ensures that even if the proxy's internal logs are compromised, sensitive information remains protected.
Implementing a multi-layered security approach at the api gateway is non-negotiable for any enterprise-grade API.
4.3 Performance Optimization: Delivering Speedy and Reliable APIs
A fast api gateway is crucial for a positive user experience. MuleSoft offers several strategies to optimize the performance of your proxy.
- Caching Strategies: As mentioned, the Caching policy in API Manager is a powerful tool. Within Mule flows, you can also use the "Cache" scope for finer-grained control over caching specific parts of a flow or data transformations.
- Load Balancing for Backend Services: If your backend service has multiple instances, your Mule proxy can be configured to load balance requests among them. This can be achieved by providing multiple target URLs in the HTTP Request connector's configuration or by dynamically resolving backend endpoints using a service registry.
- Asynchronous Processing: For operations that don't require an immediate client response (e.g., sending notifications, logging non-critical events), consider using asynchronous processing patterns within your Mule flows. The "Async" scope allows parts of your flow to execute independently, freeing up the main request thread to return a response quickly.
- Efficient DataWeave Transformations: DataWeave is highly optimized, but complex or inefficient scripts can introduce overhead. Profile your DataWeave transformations and ensure they are written efficiently, avoiding unnecessary iterations or large in-memory operations.
4.4 Monitoring and Analytics: Gaining Insights into API Usage
Understanding how your APIs are being consumed and performing is vital for continuous improvement and proactive issue resolution. MuleSoft provides comprehensive monitoring and analytics capabilities.
- Anypoint Monitoring Dashboards: API Manager automatically collects detailed metrics (request count, latency, error rates) for all managed APIs. Anypoint Monitoring offers configurable dashboards to visualize these metrics in real-time and historical views. You can set up custom alerts based on thresholds (e.g., alert when error rate exceeds 5%).
- Custom Logging Strategies: Beyond the default logging, implement robust custom logging within your Mule flows using the Logger component. Log key information at different stages of the proxy flow (request received, request sent to backend, response received, response sent to client). Use structured logging (e.g., JSON logs) for easier parsing and analysis by external logging tools.
- Alerting Mechanisms: Configure alerts in Anypoint Monitoring or integrate with external alerting systems (e.g., PagerDuty, Slack) to be notified immediately of critical issues (e.g., high error rates, sudden drops in traffic, backend service outages).
Comprehensive monitoring ensures that your api gateway is not just performing but that you have the visibility to react to any operational challenges swiftly.
4.5 Versioning and Lifecycle Management: Evolving Your APIs Gracefully
APIs are rarely static; they evolve over time. Effective versioning and lifecycle management are crucial for introducing changes without breaking existing client applications.
- API Versioning Strategies:
- URI Versioning: Including the version number in the URI (e.g.,
/v1/widgets,/v2/widgets). This is often the simplest and most explicit. Your proxy's HTTP Listener path and backend HTTP Request path can be configured to handle different versions. - Header Versioning: Specifying the version in a custom HTTP header (e.g.,
X-API-Version: 1). - Content Negotiation: Using the
Acceptheader to request a specific content type and version.
- URI Versioning: Including the version number in the URI (e.g.,
- Using Anypoint Exchange for Documentation and Discovery: Publish your API specifications (e.g., OpenAPI/Swagger) to Anypoint Exchange. This provides clear documentation for API consumers and promotes discoverability within your organization. Exchange can also host documentation for different API versions, guiding consumers on deprecation timelines.
- Promoting APIs Through Environments: Establish a robust CI/CD pipeline to promote your Mule proxy applications through development, staging, and production environments. This ensures consistency, reduces manual errors, and facilitates rigorous testing before go-live. Anypoint Platform's Runtime Manager provides tools for managing deployments across environments.
Managing the lifecycle of your APIs, including their versioning, ensures that your api gateway strategy supports continuous evolution while maintaining backward compatibility where necessary.
4.6 The Role of APIPark in Broader API Ecosystems: Complementing Your Gateway Strategy
While MuleSoft excels as a comprehensive enterprise integration platform and a powerful API gateway for a wide array of services, the modern digital landscape often presents specialized API management challenges, particularly with the proliferation of Artificial Intelligence (AI) models. For organizations dealing with a diverse set of APIs, and especially those integrating numerous AI services, a dedicated solution can offer distinct advantages, complementing traditional api gateway functionalities.
This is where ApiPark comes into play. APIPark is an open-source AI gateway and API management platform, designed to simplify the management, integration, and deployment of both AI and REST services. While MuleSoft provides robust capabilities for traditional enterprise APIs, APIPark addresses specific needs that arise when working with a large volume of AI models, offering a streamlined approach to their consumption and governance.
Key features of APIPark that can complement a MuleSoft-centric api strategy include:
- Quick Integration of 100+ AI Models: APIPark offers pre-built connectors and a unified management system specifically tailored for integrating a vast array of AI models, simplifying authentication and cost tracking across different providers. This can offload the complexity of integrating diverse AI APIs from your primary MuleSoft proxies, allowing them to focus on core enterprise integration.
- Unified API Format for AI Invocation: A significant challenge with AI models is their varied input and output formats. APIPark standardizes the request data format across all AI models, ensuring that changes in AI models or prompts do not affect your consuming applications or microservices. This abstraction layer is particularly valuable for AI services, simplifying usage and significantly reducing maintenance costs – a specialized gateway capability focused solely on AI.
- Prompt Encapsulation into REST API: APIPark allows users to quickly combine AI models with custom prompts to create new, specialized APIs, such as sentiment analysis, translation, or data analysis APIs. This "AI-as-a-Service" creation is a powerful feature for teams looking to rapidly productize AI capabilities, providing a dedicated api creation environment.
- End-to-End API Lifecycle Management: Like MuleSoft, APIPark assists with managing the entire lifecycle of APIs, from design and publication to invocation and decommission. It helps regulate API management processes, manage traffic forwarding, load balancing, and versioning of published APIs, especially within the context of AI services.
- Performance Rivaling Nginx: With impressive performance metrics (over 20,000 TPS on modest hardware) and support for cluster deployment, APIPark can handle large-scale traffic for your AI and REST services, acting as a high-performance gateway specifically tuned for these workloads.
In an ecosystem where traditional enterprise APIs coexist with rapidly evolving AI services, leveraging a specialized platform like APIPark alongside MuleSoft can lead to a more efficient and scalable API management strategy. MuleSoft can continue to manage complex enterprise integrations and act as the primary api gateway for your core business services, while APIPark provides a focused, optimized, and developer-friendly gateway for your AI model consumption and specialized AI API creation, ensuring that each tool plays to its strengths. This architectural approach allows organizations to harness the best of breed for different segments of their API landscape, promoting agility and specialized governance.
Chapter 5: Deployment and Operational Excellence
Building a robust API proxy in MuleSoft is only half the battle; successfully deploying it and ensuring its operational excellence are equally critical. This final technical chapter will cover the various deployment options within the MuleSoft ecosystem, discuss the importance of Continuous Integration/Continuous Deployment (CI/CD), and outline best practices for running your API proxies in a production environment. A well-managed deployment strategy guarantees high availability, scalability, and maintainability for your api gateway.
5.1 Deployment Options in MuleSoft: Choosing Your Runtime Environment
MuleSoft offers flexible deployment models to suit various enterprise requirements, from fully managed cloud services to hybrid and on-premises solutions. The choice of deployment target significantly impacts management overhead, scalability, and compliance.
- CloudHub: MuleSoft's Managed Cloud Platform
- Description: CloudHub is MuleSoft's flagship cloud-based integration platform as a service (iPaaS). It provides a fully managed runtime environment for your Mule applications, including API proxies. Applications are deployed as "workers" (isolated runtime containers) that can be scaled horizontally.
- Advantages:
- Ease of Deployment: Simple click-and-deploy process directly from Anypoint Studio or Anypoint Runtime Manager.
- Scalability: Effortless scaling by increasing worker size or adding more workers. CloudHub handles underlying infrastructure.
- High Availability: Built-in high availability across multiple availability zones.
- Reduced Operational Overhead: MuleSoft manages the underlying infrastructure, patching, and monitoring of the platform.
- Global Reach: Deploy to various regions worldwide to minimize latency.
- Deployment Steps (via Anypoint Runtime Manager):
- In Anypoint Studio, right-click on your project
WidgetsAPIGatewayProxy. - Select
Anypoint Platform > Deploy to CloudHub. - Provide your Anypoint Platform credentials.
- Select the
Runtime Version,Deployment Target(CloudHub 1.0 or 2.0),Environment, andApplication Name. - Configure
Worker SizeandNumber of Workersfor scaling. - Optionally configure advanced settings like
Object Store v2,properties, andlogging. - Click
Deploy Application.
- In Anypoint Studio, right-click on your project
- Best Use Case: Ideal for most organizations seeking speed, scalability, and minimal infrastructure management. Your CloudHub deployed application effectively becomes your api gateway.
- Runtime Fabric (RTF): Hybrid Deployment for Containerization Benefits
- Description: Runtime Fabric is a containerized, hybrid deployment model that allows you to deploy Mule applications and API proxies to your own infrastructure (on-premises or private cloud) while leveraging the management capabilities of Anypoint Platform. It brings the benefits of containerization (isolation, portability) to your Mule deployments.
- Advantages:
- Isolation and Portability: Applications run in isolated containers, ensuring consistent behavior across environments.
- Resource Efficiency: Better resource utilization through container orchestration (Kubernetes/OpenShift).
- Hybrid Cloud: Run applications closer to your data, whether on-premises or in a private cloud, while still managing them from Anypoint Platform.
- Increased Control: More control over the runtime environment compared to CloudHub, suitable for specific security or compliance requirements.
- Deployment Steps: Deployment to RTF is similar to CloudHub but requires an existing RTF installation. You select RTF as the deployment target in Anypoint Runtime Manager.
- Best Use Case: Enterprises with strict compliance, data residency requirements, or those who prefer to manage their own infrastructure while still benefiting from Anypoint Platform's centralized control.
- Customer-Hosted (On-Premise or Private Cloud): Traditional Server Deployments
- Description: This involves manually deploying Mule applications to a customer-managed Mule Runtime installed on physical servers, virtual machines, or IaaS (Infrastructure as a Service) instances (e.g., AWS EC2, Azure VMs).
- Advantages:
- Maximum Control: Full control over the operating system, network, and runtime environment.
- Existing Infrastructure: Leverages existing on-premises infrastructure investments.
- Specific Customizations: Enables highly customized environments.
- Deployment Steps:
- Export your Mule project as a deployable JAR file from Anypoint Studio.
- Copy the JAR file to the
appsdirectory of your Mule Runtime installation. - The Mule Runtime will automatically pick up and deploy the application.
- Disadvantages: High operational overhead, manual scaling, and greater responsibility for patching, monitoring, and high availability.
- Best Use Case: Legacy systems, highly specific regulatory environments, or situations where cloud deployments are not feasible. This approach also allows the Mule Runtime to function as a self-managed api gateway.
5.2 CI/CD Integration: Automating Your Deployment Pipeline
Implementing a Continuous Integration/Continuous Deployment (CI/CD) pipeline for your Mule applications, including API proxies, is a cornerstone of modern software development. It automates the process of building, testing, and deploying changes, leading to faster release cycles, improved code quality, and reduced manual errors.
- Maven for Packaging: Mule projects are Maven-based. Configure your
pom.xmlto include the Mule Maven plugin, which handles packaging your application into a deployable JAR file. This makes it easy for your CI server to build the project. - Version Control System (VCS): Store your Mule project in a VCS like Git. This enables collaboration, change tracking, and forms the starting point for your CI/CD pipeline.
- CI Server Integration:
- Integrate your VCS with a CI server (e.g., Jenkins, GitLab CI/CD, Azure DevOps, GitHub Actions).
- Configure the CI pipeline to trigger a build whenever changes are pushed to a specific branch (e.g.,
develop,main). - The build job should:
- Checkout the code from VCS.
- Run Maven to build the project and execute unit tests.
- Run integration tests (if applicable).
- Scan for code quality and security vulnerabilities.
- Publish the deployable JAR artifact.
- CD Automation:
- Once the CI build is successful, the CD pipeline takes over.
- This typically involves deploying the built artifact to a non-production environment (e.g., staging) for further testing.
- Upon successful completion of automated or manual tests in staging, the application can be promoted to production.
- MuleSoft provides Maven goals and REST APIs to facilitate automated deployments to CloudHub or Runtime Fabric from your CI/CD tools.
A robust CI/CD pipeline ensures that your api gateway deployments are consistent, reliable, and can be rolled out efficiently, supporting rapid iteration and continuous delivery of new features or policy updates.
5.3 Best Practices for Production: Ensuring Operational Excellence
Operating API proxies in a production environment demands careful attention to performance, security, and resilience. Adhering to best practices ensures your api gateway remains stable, secure, and performs optimally under varying loads.
- Capacity Planning and Sizing:
- Performance Testing: Conduct thorough performance testing (load testing, stress testing) against your deployed proxy to understand its limits and identify bottlenecks.
- Worker Sizing (CloudHub/RTF): Based on performance test results, appropriately size your CloudHub workers or RTF replicas. Over-provisioning wastes resources, while under-provisioning leads to performance degradation and outages.
- Horizontal Scaling: Design your proxies for horizontal scalability, allowing you to easily add more workers or instances to handle increased traffic.
- High Availability and Disaster Recovery:
- Multi-Region/Multi-AZ Deployment: For critical APIs, deploy your Mule proxies across multiple regions or availability zones to ensure continuous operation even if one region or zone experiences an outage.
- Backend Redundancy: Ensure your backend services (the targets of your proxy) also have high availability and disaster recovery strategies in place. A resilient api gateway needs a resilient backend.
- Backup and Restore: Have a strategy for backing up application configurations and data (if your application uses persistent storage) and for restoring them quickly in case of data loss.
- Continuous Monitoring and Alerting:
- Proactive Monitoring: Leverage Anypoint Monitoring, complemented by external APM tools (e.g., Splunk, ELK, Datadog), to continuously monitor your proxy's health, performance, and usage patterns.
- Granular Alerts: Configure alerts for key metrics: high error rates, increased latency, CPU/memory utilization exceeding thresholds, and sudden drops/spikes in traffic.
- Log Management: Centralize your application logs (from MuleSoft) into a robust log management system for easy searching, analysis, and troubleshooting.
- Security Audits and Penetration Testing:
- Regular Audits: Periodically audit your API Manager policies, proxy configurations, and underlying infrastructure for security vulnerabilities.
- Penetration Testing: Conduct external penetration tests against your public-facing API endpoints (your api gateway) to identify and remediate potential security weaknesses.
- Least Privilege: Configure user roles and permissions (both in Anypoint Platform and for any backend access) using the principle of least privilege.
- Documentation and Runbooks:
- Comprehensive Documentation: Maintain up-to-date documentation for your API proxies, including API specifications, deployment instructions, configuration details, and troubleshooting guides.
- Runbooks: Develop detailed runbooks for common operational procedures (e.g., deployment, rollback, scaling, incident response) to ensure consistent and efficient handling of production events.
By diligently applying these deployment strategies and operational best practices, you can ensure that your MuleSoft API proxies serve as reliable, secure, and high-performing api gateway components within your enterprise architecture, delivering continuous value to your digital initiatives.
Conclusion: Mastering the Art of MuleSoft API Proxies
The digital economy thrives on connectivity, and at the heart of this intricate web lies the API. As organizations increasingly rely on APIs to power their applications, foster partnerships, and drive innovation, the strategic importance of effective API management cannot be overstated. Throughout this comprehensive guide, we have explored the profound impact of API proxies as a fundamental component of any sophisticated API gateway strategy, particularly within the robust and versatile ecosystem of MuleSoft's Anypoint Platform.
We began by dissecting the core concept of an API proxy, understanding its role as an intelligent intermediary that shields backend services, enhances security, optimizes performance, and simplifies management. We then delved into MuleSoft's unique strengths as a holistic API gateway solution, showcasing how its integrated components—Anypoint Studio, API Manager, Runtime Manager, and Exchange—work in concert to provide end-to-end control over the API lifecycle.
The step-by-step practical implementation demonstrated how to transform a theoretical understanding into a tangible, functional asset. From the initial project setup in Anypoint Studio to configuring HTTP listeners and request connectors for dynamic forwarding, we meticulously walked through the process of building a basic, yet effective, API proxy. The inclusion of initial error handling underscored the importance of resilience even in the simplest of designs.
Beyond the basics, we ventured into the realm of advanced features, highlighting how Anypoint API Manager empowers developers and operations teams to enforce crucial policies without touching code. Policies such as rate limiting, client ID enforcement, IP whitelisting, and caching were explored in detail, revealing how they transform a simple proxy into a sophisticated, policy-driven api gateway. We also examined broader security considerations, performance optimization techniques, and the critical role of monitoring and analytics in maintaining a healthy API ecosystem. Notably, we introduced ApiPark as a powerful, open-source AI gateway and API management platform, demonstrating how specialized tools can complement MuleSoft's enterprise capabilities, particularly in managing the unique challenges presented by diverse AI models.
Finally, we addressed the crucial aspects of deployment and operational excellence, reviewing various deployment options (CloudHub, Runtime Fabric, On-Premise) and emphasizing the necessity of CI/CD integration. Best practices for production environments, including capacity planning, high availability, continuous monitoring, and security audits, were outlined to ensure the long-term success and stability of your API proxies.
In essence, mastering the creation of API proxies in MuleSoft is not merely about technical configuration; it's about architecting a resilient, secure, and agile api landscape. A well-designed MuleSoft API gateway empowers organizations to expose their digital assets confidently, manage them efficiently, and scale them without compromise. As APIs continue to drive digital transformation, the skills gained from this guide will prove invaluable in building the connective tissue of future-proof enterprise architectures, ensuring that your digital services are always available, secure, and performing at their peak. Embrace these principles, and you will unlock the full potential of your APIs, propelling your organization towards unparalleled connectivity and innovation.
Frequently Asked Questions (FAQs)
- What is the primary difference between a "proxy" in MuleSoft and a direct "API implementation"? A direct API implementation in MuleSoft means your Mule application is the backend service; it processes business logic, interacts with databases, and generates responses. A "proxy" in MuleSoft, however, acts as an intermediary. It receives requests, forwards them to an existing backend service (which is not necessarily a Mule application), and then relays the backend's response back to the client. The proxy typically adds a layer of security, management, and abstraction without implementing the core business logic itself. Essentially, the proxy is a thin wrapper that transforms your Mule application into an API gateway for another service.
- Can I apply policies to a MuleSoft API proxy without modifying its code in Anypoint Studio? Absolutely, and this is one of the most powerful features of MuleSoft as an API gateway. Once your Mule application (acting as a proxy) is deployed and configured with API Auto-discovery, you can use Anypoint API Manager to apply a wide range of pre-built or custom policies (like rate limiting, client ID enforcement, caching, security threat protection) directly to the API instance. These policies are enforced at runtime by your deployed Mule application without requiring any changes to its XML configuration or source code in Anypoint Studio, providing significant operational flexibility and agility.
- What types of backend services can a MuleSoft API proxy connect to? A MuleSoft API proxy is incredibly versatile and can connect to virtually any backend service that communicates over standard protocols. This primarily includes RESTful APIs, SOAP web services, and even custom services exposed over HTTP/HTTPS. Given MuleSoft's extensive connector ecosystem, it can also act as a gateway to integrate with databases, messaging queues (JMS, AMQP), SaaS applications (Salesforce, SAP), and much more, though HTTP-based services are the most common targets for a typical API proxy.
- How does MuleSoft handle API versioning for proxies? MuleSoft supports various API versioning strategies at the API gateway level. You can implement URI versioning (e.g.,
/v1/myapi,/v2/myapi) by configuring different listener paths in your Mule applications or by routing based on the URI. Header versioning (e.g.,X-API-Version: 1.0) can be handled by inspecting incoming headers and routing accordingly. Anypoint API Manager and Anypoint Exchange also help in managing different versions of your API instances, allowing you to apply specific policies to each version and deprecate older versions gracefully, ensuring clients always interact with the correct api version. - When should I consider a specialized API gateway like APIPark in conjunction with MuleSoft? While MuleSoft is a comprehensive API gateway and integration platform, specialized platforms like ApiPark can be highly beneficial when you have specific needs that align with their core strengths. For instance, if your organization heavily utilizes a wide variety of AI models and requires standardized invocation, prompt encapsulation into APIs, or specialized AI-centric lifecycle management, APIPark offers optimized features that can complement MuleSoft. MuleSoft can handle your general enterprise integration and act as the gateway for traditional business services, while APIPark can serve as a focused AI gateway, abstracting the complexities of AI model integration and management, thereby creating a more efficient and targeted API ecosystem.
🚀You can securely and efficiently call the OpenAI API on APIPark in just two steps:
Step 1: Deploy the APIPark AI gateway in 5 minutes.
APIPark is developed based on Golang, offering strong product performance and low development and maintenance costs. You can deploy APIPark with a single command line.
curl -sSO https://download.apipark.com/install/quick-start.sh; bash quick-start.sh

In my experience, you can see the successful deployment interface within 5 to 10 minutes. Then, you can log in to APIPark using your account.

Step 2: Call the OpenAI API.