How to Restrict Page Access on Azure Nginx (No Plugin)


In the sprawling landscape of modern web applications, ensuring the security and controlled access to digital resources is paramount. Whether you're hosting a public-facing website, a proprietary internal tool, or a cutting-edge AI-driven service, the ability to precisely dictate who can access what, and under what conditions, forms the bedrock of a robust security posture. At the heart of many such deployments, especially within cloud environments like Azure, lies Nginx – a powerful, high-performance web server, reverse proxy, and load balancer renowned for its efficiency and flexibility.
This comprehensive guide delves deep into the methodologies for restricting page access on Nginx instances deployed within Azure, critically, without relying on external plugins or third-party modules. Our focus is squarely on leveraging Nginx's native capabilities, exploring its configuration directives to build resilient access control mechanisms. We will navigate through fundamental concepts, practical implementations, and advanced strategies, ensuring that your Azure-hosted Nginx serves as an impenetrable gateway for unauthorized access while smoothly orchestrating legitimate traffic. While Nginx itself can act as a foundational gateway, we'll also touch upon how dedicated solutions might complement its strengths for more complex API management scenarios, especially for securing the burgeoning number of api endpoints.
The journey through Nginx's native access controls is not merely about blocking unwanted requests; it's about understanding the nuances of how Nginx processes requests, how its configuration directives interact, and how to strategically apply these principles to create a multi-layered defense. From simple IP-based restrictions to more sophisticated conditional access rules, we will meticulously unpack each technique, providing detailed examples and best practices tailored for an Azure environment. This deep dive aims to empower administrators and developers to construct secure, scalable, and maintainable access policies directly within their Nginx configurations, fostering a deeper appreciation for the server's intrinsic power without the added complexity of external dependencies.
Understanding the Landscape: Azure, Nginx, and the Imperative of Security
Before we dive into the specifics of Nginx configuration, it's crucial to establish a clear understanding of the environment we're operating within. Azure, Microsoft's expansive cloud computing platform, provides a vast array of services for deploying and managing applications. Nginx, on the other hand, is a widely adopted open-source web server known for its stability, rich feature set, and low resource consumption. When these two technologies converge, they create a highly capable platform for delivering web content and services. However, this power comes with a critical responsibility: securing access.
Nginx Deployment Scenarios on Azure
Nginx can be deployed in various ways within Azure, each presenting slightly different considerations for access control, though the underlying Nginx configuration principles remain consistent:
- Azure Virtual Machines (VMs): This is perhaps the most straightforward deployment. Nginx is installed directly on an Ubuntu, CentOS, or other Linux VM. Access control is managed directly through SSH into the VM and editing Nginx configuration files. This offers the highest degree of control and customization.
- Azure Container Instances (ACI): For containerized applications, Nginx can run within a Docker container deployed as an ACI. The Nginx configuration is baked into the Docker image, allowing for immutable infrastructure principles. Updates to access rules require building and deploying a new container image.
- Azure Kubernetes Service (AKS): In more complex, microservices-oriented architectures, Nginx often serves as an Ingress controller within AKS. Here, Nginx is responsible for routing external HTTP/S traffic to internal services based on rules defined in Kubernetes Ingress resources. While some basic access control can be handled at the Ingress level, more granular page-level restrictions are still best managed within the Nginx configuration itself, often via ConfigMaps injected into the Nginx Ingress Controller pod.
- Azure App Service for Containers: Although less common for pure Nginx deployments (as App Service often handles much of the proxying internally), it's possible to run custom Nginx images. Similar to ACI, configuration is part of the container image.
Regardless of the deployment method, the fundamental challenge remains: how do we ensure that only authorized users or systems can reach specific paths, files, or application endpoints served by Nginx?
Azure's Network Security Groups (NSGs) vs. Nginx Access Control
It's important to differentiate between network-level security and application-level security. Azure's Network Security Groups (NSGs) provide a foundational layer of security by filtering network traffic to and from Azure resources. An NSG can allow or deny inbound and outbound traffic based on source IP address, destination IP address, port, and protocol. For instance, you might configure an NSG to only allow inbound HTTP/S traffic (ports 80 and 443) from specific trusted IP ranges to your Nginx VM or AKS cluster.
While NSGs are essential for perimeter defense, they operate at Layer 4 (Transport Layer) of the OSI model. They cannot inspect HTTP headers, evaluate URLs beyond the port, or perform user authentication. This is where Nginx's application-layer access control becomes indispensable. Nginx operates at Layer 7 (Application Layer) and can inspect the full HTTP request, including the URL path, HTTP method, headers, and even perform authentication against user credentials.
Why Nginx-level access control is crucial:
- Granular Path-Based Restrictions: NSGs can't differentiate between
/adminand/public. Nginx can. - User Authentication: Nginx can challenge users for credentials (e.g., HTTP Basic Auth).
- Conditional Logic: Nginx can apply rules based on various request attributes (e.g., User-Agent, Referer, dynamic IP ranges).
- Rate Limiting: Protect against abuse and brute-force attacks at the application level.
- Protection for Internal Services: Even if an internal service is exposed only to a private network, Nginx can add an extra layer of authentication before proxying requests.
Therefore, a robust security strategy in Azure combines both NSGs for network perimeter defense and Nginx's native capabilities for granular, application-level access control. This layered approach ensures comprehensive protection against a wide spectrum of threats.
Nginx Fundamentals for Security Configuration
Effective Nginx security configuration begins with a solid understanding of its core architectural elements:
nginx.conf: The main configuration file, typically located in/etc/nginx/nginx.confon Linux systems. It includes global settings and can include other configuration files.httpblock: Contains directives that apply to all HTTP traffic handled by Nginx.serverblock: Defines a virtual host, listening on specific IP addresses and ports. Eachserverblock typically corresponds to a domain name or a specific listening interface.locationblock: Nested within aserverblock,locationblocks define how Nginx should handle requests for specific URL paths or patterns. This is where most of our access restriction directives will reside. Nginx selects thelocationblock that best matches the incoming request URI.- Order of Processing: Nginx processes directives in a specific order. Understanding this order (e.g.,
serverblocks, thenlocationblocks, and the priority of differentlocationmatching types like exact match=, prefix match^~, regular expression~or~*, and general prefix match) is vital to avoid unintended access allowances or denials.
With this foundational knowledge, we are now equipped to explore the specific native Nginx directives that empower us to restrict page access effectively on Azure Nginx deployments without resorting to any external plugins.
Core Native Nginx Access Restriction Mechanisms (No Plugin)
Nginx offers a robust set of built-in directives that allow for powerful access control directly within its configuration files. These methods leverage the core Nginx engine and do not require any additional compilation, dynamic modules, or third-party plugins. This approach ensures maximum compatibility, stability, and often, performance.
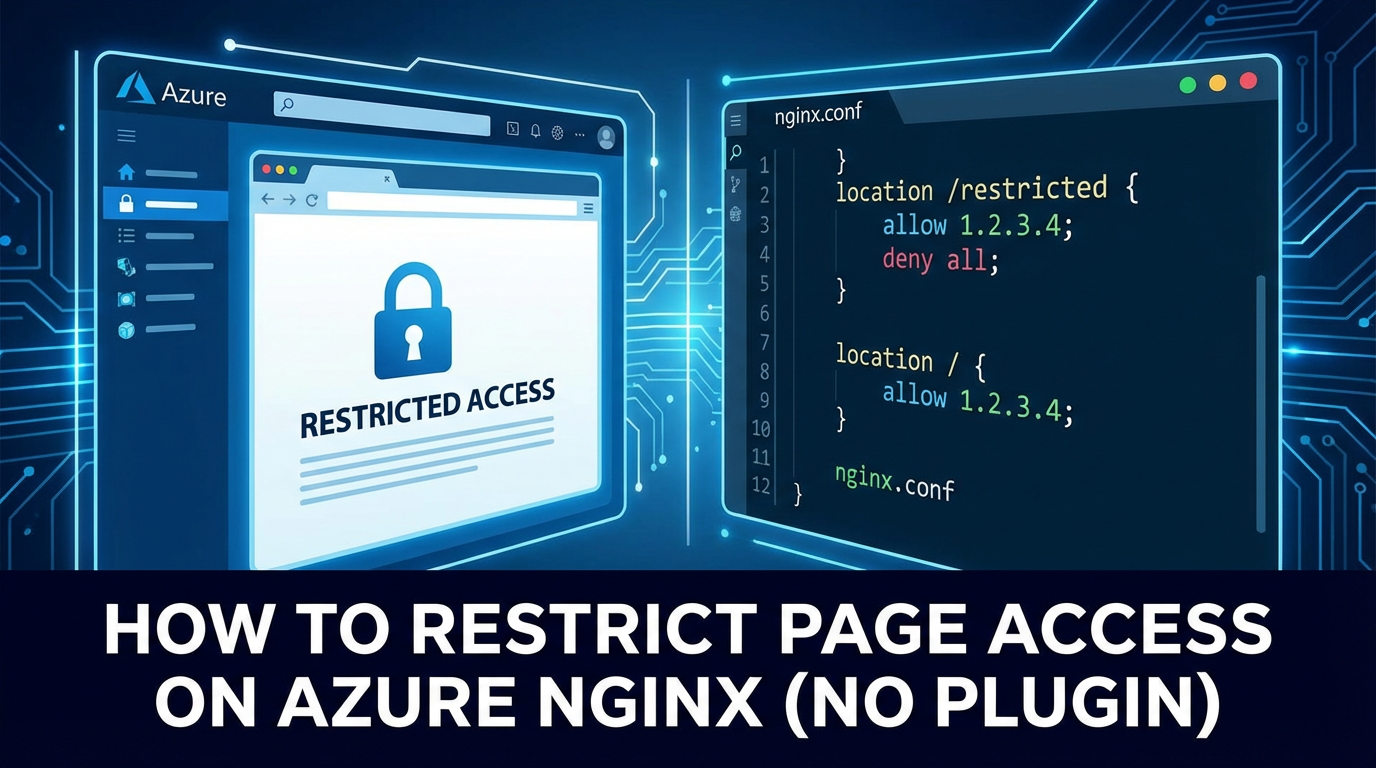
1. IP Address-Based Restrictions (allow, deny)
The most fundamental form of access control is based on the client's IP address. Nginx provides the allow and deny directives for this purpose, which can be applied globally within the http block, within a server block, or, most commonly, within a specific location block to restrict access to particular URLs.
How it works: The allow directive specifies IP addresses or CIDR blocks that are permitted access, while deny specifies those that are forbidden. Nginx processes these directives sequentially. If an allow directive is encountered first, the request is permitted. If a deny directive is encountered first, the request is denied. If neither matches, Nginx defaults to denying access if a deny all is present, or allowing if not. The general principle is to list specific allow entries and then a final deny all to ensure only explicitly allowed IPs can access.
Syntax:
allow address | CIDR | all;
deny  address | CIDR | all;
address: A single IPv4 or IPv6 address (e.g.,192.168.1.1).CIDR: An IP address range in CIDR notation (e.g.,192.168.1.0/24).all: Refers to all IP addresses.
Detailed Example for Azure Nginx:
Let's imagine you have an Azure Nginx instance serving a web application. You want to restrict access to the /admin panel to only your office IP address and a specific Azure VNet subnet where your internal management tools reside.
# /etc/nginx/sites-available/your_webapp.conf

server {
    listen 80;
    listen [::]:80;
    server_name example.com www.example.com;

    # Redirect HTTP to HTTPS for better security (recommended)
    return 301 https://$host$request_uri;
}

server {
    listen 443 ssl;
    listen [::]:443 ssl;
    server_name example.com www.example.com;

    ssl_certificate /etc/nginx/ssl/example.com.crt;
    ssl_certificate_key /etc/nginx/ssl/example.com.key;
    ssl_protocols TLSv1.2 TLSv1.3;
    ssl_ciphers 'TLS_AES_256_GCM_SHA384:TLS_CHACHA20_POLY1305_SHA256:TLS_AES_128_GCM_SHA256:ECDHE-RSA-AES256-GCM-SHA384:ECDHE-RSA-AES128-GCM-SHA256';
    ssl_prefer_server_ciphers off;

    root /var/www/example.com/html;
    index index.html index.htm;

    # Publicly accessible content
    location / {
        try_files $uri $uri/ =404;
    }

    # Restrict access to the /admin path
    location /admin {
        # Allow access from your office public IP
        allow 203.0.113.42;

        # Allow access from a specific Azure VNet subnet (e.g., management subnet)
        allow 10.0.1.0/24;

        # Deny all other IP addresses
        deny all;

        # Serve files from the admin directory
        # (This line assumes your admin content is located at /var/www/example.com/html/admin)
        try_files $uri $uri/ =404;

        # You might also want to add basic authentication on top of IP restrictions for extra security
        # See the next section for basic authentication details.
        # auth_basic "Administrator's Area";
        # auth_basic_user_file /etc/nginx/.htpasswd;
    }

    # Example of restricting a specific file or API endpoint
    location /api/secret_data.json {
        allow 192.168.1.0/24; # Only allow from internal network
        deny all;
        # You would typically proxy this to an upstream service rather than serving directly
        # proxy_pass http://backend_api_server/secret_data;
    }

    error_page 404 /404.html;
    location = /40x.html {
        internal;
    }

    error_page 500 502 503 504 /50x.html;
    location = /50x.html {
        internal;
    }

    # Log configuration
    access_log /var/log/nginx/example.com_access.log;
    error_log /var/log/nginx/example.com_error.log;
}
After modifying the Nginx configuration:
- Test the configuration for syntax errors:
sudo nginx -t - Reload Nginx to apply changes:
sudo systemctl reload nginx(orsudo service nginx reloadon older systems)
Use Cases: * Admin Panels: Restricting administrative interfaces to specific, known IP addresses. * Internal Tools: Making internal monitoring dashboards or management tools accessible only from corporate networks. * Staging/Development Environments: Limiting access to pre-production environments. * Partner Access: Granting specific partners access to certain APIs or data feeds from their known IP ranges.
Limitations: * Dynamic IPs: Not suitable for users with dynamic IP addresses unless a VPN or a more advanced authentication mechanism is used. * IP Spoofing: While network-level filtering mitigates basic spoofing, sophisticated attackers might attempt to bypass this. * Public Proxies/VPNs: Users can circumvent IP restrictions by using VPNs or proxy services that provide an allowed IP address.
2. Basic Authentication (auth_basic, auth_basic_user_file)
For scenarios requiring user-level authentication rather than just IP-based access, Nginx's HTTP Basic Authentication is a simple yet effective native solution. It prompts users for a username and password before granting access.
How it works: When a client requests a resource protected by auth_basic, Nginx sends a 401 Unauthorized response with a WWW-Authenticate header. The browser then typically displays a login dialog. The user enters credentials, which the browser sends back in an Authorization header, encoded in Base64. Nginx verifies these credentials against a password file, usually created with the htpasswd utility.
Prerequisites: You need the htpasswd utility, which is typically part of the apache2-utils package on Debian/Ubuntu or httpd-tools on CentOS/RHEL. Install it if you don't have it: * Ubuntu/Debian: sudo apt update && sudo apt install apache2-utils * CentOS/RHEL: sudo yum install httpd-tools
Creating the Password File (.htpasswd): The password file stores usernames and hashed passwords. It's crucial to store this file outside the webroot to prevent direct access.
- Create the first user (e.g.,
adminuser):bash sudo htpasswd -c /etc/nginx/.htpasswd adminuser # Enter and confirm passwordThe-cflag creates a new file. Only use it for the first user. - Add additional users (e.g.,
devuser):bash sudo htpasswd /etc/nginx/.htpasswd devuser # Enter and confirm passwordDo not use-cagain, as it would overwrite the file.
Detailed Example for Azure Nginx:
Let's protect the /sensitive_data path on your Azure Nginx instance with basic authentication.
# /etc/nginx/sites-available/your_webapp.conf

server {
    listen 443 ssl;
    listen [::]:443 ssl;
    server_name example.com;

    ssl_certificate /etc/nginx/ssl/example.com.crt;
    ssl_certificate_key /etc/nginx/ssl/example.com.key;
    ssl_protocols TLSv1.2 TLSv1.3;
    ssl_ciphers 'TLS_AES_256_GCM_SHA384:TLS_CHACHA20_POLY1305_SHA256:TLS_AES_128_GCM_SHA256:ECDHE-RSA-AES256-GCM-SHA384:ECDHE-RSA-AES128-GCM-SHA256';
    ssl_prefer_server_ciphers off;

    root /var/www/example.com/html;
    index index.html index.htm;

    location / {
        try_files $uri $uri/ =404;
    }

    # Protect a specific path with HTTP Basic Authentication
    location /sensitive_data {
        auth_basic "Restricted Area"; # Message displayed in the login dialog
        auth_basic_user_file /etc/nginx/.htpasswd; # Path to your password file

        # Serve content for this protected path
        # If this path is a directory, ensure index files are handled
        try_files $uri $uri/ =404;
    }

    # Another example for an API endpoint that needs authentication
    location /api/internal/v1/data {
        # Combine with IP restriction for an extra layer of security
        allow 10.0.0.0/8; # Allow only from internal network
        deny all;

        auth_basic "API Access Required";
        auth_basic_user_file /etc/nginx/.htpasswd_api; # A separate password file for API users

        # Proxy to an internal API backend
        proxy_pass http://internal_api_service;
        proxy_set_header Host $host;
        proxy_set_header X-Real-IP $remote_addr;
    }

    # If you want to protect the entire server with basic auth, place these directives in the server block itself.
    # But usually, it's more granular at the location level.

    error_page 404 /404.html;
    location = /40x.html {
        internal;
    }
}
After modifications:
- Test Nginx config:
sudo nginx -t - Reload Nginx:
sudo systemctl reload nginx
Security Considerations: * HTTPS is Mandatory: Basic authentication transmits credentials in Base64 encoding, which is easily reversible. ALWAYS use Basic Authentication over HTTPS (SSL/TLS) to encrypt the traffic and prevent credentials from being intercepted in plain text. Azure Load Balancers or Application Gateways can terminate SSL, but ensuring the connection from the client to Nginx is encrypted is paramount. * Strong Passwords: Enforce strong, unique passwords for users in the .htpasswd file. * File Permissions: Ensure the .htpasswd file has strict permissions (chmod 600 /etc/nginx/.htpasswd) so only the Nginx user can read it.
Use Cases: * Staging/QA Environments: Protecting pre-production websites from public access while allowing developers and testers to log in. * Internal Documentation: Securing internal wikis or documentation sites. * Simple API Protection: For very simple internal APIs where a full OAuth/API Key management system is overkill.
3. HTTP Referer Module (valid_referers)
The valid_referers directive allows Nginx to restrict access based on the HTTP Referer header. This is primarily used to prevent hotlinking (embedding your images or files on other websites) or to ensure that requests for specific resources originate from an expected domain (e.g., your own website).
How it works: The Referer header (note the common misspelling, but it's standard) indicates the URL of the page that linked to the current requested resource. Nginx can check if the Referer header matches a list of allowed domains. If it doesn't match, you can then block the request.
Syntax:
valid_referers none | blocked | server_names | string ...;
none: Allows requests with an empty or missingRefererheader.blocked: Allows requests where theRefererheader is present but its value has been "blocked" (e.g., by firewalls or privacy software, appearing ashttp://orhttps://without a host).server_names: Allows requests where theRefererheader matches any of theserver_namedirectives defined in the currentserverblock. This is useful for self-referential links.string: Can be a hostname (e.g.,example.com), a hostname with wildcards (e.g.,*.example.com), or a regular expression (e.g.,~^http://.*\.trusted\.com/).
When valid_referers is used, Nginx sets the $invalid_referer variable to 1 if the referer is invalid, and 0 if it's valid. You can then use an if block to act upon this variable.
Detailed Example for Azure Nginx:
Consider a scenario where you host images or video files on your Azure Nginx instance, and you want to prevent other websites from directly embedding them (hotlinking).
# /etc/nginx/sites-available/your_webapp.conf

server {
    listen 443 ssl;
    listen [::]:443 ssl;
    server_name images.example.com; # A subdomain for serving static assets

    ssl_certificate /etc/nginx/ssl/images.example.com.crt;
    ssl_certificate_key /etc/nginx/ssl/images.example.com.key;
    # ... other SSL/TLS directives ...

    root /var/www/images.example.com; # Directory where images are stored

    # Restrict access to image files (e.g., .jpg, .png, .gif)
    location ~* \.(jpg|jpeg|png|gif|bmp|ico|webp|svg)$ {
        # Allow requests with no referer (e.g., direct access, or from private browsing)
        # Allow requests from your own domains
        # Allow requests from a partner site
        valid_referers none blocked server_names example.com *.example.com partnerwebsite.com;

        # If the referer is invalid, deny access and return a 403 Forbidden
        if ($invalid_referer) {
            return 403;
        }

        # If referer is valid, serve the file
        try_files $uri =404;
        expires 30d; # Cache images for a long time
        access_log off; # No need to log every image request
    }

    # Example for video files
    location ~* \.(mp4|mov|avi)$ {
        valid_referers none blocked server_names example.com;
        if ($invalid_referer) {
            return 403;
        }
        try_files $uri =404;
    }

    # Default location for other files or index
    location / {
        try_files $uri $uri/ =404;
    }

    error_page 404 /404.html;
    location = /40x.html {
        internal;
    }
}
After modifications:
- Test Nginx config:
sudo nginx -t - Reload Nginx:
sudo systemctl reload nginx
Limitations: * Referer Spoofing: The Referer header can be easily spoofed by malicious users, making this method less reliable for critical security. It's best used as a deterrent against casual hotlinking rather than a primary security control. * Privacy Browsers/Settings: Some browsers or privacy extensions might strip or modify the Referer header, which could inadvertently block legitimate users if none or blocked are not included in valid_referers.
Use Cases: * Hotlinking Prevention: Preventing other websites from directly using your bandwidth by embedding your media files. * Content Origin Verification: Ensuring that certain downloadable files or media streams are only accessed from within your own website.
4. Limiting Requests (limit_req_zone, limit_req, limit_conn_zone, limit_conn)
While not strictly "page access restriction" in the authentication sense, rate limiting and connection limiting are crucial access control mechanisms that protect your Azure Nginx instance and upstream services from abuse, denial-of-service (DoS) attacks, and brute-force attempts. These are native Nginx modules that require no external plugins.
How it works: * limit_req_zone and limit_req (Request Rate Limiting): * limit_req_zone defines a shared memory zone for storing request states (IP addresses, timestamps). It specifies the key for tracking (e.g., client IP), the size of the zone, and the average request rate (rate). * limit_req applies the defined zone to a specific location or server block. It can also specify a burst size (how many requests are allowed above the rate before throttling begins) and a nodelay option (whether to queue burst requests or drop them immediately). * limit_conn_zone and limit_conn (Concurrent Connection Limiting): * limit_conn_zone defines a shared memory zone for storing connection states, using a key (e.g., client IP) and a zone size. * limit_conn applies the zone and sets the maximum number of simultaneous connections allowed per key.
Detailed Example for Azure Nginx:
Let's protect an API endpoint on your Azure Nginx instance from being overwhelmed by too many requests or too many concurrent connections from a single client. This is particularly relevant when Nginx acts as an api gateway for your services.
# /etc/nginx/nginx.conf (often in the http block)
http {
    # ... other http directives ...

    # Define a rate limiting zone based on client IP
    # Key: $binary_remote_addr (binary representation of client IP, more memory efficient)
    # Zone: 'mylimit' with 10MB size
    # Rate: 10 requests per second (r/s)
    # This zone can handle around 160,000 distinct IP addresses
    limit_req_zone $binary_remote_addr zone=mylimit:10m rate=10r/s;

    # Define a connection limiting zone based on client IP
    # Key: $binary_remote_addr
    # Zone: 'connlimit' with 10MB size
    limit_conn_zone $binary_remote_addr zone=connlimit:10m;

    server {
        listen 443 ssl;
        listen [::]:443 ssl;
        server_name api.example.com; # An API specific domain

        ssl_certificate /etc/nginx/ssl/api.example.com.crt;
        ssl_certificate_key /etc/nginx/ssl/api.example.com.key;
        # ... other SSL/TLS directives ...

        # Default location, potentially redirecting or returning 404
        location / {
            return 404;
        }

        # Protect a public API endpoint with rate limiting
        location /api/public/v1/data {
            # Apply the 'mylimit' rate limit zone
            # Allow a burst of 5 requests beyond the rate, without delay (nodelay)
            # If rate + burst is exceeded, return 503 Service Unavailable
            limit_req zone=mylimit burst=5 nodelay;

            # Apply the 'connlimit' connection limit zone
            # Allow a maximum of 2 concurrent connections per IP
            limit_conn connlimit 2;

            # Proxy to an upstream API service
            proxy_pass http://backend_data_api;
            proxy_set_header Host $host;
            proxy_set_header X-Real-IP $remote_addr;
            proxy_set_header X-Forwarded-For $proxy_add_x_forwarded_for;
        }

        # A more critical API endpoint might have stricter limits
        location /api/auth/login {
            limit_req zone=mylimit burst=0 nodelay; # No burst, strict 10r/s
            limit_conn connlimit 1; # Only 1 concurrent connection for login attempts

            proxy_pass http://auth_service;
            proxy_set_header Host $host;
        }

        error_page 429 /429_custom.html; # Custom page for Too Many Requests
        location = /429_custom.html {
            internal;
            root /var/www/error_pages; # Path to your custom error page
        }

        error_page 503 /503.html;
        location = /50x.html {
            internal;
        }
    }
}
After modifications:
- Test Nginx config:
sudo nginx -t - Reload Nginx:
sudo systemctl reload nginx
Considerations: * Zone Size: Choose a zone size large enough to store states for the expected number of unique client IPs. Each state takes about 32-bytes on 64-bit systems. * Rate and Burst: Carefully tune rate and burst values based on your application's expected traffic patterns and tolerance for legitimate spikes. * Proxies/Load Balancers: If your Nginx instance is behind an Azure Application Gateway, Load Balancer, or other proxy, $remote_addr will be the IP of the proxy. Ensure you configure Nginx to correctly read the client's real IP from X-Forwarded-For or X-Real-IP headers using the set_real_ip_from and real_ip_header directives in your http block. This is critical for accurate rate limiting. * Error Pages: Provide user-friendly custom error pages for 429 Too Many Requests or 503 Service Unavailable responses.
Use Cases: * API Protection: Preventing individual clients from overwhelming api endpoints. * Brute-Force Attack Prevention: Slowing down or blocking login attempts, password resets, or search queries from a single source. * Resource Throttling: Ensuring fair access to shared resources and protecting backend services from being flooded.
Advanced Native Nginx Access Control Techniques (No Plugin)
Beyond the fundamental methods, Nginx offers more sophisticated ways to control access using variables, conditional logic, and specialized modules that are part of its core distribution. These techniques enable dynamic access decisions based on various request attributes, expanding the granularity of your security posture.
5. Conditional Access with map and geo Modules
The map and geo modules are incredibly powerful for creating custom variables based on certain input values, which can then be used in if conditions or other directives for access control. These are native Nginx modules.
a. map Module: Creating Variables from Request Attributes
The map module allows you to create new variables whose values depend on the values of other variables. This is excellent for defining custom access rules based on HTTP headers, user agents, cookies, or other request elements.
How it works: You define a map block, usually in the http block, specifying an input variable and an output variable. Inside the map block, you list key-value pairs. If the input variable's value matches a key, the output variable takes the corresponding value. If no match, it can use a default value.
Syntax:
map input_variable $output_variable {
    key1 value1;
    key2 value2;
    default default_value;
}
Detailed Example for Azure Nginx (Blocking Specific User Agents):
Let's say you want to block requests from known malicious bots or outdated browsers that often scan for vulnerabilities, targeting specific paths or the entire site.
# /etc/nginx/nginx.conf (within the http block)

http {
    # ... other http directives ...

    # Define a map to identify bad user agents
    # Input: $http_user_agent (value of the User-Agent header)
    # Output: $block_ua (will be 1 for bad agents, 0 otherwise)
    map $http_user_agent $block_ua {
        default 0; # By default, don't block
        "~*curl" 1; # Block curl requests (case-insensitive regex)
        "~*wget" 1; # Block wget requests
        "~*bot.exe" 1; # Example of a specific bot string
        "~*msie [1-8]\." 1; # Block old Internet Explorer versions
    }

    server {
        listen 443 ssl;
        listen [::]:443 ssl;
        server_name example.com;

        ssl_certificate /etc/nginx/ssl/example.com.crt;
        ssl_certificate_key /etc/nginx/ssl/example.com.key;
        # ... other SSL/TLS directives ...

        root /var/www/example.com/html;
        index index.html;

        location / {
            # Use the $block_ua variable for conditional access
            if ($block_ua) {
                return 403 "Blocked by Nginx: Invalid User-Agent"; # Return 403 Forbidden
            }

            try_files $uri $uri/ =404;
        }

        # You can also apply this to specific locations
        location /api/v1/legacy {
            if ($block_ua) {
                return 403;
            }
            proxy_pass http://legacy_backend;
        }

        # ... other configurations ...
    }
}
After modifications:
- Test Nginx config:
sudo nginx -t - Reload Nginx:
sudo systemctl reload nginx
Use Cases for map: * User-Agent Filtering: Blocking known bots, scrapers, or outdated browsers. * Header-Based Access: Granting access only if a specific custom header (e.g., X-Internal-Secret) is present with a predefined value. * Cookie-Based Logic: Redirecting users based on the presence or value of a cookie (though this is more for user experience than strict access control). * Environment-Specific Rules: Creating variables that adapt behavior based on environment variables (e.g., dev, staging, prod).
b. geo Module: Geographic IP Address-Based Restrictions
The geo module allows you to create variables based on the client's IP address, mapping IP ranges to specific values. This is incredibly useful for restricting access based on the geographical origin of the request, which is a common requirement in many Azure deployments for compliance or security.
How it works: The geo block, also typically in the http block, defines a new variable whose value depends on the client's IP address ($remote_addr). You specify IP ranges (CIDR blocks) and assign a value to them.
Syntax:
geo $remote_addr $variable_name {
    default value_for_non_matching_ips;
    ip_address_or_cidr value_for_matching_ips;
    # ... more IP ranges
}
Detailed Example for Azure Nginx (Geo-blocking):
Let's assume your Azure-hosted application serves users primarily in Europe and North America, and you want to block all traffic originating from other continents due to compliance reasons or to mitigate known attack sources.
# /etc/nginx/nginx.conf (within the http block)

http {
    # ... other http directives ...

    # Define a geo block to map IPs to a 'country_code' or 'allow_status'
    # Input: $remote_addr (client's IP address)
    # Output: $allowed_country (1 if allowed, 0 if blocked)
    geo $remote_addr $allowed_country {
        default 0; # By default, block all IPs

        # Allow specific IP ranges for legitimate clients
        # Example: Office IP range
        198.51.100.0/24 1;

        # Example: Azure VNet gateway IPs or internal IPs
        10.0.0.0/8 1;
        172.16.0.0/12 1;
        192.168.0.0/16 1;

        # Allow traffic from specific countries/regions
        # (You would need a comprehensive list of CIDR blocks for each country/region)
        # For demonstration, let's use example ranges for "Europe" and "North America"
        # In a real scenario, you'd use public databases like MaxMind GeoLite2 for accurate, up-to-date lists.
        # Example for North American IP range (subset)
        64.0.0.0/8 1;
        65.0.0.0/8 1;
        # ... more North American ranges ...

        # Example for European IP range (subset)
        80.0.0.0/8 1;
        81.0.0.0/8 1;
        # ... more European ranges ...
    }

    server {
        listen 443 ssl;
        listen [::]:443 ssl;
        server_name example.com;

        ssl_certificate /etc/nginx/ssl/example.com.crt;
        ssl_certificate_key /etc/nginx/ssl/example.com.key;
        # ... other SSL/TLS directives ...

        root /var/www/example.com/html;
        index index.html;

        location / {
            # Check the $allowed_country variable
            if ($allowed_country = 0) {
                return 403 "Access Denied: Geographic Restriction";
            }
            try_files $uri $uri/ =404;
        }

        # Apply specific geo-restriction to a particular API
        location /api/data_region_specific {
            # Maybe this API is even more restricted
            geo $remote_addr $api_allowed_region {
                default 0;
                198.51.100.0/24 1; # Only office IPs
                10.0.0.0/8 1;      # Only Azure internal IPs
            }
            if ($api_allowed_region = 0) {
                return 403 "API Access Denied: Regional Restriction";
            }
            proxy_pass http://regional_api_backend;
        }

        # ... other configurations ...
    }
}
After modifications:
- Test Nginx config:
sudo nginx -t - Reload Nginx:
sudo systemctl reload nginx
Important Note on geo Data: Maintaining an up-to-date list of IP ranges for countries/regions manually is extremely challenging and prone to errors. For serious production use, you'd typically integrate with a commercial or open-source geo-IP database service (like MaxMind GeoLite2). While Nginx can directly use a .mmdb file with the ngx_http_geoip2_module, that is an external module. To stay "no plugin," you'd have to parse these lists into Nginx geo block format, which is a complex automation task for large datasets. For simplicity and demonstrative purposes, the example above uses illustrative ranges.
Use Cases for geo: * Compliance: Meeting regulatory requirements that restrict data access based on user location. * Security: Blocking traffic from known problematic regions to reduce attack surface. * Content Licensing: Restricting media content access based on geographic licensing agreements. * Targeted Content Delivery: Serving different content or redirecting users based on their country.
6. Token-Based Access Control (Leveraging Internal Nginx Logic)
Implementing true token-based authentication (like JWT validation) directly within native Nginx without any external modules (like Lua) is extremely challenging, as Nginx lacks cryptographic functions or complex parsing capabilities. However, you can achieve a form of token-based access by making Nginx act as a gateway that checks for the presence and basic format of a token, or, more effectively, by using Nginx's auth_request directive to offload token validation to a lightweight internal authentication service. The auth_request module itself is a core Nginx module, not an external plugin.
How auth_request works (the most robust "no plugin" approach for complex auth): The auth_request directive sends a subrequest to a specified internal URL (an authentication endpoint). Nginx then checks the response status code of this subrequest: * If the status is 200 (OK), access is granted. * If the status is 401 (Unauthorized) or 403 (Forbidden), access is denied. * Other 2xx responses might also grant access, depending on configuration.
This internal authentication endpoint could be a minimal Python/Node.js/Go service running alongside your application on Azure, or even another Nginx location block configured to handle the validation if you can implement the logic with map/if (highly complex for true token validation). The most practical "no plugin" interpretation here is that Nginx itself doesn't perform the complex validation, but it acts as a gatekeeper based on the response of another service that does. This keeps the Nginx binary pure.
Detailed Example for Azure Nginx (Using auth_request with an Internal Auth Service):
Imagine you have a microservice, auth-service, deployed internally in your Azure VNet, responsible for validating api keys or JWT tokens. Nginx will forward the authorization headers to this service.
# /etc/nginx/nginx.conf (within the http block)

http {
    # ... other http directives ...

    # Define an upstream for the internal authentication service
    # This service validates tokens (e.g., API keys, JWTs)
    upstream auth_backend {
        server 10.0.0.10:8080; # IP and port of your internal auth microservice
        # For AKS, this would be the internal service name:
        # server auth-service.default.svc.cluster.local:8080;
    }

    server {
        listen 443 ssl;
        listen [::]:443 ssl;
        server_name api.example.com;

        ssl_certificate /etc/nginx/ssl/api.example.com.crt;
        ssl_certificate_key /etc/nginx/ssl/api.example.com.key;
        # ... other SSL/TLS directives ...

        # Default location, might return 404 or a public API entry point
        location / {
            return 404;
        }

        # Internal location for the authentication subrequest
        # This location should NEVER be directly accessible from external clients.
        location = /_validate_token {
            internal; # This makes the location accessible only via internal subrequests (e.g., auth_request)

            # Pass original request headers (like Authorization) to the auth service
            proxy_set_header Host $host;
            proxy_set_header X-Real-IP $remote_addr;
            proxy_set_header X-Forwarded-For $proxy_add_x_forwarded_for;
            proxy_set_header X-Original-URI $request_uri; # Useful for auth service to know the original request

            # Crucially, pass the Authorization header from the client to the auth service
            proxy_set_header Authorization $http_authorization;

            proxy_pass http://auth_backend/validate; # Endpoint on your auth service
            # auth_backend is the upstream defined above
        }

        # Protect a specific API endpoint that requires token validation
        location /api/secured/v1/data {
            # Use the auth_request directive to send a subrequest to our internal validation endpoint
            auth_request /_validate_token;

            # If the auth_request returns 200, Nginx proceeds to proxy the request.
            # If it returns 401/403, Nginx returns that status to the client.

            # Pass all original headers (including validated Authorization header) to the upstream
            proxy_pass http://data_backend; # Your actual backend API service
            proxy_set_header Host $host;
            proxy_set_header X-Real-IP $remote_addr;
            proxy_set_header X-Forwarded-For $proxy_add_x_forwarded_for;

            # Optionally, extract information from the auth service response
            # e.g., if auth_backend sets X-User-ID header, you can capture it:
            # auth_request_set $user_id $upstream_http_x_user_id;
            # And then pass it to your backend:
            # proxy_set_header X-User-ID $user_id;
        }

        # Example for another secured API
        location /api/another/protected/endpoint {
            auth_request /_validate_token;
            proxy_pass http://another_backend;
            proxy_set_header Host $host;
            proxy_set_header X-Real-IP $remote_addr;
            proxy_set_header X-Forwarded-For $proxy_add_x_forwarded_for;
        }

        # Error pages for authentication failures
        error_page 401 /401.html;
        location = /401.html {
            internal;
            root /var/www/error_pages;
        }
        error_page 403 /403.html;
        location = /403.html {
            internal;
            root /var/www/error_pages;
        }

        # ... other configurations ...
    }
}
After modifications:
- Test Nginx config:
sudo nginx -t - Reload Nginx:
sudo systemctl reload nginx
Explanation: This configuration makes Nginx a powerful api gateway for your microservices. It transparently intercepts requests to protected /api/secured endpoints, forwards the Authorization header to an internal /validate endpoint on your auth-service, and then proceeds with the main request only if the auth-service responds with a 200 OK. This effectively implements token-based access control using Nginx's native capabilities to interact with an external (but internal to your network) validator.
Use Cases for auth_request: * API Key Validation: Protecting api endpoints by validating API keys passed in headers or query parameters. * JWT Validation: Offloading the validation of JSON Web Tokens (JWTs) to a dedicated service. * Session Validation: Checking session tokens with a central session management service. * Custom Authorization Logic: Implementing any complex authorization rules that are difficult to manage directly in Nginx config.
This approach leverages Nginx's strength as a performant reverse proxy while delegating complex business logic like token validation to specialized services. It keeps the Nginx configuration clean and focused on routing and basic access policy enforcement.
Table: Comparison of Native Nginx Access Restriction Methods
To consolidate our understanding, let's look at a comparative table outlining the characteristics of each native Nginx access control method discussed. This table highlights their primary use cases, strengths, and limitations, providing a quick reference for choosing the right approach for your Azure Nginx deployment.
| Feature | IP Address (allow/deny) |
Basic Auth (auth_basic) |
Referer (valid_referers) |
Rate/Conn Limit (limit_req/limit_conn) |
Token-based (auth_request + Internal Service) |
|---|---|---|---|---|---|
| Primary Use | Restricting access to known networks/IPs. | User-level authentication for static/internal content. | Preventing hotlinking; verifying content origin. | Protecting against DoS, brute-force, and resource exhaustion. | Advanced, dynamic authentication (API Keys, JWTs, sessions). |
| Layer | Application (L7) based on source IP. | Application (L7) based on credentials. | Application (L7) based on HTTP Referer header. | Application (L7) based on IP, request rate, concurrent connections. | Application (L7) proxying to an internal authentication service. |
| Strengths | Simple, highly performant, effective for static networks. | Easy to set up, good for simple user auth, widely supported. | Simple hotlink prevention, can verify content source. | Highly effective against traffic spikes and abusive clients, improves backend stability. | Flexible, scalable, supports complex logic without Nginx binary modification. |
| Limitations | Not suitable for dynamic IPs, single-layer defense. | Credentials in transit (unless HTTPS), not scalable for many users, no user management. | Easily spoofed, may block legitimate users with privacy settings. | Requires careful tuning, does not authenticate users, only traffic patterns. | Requires an additional internal authentication service, more complex setup. |
| Security Level | Basic network-level filtering. | Moderate (requires HTTPS). | Low (easily bypassed). | High (for traffic management and abuse prevention). | High (as strong as the internal authentication service). |
| Example Use | Admin panel for specific office IP. | Staging environment, internal documentation. | Preventing image hotlinking, restricted downloads. | Protecting API endpoints, login forms from brute force. | Securing a REST API gateway with JWTs for microservices. |
| Plugin Required | No (native Nginx directives). | No (native Nginx directives, htpasswd utility). |
No (native Nginx directives). | No (native Nginx directives). | No (native Nginx auth_request module is core, external service logic is separate). |
This comparison highlights that each method has its place and purpose. A robust security strategy often involves a combination of these native Nginx techniques, layered with Azure's network security features, to create a comprehensive defense.
APIPark is a high-performance AI gateway that allows you to securely access the most comprehensive LLM APIs globally on the APIPark platform, including OpenAI, Anthropic, Mistral, Llama2, Google Gemini, and more.Try APIPark now! 👇👇👇
Practical Implementation on Azure
Deploying and configuring Nginx on Azure with these access restrictions requires attention to the specific Azure services and best practices. While the Nginx configuration itself is platform-agnostic, how you manage and apply it differs across Azure deployment models.
Deployment Scenarios and Configuration Management
- Azure VM:
- Installation: SSH into your Linux VM (Ubuntu, CentOS), install Nginx (
sudo apt install nginxorsudo yum install nginx). - Configuration: Edit
/etc/nginx/nginx.confand files in/etc/nginx/sites-available/(linked to/etc/nginx/sites-enabled/). - Management: Use
sudo nginx -tto test syntax andsudo systemctl reload nginx(orsudo service nginx reload) to apply changes. For automation, consider Azure Automation, Ansible, or custom shell scripts executed via Azure CLI'saz vm run-command. - SSL/TLS: Obtain SSL certificates (e.g., Let's Encrypt with Certbot) and configure them in Nginx
serverblocks. Ensure Azure NSGs allow traffic on port 443.
- Installation: SSH into your Linux VM (Ubuntu, CentOS), install Nginx (
- Azure Container Instances (ACI):
- Dockerfile: Bake your Nginx configuration directly into a Docker image.
dockerfile FROM nginx:latest COPY nginx.conf /etc/nginx/nginx.conf COPY conf.d/ /etc/nginx/conf.d/ COPY html/ /usr/share/nginx/html/ COPY .htpasswd /etc/nginx/.htpasswd # If using basic auth # Add other assets like SSL certs if not handled by Azure LB - Deployment: Push the image to Azure Container Registry (ACR) and deploy using
az container create, referencing your image. - Configuration Updates: Changes to Nginx config require rebuilding the Docker image and redeploying the container group.
- Dockerfile: Bake your Nginx configuration directly into a Docker image.
- Azure Kubernetes Service (AKS) - Nginx Ingress Controller:
- Ingress Controller: AKS often uses an Nginx Ingress Controller. The controller manages Nginx deployments internally.
- Configuration: Nginx configuration directives for
serverandlocationblocks are typically provided via KubernetesConfigMapsor Ingress Annotations.- ConfigMap for
httpblock directives: Create aConfigMapfor global Nginx settings (likelimit_req_zone,limit_conn_zone,geo,map). The Ingress Controller can be configured to load thisConfigMap. - Ingress Annotations for
server/locationdirectives: Manylocation-specific directives (likeauth_basic,limit_req,valid_referers,auth_request) can be applied directly via annotations on your Kubernetes Ingress resources. For example:yaml apiVersion: networking.k8s.io/v1 kind: Ingress metadata: name: my-app-ingress annotations: nginx.ingress.kubernetes.io/auth-url: "http://auth-service.default.svc.cluster.local/_validate_token" nginx.ingress.kubernetes.io/auth-signin: "https://login.example.com" # Or return 401/403 directly nginx.ingress.kubernetes.io/limit-rps: "10" nginx.ingress.kubernetes.io/limit-burst-multiplier: "5" nginx.ingress.kubernetes.io/server-snippet: | # Custom server-level Nginx config # Can't directly put 'allow/deny' or 'location' blocks here nginx.ingress.kubernetes.io/location-snippet: | # Custom location-level Nginx config # Example: allow 192.168.1.0/24; deny all; spec: # ... rules ...This approach keeps the Nginx binary itself "no plugin" while leveraging Kubernetes mechanisms to inject configurations.
- ConfigMap for
- SSL/TLS: Handled by cert-manager for automatic certificate provisioning or via secrets storing manually issued certificates.
Integrating with Azure Security
- Network Security Groups (NSGs): Always configure NSGs for your Nginx VMs, AKS nodes, or ACI subnets. Allow only necessary inbound ports (e.g., 80, 443, 22 for SSH management) from trusted sources. Block all other inbound traffic by default. This acts as a crucial first line of defense.
- Azure Load Balancer / Application Gateway:
- If Nginx is behind an Azure Load Balancer (Layer 4) or Application Gateway (Layer 7), configure them appropriately.
- SSL Termination: Application Gateway can perform SSL termination, meaning it decrypts traffic, inspects it, and then re-encrypts (or sends plain HTTP) to Nginx. This offloads SSL from Nginx, but you still need to secure the Nginx-to-backend connection.
- Real Client IP: Ensure Nginx correctly identifies the real client IP address when behind a proxy. Use
set_real_ip_fromandreal_ip_headerdirectives in Nginx'shttpblock, typically settingreal_ip_header X-Forwarded-For;andset_real_ip_from <IP_range_of_LB_or_AG>;.
- Azure Front Door / CDN: For global deployments, Azure Front Door can act as a global load balancer, WAF, and CDN. It will sit in front of your Nginx deployments. Configure Nginx to trust Front Door's IPs and retrieve the real client IP.
- Managed Identities: If Nginx needs to interact with other Azure services (e.g., fetching secrets from Key Vault for Nginx configuration), use Managed Identities for secure, password-less authentication.
Monitoring and Logging
Effective access control isn't just about blocking requests; it's also about understanding what's happening.
- Nginx Access Logs: Nginx logs every request, including client IP, requested URL, status code, user agent, and referrer. Configure appropriate
log_formatandaccess_logdirectives in yourhttporserverblocks. - Nginx Error Logs: Capture errors, warnings, and debugging information.
error_logis crucial for troubleshooting configuration issues or unexpected access patterns. - Azure Monitor / Log Analytics: Forward Nginx access and error logs to Azure Log Analytics. This centralizes logs, enables powerful querying (KQL), visualization, and alerting. You can create alerts for:
- High numbers of
401 Unauthorizedor403 Forbiddenresponses (indicating brute-force attempts or misconfigurations). - Sudden spikes in
429 Too Many Requests(indicating rate limit hitting). - Access attempts from specific denied IPs or user agents.
- High numbers of
- Security Information and Event Management (SIEM): Integrate Log Analytics with Azure Sentinel or other SIEM solutions for advanced threat detection and security operations.
Securing the Nginx Configuration Itself
Beyond just configuring access rules, the overall security of your Nginx server and its configuration is paramount. A misconfigured Nginx can expose your application to vulnerabilities even with robust access controls in place.
- Principle of Least Privilege:
- Run Nginx as a non-privileged user (e.g.,
www-dataornginx). Theuserdirective innginx.confcontrols this. Only the master process needs root privileges to bind to privileged ports (like 80 and 443), while worker processes should run as the non-privileged user. - Ensure Nginx configuration files, SSL certificates, and
.htpasswdfiles have appropriate file permissions (e.g.,600for sensitive files,644for general config, owned by root or the Nginx user where appropriate).
- Run Nginx as a non-privileged user (e.g.,
- Disabling Unnecessary Modules:
- Nginx is built modularly. A "no plugin" approach ensures you're only using modules compiled into the default Nginx binary. However, if you are building Nginx from source (less common on Azure VMs), only include the modules you actually need. Less code means a smaller attack surface.
- Regular Updates:
- Keep Nginx and the underlying operating system (Azure VM) up to date. Security patches frequently address vulnerabilities that could be exploited. Use automated update mechanisms where appropriate, with testing.
- HTTPS Everywhere (SSL/TLS Configuration):
- As highlighted with Basic Authentication, SSL/TLS is non-negotiable. Always serve your applications over HTTPS.
- Strong Ciphers and Protocols: Configure Nginx to use strong SSL/TLS protocols (TLSv1.2, TLSv1.3) and modern cipher suites. Disable older, insecure protocols (SSLv2, SSLv3, TLSv1.0, TLSv1.1) and weak ciphers.
nginx ssl_protocols TLSv1.2 TLSv1.3; ssl_ciphers 'TLS_AES_256_GCM_SHA384:TLS_CHACHA20_POLY1305_SHA256:TLS_AES_128_GCM_SHA256:ECDHE-RSA-AES256-GCM-SHA384:ECDHE-RSA-AES128-GCM-SHA256'; ssl_prefer_server_ciphers on; - HSTS (HTTP Strict Transport Security): Implement HSTS (
add_header Strict-Transport-Security "max-age=31536000; includeSubDomains" always;) to force browsers to always connect via HTTPS, even if a user typeshttp://.
- Hardening HTTP Headers:
X-Frame-Options: Prevent clickjacking attacks (add_header X-Frame-Options SAMEORIGIN;).X-Content-Type-Options: Prevent MIME-sniffing (add_header X-Content-Type-Options nosniff;).X-XSS-Protection: Enable browser's XSS filter (add_header X-XSS-Protection "1; mode=block";).- Content Security Policy (CSP): While complex, a strict CSP can significantly mitigate XSS attacks.
- Disable Server Tokens:
- Hide the Nginx version number from error pages and headers to prevent attackers from knowing which specific vulnerabilities might apply (
server_tokens off;).
- Hide the Nginx version number from error pages and headers to prevent attackers from knowing which specific vulnerabilities might apply (
Considerations for Scalability and Maintainability
As your applications grow and traffic increases, managing Nginx configurations across multiple instances in Azure becomes critical. While native Nginx provides powerful tools for access control, the operational aspects of managing these configurations at scale require thought.
- Configuration Management Tools:
- For Azure VMs or container images, tools like Ansible, Chef, Puppet, or HashiCorp Nomad/Consul can automate the deployment and management of Nginx configuration files. This ensures consistency across instances and speeds up deployments.
- Azure Resource Manager (ARM) templates or Bicep can provision the underlying Azure infrastructure (VMs, NSGs, VNETs), and then these configuration management tools can take over the Nginx specifics.
- Automated Deployments (CI/CD Pipelines):
- Integrate Nginx configuration changes into your CI/CD pipelines (e.g., Azure DevOps Pipelines, GitHub Actions). This allows for automated testing of configurations (
nginx -t) and phased rollouts to minimize disruption. For AKS, this means managing your Ingress annotations and ConfigMaps through GitOps principles.
- Integrate Nginx configuration changes into your CI/CD pipelines (e.g., Azure DevOps Pipelines, GitHub Actions). This allows for automated testing of configurations (
- Centralized Authentication Systems:
- While Nginx can handle basic authentication and proxy to internal validation services (
auth_request), for large-scale enterprise applications, you'll likely integrate with centralized Identity Providers (IdPs) and authentication systems like Azure Active Directory (Azure AD), LDAP, OAuth 2.0, or OpenID Connect. Nginx typically acts as the gateway proxy, routing requests to these IdPs or an API gateway solution that handles the complex authentication handshake.
- While Nginx can handle basic authentication and proxy to internal validation services (
When Native Nginx Needs More: The Role of a Dedicated API Gateway
For simpler, static page access control, and robust traffic management, native Nginx directives are undeniably powerful and highly performant. However, as organizations grow, manage numerous dynamic services, or integrate advanced AI models, the complexity of managing access, granular authentication, sophisticated rate limiting per-user, detailed analytics, and comprehensive lifecycle management across a sprawling microservices architecture can quickly outstrip what simple Nginx configurations can gracefully handle. This is where dedicated API gateway platforms shine, offering a higher layer of abstraction and control.
Solutions like ApiPark emerge as crucial components in modern cloud architectures, particularly for the expanding realm of AI and microservices. APIPark is an open-source AI gateway and API management platform that excels at providing end-to-end lifecycle management for APIs. It offers sophisticated access control mechanisms far beyond what native Nginx can provide out-of-the-box, including:
- Quick Integration of 100+ AI Models: With unified management for authentication and cost tracking, something immensely complex to achieve with just Nginx.
- Unified API Format for AI Invocation: Standardizing request formats across diverse AI models, ensuring application stability regardless of model changes.
- Prompt Encapsulation into REST API: Allowing users to quickly create new APIs from AI models and custom prompts.
- End-to-End API Lifecycle Management: Going beyond basic proxying to cover design, publication, invocation, and decommission of APIs, managing traffic forwarding, load balancing, and versioning.
- Independent API and Access Permissions for Each Tenant: Enabling multi-tenancy with isolated applications, data, user configurations, and security policies while sharing underlying infrastructure.
- API Resource Access Requires Approval: Implementing subscription approval workflows to prevent unauthorized API calls and data breaches.
- Detailed API Call Logging and Powerful Data Analysis: Providing comprehensive insights into API usage, performance, and potential issues for proactive maintenance.
While Nginx provides the foundational web server and basic proxy capabilities, platforms like APIPark build upon this by offering a specialized and comprehensive solution for API governance. They effectively act as a central API gateway for both traditional RESTful services and the rapidly growing landscape of AI-driven api endpoints. APIPark can stand as a performant gateway for all your external api traffic, ensuring robust security, advanced traffic management, and sophisticated authentication mechanisms, complementing Nginx's role by handling the more intricate aspects of modern api infrastructure. For organizations scaling their AI and microservices initiatives on Azure, integrating a powerful platform like APIPark significantly streamlines management and enhances security beyond the scope of purely native Nginx.
Summary and Best Practices
Restricting page access on Azure Nginx instances without relying on external plugins is a highly effective way to enhance the security of your web applications and APIs. By leveraging Nginx's native directives, you gain granular control over who can access specific resources, using methods ranging from simple IP address filtering to advanced conditional logic and external validation via auth_request.
Key Takeaways:
- Layered Security: Always combine Nginx-level access controls with Azure's network security groups (NSGs) for a multi-layered defense.
- IP-Based Control: Use
allowanddenyfor restricting access to known, static IP addresses or CIDR blocks, ideal for admin panels and internal tools. - Basic Authentication: Employ
auth_basicfor simple user-level password protection, crucial to use over HTTPS. - Referer Checking: Utilize
valid_referersfor hotlinking prevention and basic content origin verification, but be aware of its limitations. - Rate Limiting: Implement
limit_reqandlimit_connto protect against DoS attacks, brute-force attempts, and general abuse of your api endpoints and services. - Conditional Logic with
map/geo: Use these powerful modules to create dynamic access rules based on user agents, custom headers, or geographic IP locations. - External Validation with
auth_request: For complex token-based authentication (API keys, JWTs), Nginx'sauth_requestcan delegate validation to an internal, dedicated service while maintaining Nginx's "no plugin" integrity. - Security Hardening: Always configure strong SSL/TLS, appropriate HTTP headers, and keep Nginx and its host OS updated.
- Monitor and Log: Integrate Nginx logs with Azure Monitor/Log Analytics to gain visibility into access patterns and potential security incidents.
- Scalability: For large-scale deployments and complex api management, consider how configuration management tools and dedicated API gateway solutions like ApiPark can augment Nginx's capabilities, providing advanced features for integrating and securing diverse services, including AI models.
By meticulously applying these native Nginx techniques, you can transform your Azure Nginx deployment into a robust and reliable gateway for your web applications and api services, ensuring that your valuable digital assets remain secure and accessible only to authorized entities. This detailed approach emphasizes control, efficiency, and a deep understanding of Nginx's powerful, built-in security features, ensuring your infrastructure is both performant and protected.
Frequently Asked Questions (FAQ)
1. Is it truly secure to rely solely on Nginx's native features for access control without any external plugins or modules? Yes, for many common scenarios, Nginx's native features provide a robust and highly performant foundation for access control. IP-based restrictions, HTTP Basic Auth, referrer checking, and rate limiting are all core Nginx capabilities designed for security. For more complex dynamic authentication (like JWT validation), Nginx's auth_request module (which is a core module, not an external plugin) allows you to delegate validation to an internal, custom authentication service, effectively achieving sophisticated control without modifying the Nginx binary itself. The key is to understand the strengths and limitations of each method and apply them judiciously, often in layers, complemented by Azure's network security features.
2. How do I manage Nginx configuration files across multiple Azure VMs for consistency and scalability? For multiple Azure VMs, manual configuration quickly becomes unmanageable. It's highly recommended to use configuration management tools. For Linux VMs, Ansible is a popular choice for declarative configuration. You can also leverage Azure Automation, which allows you to define configurations and apply them to multiple VMs. For containerized deployments (ACI or AKS), the Nginx configuration is part of the Docker image or managed via Kubernetes ConfigMaps and Ingress annotations, which are version-controlled and deployed through CI/CD pipelines.
3. What are the best practices for handling SSL/TLS with Nginx on Azure when restricting access? Always enforce HTTPS. For Nginx on Azure, this means: * Certificate Management: Obtain and manage SSL/TLS certificates (e.g., Let's Encrypt with Certbot, or Azure Key Vault integrated with Nginx). * Nginx Configuration: Configure Nginx with listen 443 ssl;, specify ssl_certificate and ssl_certificate_key. * Strong Protocols/Ciphers: Use ssl_protocols TLSv1.2 TLSv1.3; and a modern ssl_ciphers list. * HTTP to HTTPS Redirect: Add a server block to redirect all HTTP (port 80) traffic to HTTPS (port 443) to prevent unencrypted access. * HSTS: Implement HTTP Strict Transport Security (add_header Strict-Transport-Security "max-age=31536000; includeSubDomains" always;) to force browsers to always use HTTPS. Using Azure Application Gateway in front of Nginx can also offload SSL termination, simplifying Nginx's configuration, but the connection from the Application Gateway to Nginx should still be secured.
4. How can I ensure that IP-based restrictions are accurate when Nginx is behind an Azure Load Balancer or Application Gateway? When Nginx is behind an Azure Load Balancer or Application Gateway, $remote_addr will show the IP address of the load balancer/gateway, not the original client. To get the real client IP, you need to configure Nginx to read the X-Forwarded-For or X-Real-IP header set by the proxy. In your Nginx http block, add: nginx set_real_ip_from <Azure_Load_Balancer_or_Application_Gateway_IP_range_or_CIDR>; real_ip_header X-Forwarded-For; Replace <Azure_Load_Balancer_or_Application_Gateway_IP_range_or_CIDR> with the appropriate IP ranges (e.g., 168.63.129.16 for Azure internal infrastructure, or specific ranges for your Application Gateway's frontend IPs). This ensures allow/deny directives, rate limiting, and geo-blocking correctly apply to the actual client's IP.
5. When should I consider a full API Gateway solution like APIPark over native Nginx access control for my Azure deployments? Native Nginx is excellent for foundational web server tasks, static content serving, basic access control, and as a performant reverse proxy or gateway. However, for complex, large-scale scenarios involving many dynamic api endpoints, microservices, multiple development teams, and especially AI models, a dedicated API gateway like ApiPark offers significant advantages. Consider APIPark when you need: * Comprehensive API Lifecycle Management: Design, publication, versioning, and retirement beyond simple proxying. * Advanced Authentication/Authorization: Centralized user management, OAuth/OpenID Connect integration, API key management, and fine-grained access policies per tenant/user. * AI Model Integration: Unified access, authentication, and cost tracking for 100+ AI models. * Developer Portal: Self-service for API discovery, documentation, and subscription for consumers. * Advanced Analytics & Monitoring: Detailed insights into API usage, performance, and health. * Monetization & Quota Management: Enforcing usage limits and potentially billing for API consumption. * Multi-tenancy: Isolated environments for different teams or customers. While Nginx can be a component within an API Gateway architecture, a specialized platform like APIPark handles the higher-level complexities of modern API governance.
🚀You can securely and efficiently call the OpenAI API on APIPark in just two steps:
Step 1: Deploy the APIPark AI gateway in 5 minutes.
APIPark is developed based on Golang, offering strong product performance and low development and maintenance costs. You can deploy APIPark with a single command line.
curl -sSO https://download.apipark.com/install/quick-start.sh; bash quick-start.sh

In my experience, you can see the successful deployment interface within 5 to 10 minutes. Then, you can log in to APIPark using your account.

Step 2: Call the OpenAI API.