Master Keycloak Self Registration User Flow


The digital landscape of today is characterized by an ever-increasing demand for seamless user experiences coupled with robust security. For applications, services, and entire platforms, the initial point of interaction—user registration—is not merely a formality but a critical gateway that defines user engagement, operational efficiency, and security posture. In this complex environment, Identity and Access Management (IAM) solutions have become indispensable, and Keycloak stands out as a powerful, open-source player, empowering organizations to manage user identities with unparalleled flexibility. Among its myriad features, the self-registration user flow holds particular significance, serving as the primary mechanism for users to onboard themselves onto a system.
This comprehensive guide delves into the intricacies of mastering Keycloak's self-registration user flow. We will journey from the foundational concepts of Keycloak and its architecture, through the initial setup and configuration of self-registration, to advanced customization techniques that tailor the experience to specific business needs. Furthermore, we will explore integration patterns with external systems, discuss critical security considerations, and examine how effective self-registration contributes to the creation of a truly robust and scalable Open Platform. By the end of this exploration, developers, system administrators, and architects will possess a profound understanding of how to leverage Keycloak to build a secure, user-friendly, and highly adaptable registration process that forms the bedrock of any successful digital offering.
Chapter 1: Understanding Keycloak and Its Core Identity Concepts
Before embarking on the practicalities of configuring self-registration, it is essential to establish a firm understanding of Keycloak itself and the fundamental identity concepts it employs. This groundwork will illuminate why Keycloak is such a formidable choice for identity management and how its architecture supports flexible user onboarding processes.
What is Keycloak? The Foundation of Modern IAM
Keycloak is an open-source Identity and Access Management (IAM) solution developed by Red Hat. It provides Single Sign-On (SSO) capabilities for web applications and RESTful web services, handling user authentication and authorization across multiple applications and services from a central point. Built upon industry-standard protocols, Keycloak is designed for the modern enterprise, offering a rich set of features that address contemporary security challenges.
At its core, Keycloak implements several crucial standards: * OpenID Connect (OIDC): An identity layer built on top of the OAuth 2.0 framework, enabling clients to verify the identity of the end-user based on the authentication performed by an authorization server, as well as to obtain basic profile information about the end-user in an interoperable and REST-like manner. This is the primary protocol Keycloak uses for web and mobile application logins. * OAuth 2.0: An authorization framework that enables an application to obtain limited access to a user's protected resources on an HTTP service, without exposing the user's credentials to the application. Keycloak acts as the authorization server, issuing access tokens. * SAML 2.0 (Security Assertion Markup Language): An XML-based standard for exchanging authentication and authorization data between an identity provider (IdP) and a service provider (SP). Keycloak supports SAML 2.0 for enterprise applications that still rely on this older but widely adopted protocol.
Keycloak abstracts away the complexities of these protocols, providing a user-friendly administration console and a developer-centric API that allows seamless integration with virtually any application stack. This abstraction is vital for ensuring that identity management remains a robust foundation rather than a development bottleneck.
Keycloak Architecture Overview: Realms, Users, Clients, Roles, and Groups
To effectively manage identities and their interactions, Keycloak organizes its components within a logical structure. Understanding this hierarchy is paramount for configuring self-registration efficiently.
- Realms: The highest level of organization in Keycloak. A realm manages a set of users, credentials, roles, and client applications. Each realm is entirely isolated from other realms, meaning users in one realm cannot authenticate with applications in another realm unless explicitly configured for cross-realm trust. This isolation makes realms ideal for multi-tenant environments or for separating production, staging, and development environments. For self-registration, all configurations – from enabling the feature to theme customization and user profile settings – are scoped within a specific realm.
- Users: The central entities within a realm. A user represents an individual who can authenticate with Keycloak. Each user has attributes (e.g., username, email, first name, last name), credentials (password, OTP), and can be assigned roles and grouped for easier management. The self-registration process is fundamentally about creating new user entities within a chosen realm.
- Clients: Applications or services that can request authentication of a user or an access token from Keycloak. Clients can be public (like web browsers or mobile apps) or confidential (like server-side applications that can securely store a client secret). When a user self-registers, they are typically doing so to gain access to one or more client applications within that realm.
- Roles: A role defines a set of permissions that can be granted to users. Keycloak distinguishes between Realm Roles (global within a realm) and Client Roles (specific to a particular client). Roles are crucial for authorization, determining what a user can or cannot do once authenticated. While not directly part of the registration form, roles can be automatically assigned to newly registered users via custom SPIs (Service Provider Interfaces).
- Groups: A collection of users. Groups simplify user management by allowing administrators to assign roles to an entire group rather than to individual users. New users can be assigned to a default group upon registration, which can inherit specific roles or attributes.
This structured approach ensures that identity management is both flexible and secure, allowing administrators to precisely control the environment into which new users self-register.
Why Self-Registration Matters: User Experience, Scalability, and Reduced Overhead
Self-registration is more than just a convenience feature; it is a strategic imperative for modern digital platforms. Its benefits extend across user experience, operational scalability, and administrative efficiency.
- Enhanced User Experience (UX): In today's instant-gratification culture, friction in the onboarding process is a major deterrent. Self-registration empowers users to create accounts on their terms, at their pace, without waiting for administrative approval. This autonomy drastically improves the initial user experience, making the platform more inviting and accessible. A smooth registration flow sets a positive tone for the entire user journey.
- Operational Scalability: As an application or service grows, manually creating and managing user accounts becomes an insurmountable task. Self-registration automates this process, allowing the user base to scale organically without placing an undue burden on IT or administrative staff. This automation is a cornerstone of building a scalable Open Platform that can accommodate a rapidly expanding user base without compromising performance or security.
- Reduced Administrative Overhead: By shifting the responsibility of initial account creation to the user, organizations significantly reduce the administrative workload associated with user provisioning. This frees up valuable resources, allowing IT personnel to focus on more complex security tasks, system maintenance, and strategic initiatives rather than repetitive data entry. Keycloak's robust self-registration capabilities mean fewer support tickets for account creation issues and a more efficient operational model.
The ability to offer self-registration, especially within an Open Platform context where many different applications and services might need access to user identities, is a testament to the power and flexibility of a system like Keycloak. It's about enabling growth while maintaining control and security.
The Foundational Role of Realms in Self-Registration
As previously mentioned, realms are the isolated containers within Keycloak. For self-registration, the realm dictates every aspect of the process. When you enable self-registration, you enable it for a specific realm. All users created through this process belong to that realm. All associated configurations—such as email verification requirements, password policies, custom registration forms, and linked identity providers—are realm-specific.
This granular control at the realm level is incredibly powerful. An organization can host multiple applications, each within its own Keycloak realm, perhaps with different branding, user attributes, and registration policies, all while leveraging the same Keycloak instance. For instance, a B2C application might have a very open self-registration policy with social login options, while a B2B Open Platform offering might require stricter email verification and custom approval flows, each residing in its dedicated realm within Keycloak. This architectural choice is fundamental to Keycloak's multi-tenancy capabilities and its adaptability to diverse business requirements.
Chapter 2: Initial Setup of Keycloak for Self-Registration
Getting Keycloak up and running and enabling its self-registration feature is the first practical step. This chapter will walk through the essential stages of deploying Keycloak and configuring its basic self-registration settings via the administrative console.
Deployment Options: A Quick Overview
While a detailed deployment guide is beyond the scope of this article, it's worth noting that Keycloak offers various deployment options to suit different environments and scales:
- Docker: The simplest and most popular way to get Keycloak running quickly for development and testing. A single
docker runcommand can launch an instance. - Standalone Server: Deploying Keycloak as a standalone application on a bare metal server or VM, typically using the WildFly application server distribution provided by Keycloak. This offers fine-grained control over the environment.
- Kubernetes/OpenShift: For production-grade, highly available, and scalable deployments, Keycloak can be deployed on Kubernetes using official operators or Helm charts. This is often the preferred choice for enterprise-level Open Platform architectures.
Regardless of the deployment method, the administrative interface remains consistent, allowing for uniform configuration across environments.
Accessing the Admin Console
Once Keycloak is running, you can access its administrative console, typically at http://<keycloak-host>:<port>/auth/admin/. You will need to log in with an administrator account, which is usually created during the initial setup or via environment variables for Docker deployments. The admin console is the central hub for managing all aspects of Keycloak, including realms, users, clients, and, critically, self-registration settings.
Creating a New Realm (If Not Using master)
By default, Keycloak comes with a master realm. While it's possible to configure self-registration within the master realm, it's generally considered a best practice to create a new, dedicated realm for your applications and users. The master realm should ideally be reserved for Keycloak administration and managed users.
To create a new realm: 1. Log in to the Keycloak Admin Console. 2. In the top-left corner, click the "Master" dropdown (or whatever the current realm is). 3. Click "Add realm." 4. Enter a descriptive name for your new realm (e.g., my-application-realm, customer-portal). 5. Click "Create."
Once created, you should switch to this new realm using the dropdown to ensure all subsequent configurations apply to your intended environment.
Enabling Self-Registration: Navigating to Realm Settings -> Login
With your realm selected, enabling self-registration is a straightforward process within the Admin Console:
- In the left-hand navigation menu, click "Realm Settings."
- Select the "Login" tab.
- Look for the "User registration" switch. Toggle it to "On."
- Click "Save."
Once saved, a "Register" link should appear on your Keycloak login page for that realm, allowing users to initiate the self-registration process. This simple act fundamentally transforms your identity management system, opening it up to new users without manual intervention.
Basic Configuration Options for Self-Registration
Beyond merely enabling self-registration, the "Login" tab in Realm Settings offers several critical configurations that impact the user experience and security posture of your registration flow. These settings determine the initial friction a user encounters and the verification steps required.
- Require Email Verification: This is arguably one of the most important security features for self-registration. When enabled, users must verify their email address by clicking a link in an email sent to them after registration. Until verification, their account may be considered unverified or even disabled, preventing them from logging in. This mitigates spam accounts and ensures that user accounts are linked to legitimate email addresses. It's a fundamental step in building a trustworthy Open Platform.
- Verify Email: This setting specifically requires existing users whose email addresses have not been verified to do so upon their next login. It's a proactive measure to ensure data quality and security for your user base.
- User Managed Access (UMA): While not directly tied to the creation of a self-registered user, UMA allows users to manage their own resources and authorize others to access them. This is a more advanced authorization concept that can come into play post-registration, enabling users to control access to data they contribute to the platform.
- Login with Email: Allows users to log in using their email address instead of their username. This can significantly improve user experience, as email addresses are often easier to remember than specific usernames.
- Edit Username: Determines whether users can change their username after registration. For many systems, usernames are immutable identifiers, so this is often left off.
- Remember Me: Enables a "Remember Me" checkbox on the login page, allowing users to stay logged in across browser sessions for a defined period.
- Login Theme: Allows you to select a custom theme for the login, registration, and account management pages. We will delve deeper into theme customization in a later chapter.
Careful consideration of these basic settings is crucial for balancing user convenience with the necessary security requirements for your application or Open Platform.
Default Registration Form Fields
Out of the box, Keycloak's self-registration form typically requests basic user information:
- Username: A unique identifier for the user within the realm.
- Email: The user's email address, often used for verification and communication.
- First Name: The user's given name.
- Last Name: The user's family name.
- Password: The user's chosen password.
- Password Confirmation: To ensure the password was entered correctly.
These fields provide a solid starting point for most applications. However, many real-world scenarios require additional information during registration. Keycloak's flexibility, through its User Profile SPI and theme customization, allows for extensive modification of these default fields, which we will explore in detail later.
Chapter 3: Deep Dive into the Self-Registration User Flow
Understanding the mechanics of self-registration goes beyond mere configuration; it involves visualizing the entire journey a user undertakes, from their initial decision to create an account to their successful first login. This chapter dissects that journey, highlighting key stages, potential pitfalls, and how Keycloak orchestrates each step.
The User Journey: From Landing Page to Successful Account Creation
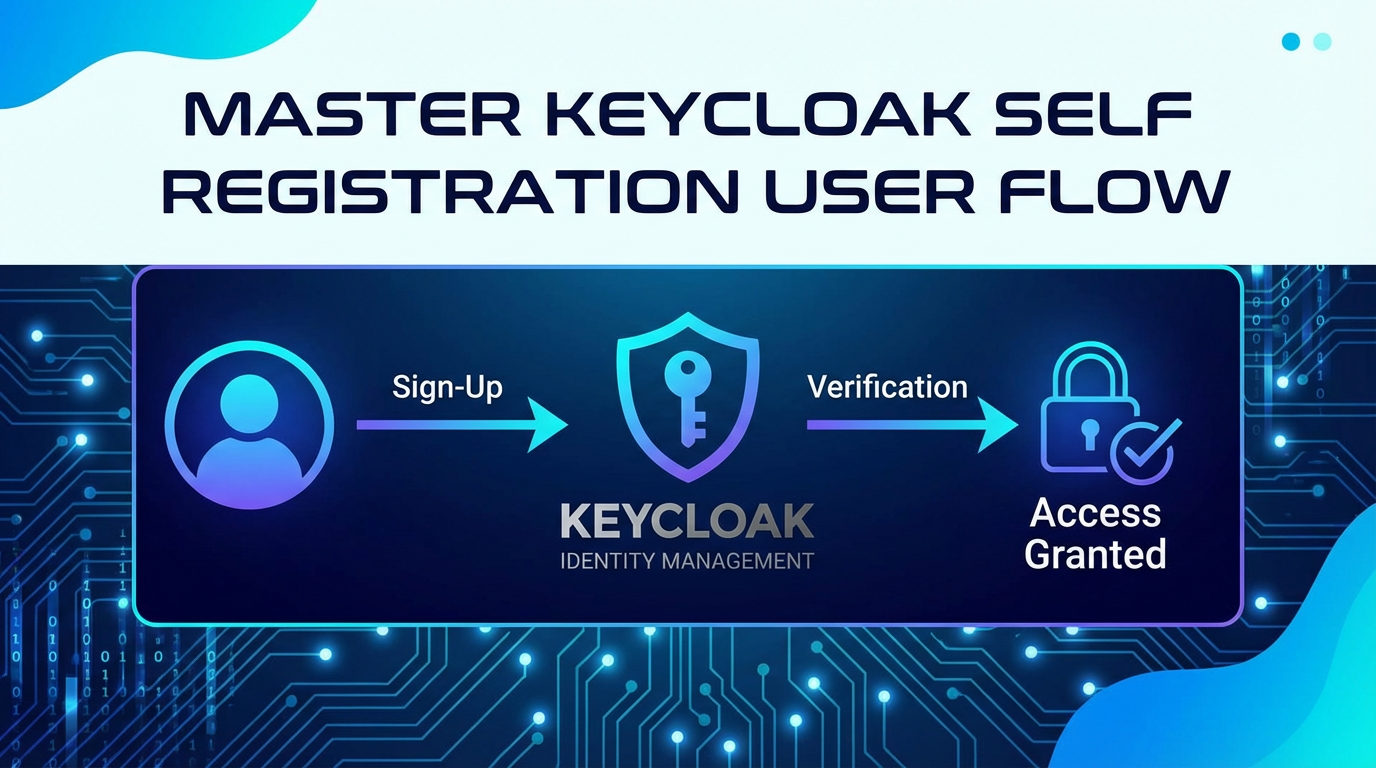
The self-registration user flow in Keycloak is a multi-step process designed to guide the user through account creation while enforcing necessary security measures.
- Initiation: The journey typically begins when a user navigates to an application's login page and clicks the "Register" or "Sign Up" link, which redirects them to the Keycloak registration form. This form is rendered by Keycloak's internal FreeMarker templates.
- Information Entry: The user is presented with the registration form, requesting fields like username, email, first name, last name, and password. The user fills in these details, adhering to any visible password policy requirements.
- Form Submission and Validation: Upon submission, Keycloak performs server-side validation on the provided data. This includes checking for unique usernames/emails, password complexity, and data type correctness. If validation fails, the user is typically redirected back to the form with error messages indicating what needs correction.
- Account Creation: If all validation passes, Keycloak creates a new user entity in the database for the current realm.
- Email Verification (If Enabled):
- If "Require Email Verification" is enabled, Keycloak sends an email containing a unique verification link to the email address provided by the user.
- The user is then typically presented with a message indicating that an email has been sent and they need to verify their account.
- The user accesses their email, clicks the verification link, which sends them back to Keycloak.
- Keycloak verifies the token in the link, marks the user's email as verified, and often redirects them to a success page or the application.
- Account Activation/First Login: Once the account is created and, if required, email is verified, the user can then log in to the application using their new credentials. For some applications, the first login might trigger additional profile setup or terms and conditions acceptance.
Each of these steps is crucial and contributes to the overall security and usability of the Open Platform. A smooth flow minimizes user drop-off and ensures that only legitimate, verified users gain access.
Email Verification Process: Importance, Configuration, Troubleshooting
Email verification is a cornerstone of secure self-registration. It serves multiple vital purposes:
- Identity Confirmation: It confirms that the user actually owns the email address they provided, reducing the likelihood of fake accounts.
- Account Recovery: Ensures that password reset emails can reach the legitimate user.
- Communication: Guarantees that the organization can communicate with the user via their correct email address.
- Mitigation of Abuse: Deters the creation of numerous spam accounts, which can be a significant problem for any Open Platform.
Configuration: As discussed, email verification is enabled via the "Require Email Verification" toggle in "Realm Settings" -> "Login" tab. Beyond that, Keycloak needs to be configured to send emails. This involves:
- SMTP Server Settings: In "Realm Settings" -> "Email" tab, configure your SMTP server details (host, port, username, password, encryption type). Keycloak uses this to dispatch all transactional emails, including verification, password reset, and account updates.
- Email Templates: Keycloak provides default email templates for various actions (e.g.,
email-verification.ftl,reset-password.ftl). These are customizable and reside within the Keycloak theme structure. You can modify these to match your branding and messaging.
Troubleshooting: If email verification fails, common issues include: * Incorrect SMTP Settings: Double-check host, port, credentials, and security protocol (SSL/TLS). * Firewall Rules: Ensure Keycloak's server can reach the SMTP server's port. * Email Queueing Issues: Keycloak logs can indicate if emails are being queued or if there are errors during sending. * Spam Filters: Verification emails might be landing in users' spam folders. Advise users to check these. * Sender Address Configuration: Ensure the "From" email address is valid and whitelisted if necessary.
Password Policies: Setting Strong Password Requirements
Password policies are non-negotiable for security. Keycloak provides a flexible mechanism to enforce robust password requirements for all users, including those self-registering.
To configure password policies: 1. In the left-hand navigation, navigate to "Realm Settings." 2. Select the "Security Defenses" tab. 3. Scroll down to "Password Policy."
Here you can add multiple constraints: * Minimum Length: The minimum number of characters required. * Uppercase Characters: Minimum number of uppercase letters. * Lowercase Characters: Minimum number of lowercase letters. * Digits: Minimum number of digits. * Special Characters: Minimum number of special characters. * Not Username: Prevents users from using their username in the password. * Password History: Prevents reuse of previous passwords (e.g., remembers the last 5 passwords). * Periodical Password Change: Forces users to change their password after a certain period.
Importance: * Brute-Force Attack Resistance: Strong, complex passwords are far more difficult for attackers to guess or crack. * Credential Stuffing Mitigation: Even if one Open Platform is breached, strong unique passwords prevent attackers from using the same credentials on other platforms. * Compliance: Many regulatory frameworks (e.g., GDPR, HIPAA, PCI DSS) mandate specific password policies.
It's crucial to strike a balance between strong security and user memorability. Overly complex policies can lead to users writing down passwords or using predictable patterns. Keycloak’s flexibility allows administrators to define a policy that meets both security requirements and user usability.
First Login Experience: Post-Registration Actions, Profile Updates
The moment a user successfully logs in after self-registration marks a new phase in their journey. For some applications, the initial login might trigger further actions:
- Terms and Conditions Acceptance: Many applications require users to accept a legal agreement. This can be enforced in Keycloak by adding a custom "Terms and Conditions" authenticator to the authentication flow.
- Mandatory Profile Updates: If certain critical user attributes were not collected during initial registration (or if custom attributes become mandatory post-registration), Keycloak can be configured to prompt the user to update their profile upon first login. This is done through the "Update Profile" required action.
- Role/Group Assignment: While often automated via SPIs, administrators might manually assign specific roles or add users to groups after their first login, granting them access to different functionalities within the application.
Designing a smooth and intuitive first login experience is just as important as the registration itself. It should clearly guide the user and ensure they have all necessary permissions and information to begin using the Open Platform effectively.
Error Handling and User Feedback During Registration
Effective error handling is paramount for a positive user experience during self-registration. When a user encounters an issue (e.g., invalid email format, password not meeting policy, username already taken), Keycloak provides clear, concise feedback.
- In-Form Validation: Keycloak's default templates often include client-side JavaScript for immediate feedback on basic field validation (e.g., "Email is invalid").
- Server-Side Error Messages: If server-side validation fails (e.g., duplicate username), Keycloak redirects the user back to the registration form, displaying an error message at the top or next to the offending field. These messages are localized and descriptive.
- Consistency: Consistent error messaging across the registration flow reduces user frustration. Customizing these messages to align with your brand's voice can further enhance the experience.
Thoughtful error handling transforms potential user abandonment into opportunities for correction, guiding the user towards successful account creation.
Chapter 4: Customizing the Self-Registration Experience
While Keycloak's out-of-the-box self-registration is functional, most organizations require a tailored experience that aligns with their brand, collects specific user data, and integrates seamlessly into their broader application ecosystem. Keycloak offers extensive customization capabilities through themes and Service Provider Interfaces (SPIs).
Theme Customization: Branding and UI Overhaul
Keycloak's look and feel are determined by themes. Customizing a theme allows you to brand the login, registration, account management, and email pages to match your application's identity. This is vital for maintaining a consistent user experience and trust.
Default Themes vs. Custom Themes
Keycloak ships with several default themes (e.g., keycloak, base, rh-sso). While these are functional, they rarely meet specific branding requirements. Creating a custom theme allows for complete control over the UI.
Creating a Custom Theme: Files and Directory Structure
A Keycloak theme is a directory structure containing Freemarker templates, CSS files, images, and JavaScript files.
- Locate Themes Directory: Themes are stored in the Keycloak installation directory, typically under
themes/. - Create Custom Theme Folder: Create a new directory for your theme, e.g.,
themes/my-custom-theme/. - Define Theme Types: Inside your custom theme folder, you'll create subdirectories for different theme types. For self-registration, the primary type is
login:themes/ ├── my-custom-theme/ │ ├── login/ │ │ ├── theme.properties │ │ ├── resources/ │ │ │ ├── css/ │ │ │ ├── img/ │ │ │ └── js/ │ │ └── templates/ │ │ ├── login.ftl │ │ ├── register.ftl │ │ ├── info.ftl │ │ └── ... (other login-related templates) │ └── account/ (for account management console) │ ├── theme.properties │ └── templates/ │ └── email/ (for email templates) │ ├── theme.properties │ └── templates/ theme.properties: This file defines the theme's name, parent theme (e.g.,parent=keycloakorparent=base), and any custom properties. Inheriting frombaseis often recommended as it provides minimal styling, allowing for more extensive customization without fighting Keycloak's default CSS.properties # themes/my-custom-theme/login/theme.properties parent=keycloak name=My Custom Login Theme styles=resources/css/custom.css scripts=resources/js/custom.js- Copying Default Templates: To customize
register.ftl,login.ftl, orinfo.ftl, copy them from the parent theme (e.g.,themes/keycloak/login/templates/) into yourthemes/my-custom-theme/login/templates/directory.
Leveraging FreeMarker Templates for UI Modifications
Keycloak uses FreeMarker Template Language (FTL) for rendering its UI. These templates are highly flexible:
register.ftl: This is the most crucial template for self-registration. You can modify its HTML structure, add new input fields, rearrange existing ones, or change the text.login.ftl: For the main login page, where the "Register" link is typically found.info.ftl: Used for displaying informational messages, such as after successful email verification or when an account requires approval.
Example Modification in register.ftl: You can add a custom div for branding, change the order of fields, or even integrate components from your frontend library. Keycloak provides a rich set of FreeMarker variables (e.g., kc.messages, kc.login, kc.realm) that expose realm settings, localized messages, and form data, making it possible to create dynamic content.
Styling with CSS and JavaScript
- CSS: Place your custom CSS files in
themes/my-custom-theme/login/resources/css/. Reference them intheme.propertiesusing thestylesproperty. This allows you to completely restyle Keycloak's forms to match your brand guidelines. - JavaScript: Place custom JavaScript files in
themes/my-custom-theme/login/resources/js/. Reference them intheme.propertiesusing thescriptsproperty. JavaScript can be used for client-side validation, dynamic form interactions, or integrating with external libraries (e.g., CAPTCHA widget loading).
After making changes, remember to refresh the Keycloak server cache (or restart if in development mode) and select your custom theme in "Realm Settings" -> "Login" tab -> "Login Theme."
Adding Custom User Attributes
Beyond the default fields (username, email, first name, last name), many applications require additional user information during registration, such as phone number, organization, or consent to specific terms. Keycloak supports custom user attributes.
User Profile SPI and Its Role
The User Profile SPI (Service Provider Interface) is a powerful extension point in Keycloak that allows you to define, manage, and validate custom attributes for users. It provides a structured way to extend the user model without directly modifying Keycloak's core database schema.
Configuration in the Admin Console (Realm Settings -> User Profile)
- Navigate to "Realm Settings" -> "User Profile."
- In the "Attributes" tab, you'll see the default attributes. Click "Add attribute."
- Attribute Name: The internal key for the attribute (e.g.,
phoneNumber,organization). - Display Name: The label shown to the user (e.g., "Phone Number").
- Validators: Apply validation rules (e.g.,
phone-number,pattern,length). - Annotations: Crucial for controlling visibility and editability:
UI_ORDER: Order of appearance on the form.UI_READ_ONLY: Prevents users from editing.UI_REQUIRED: Makes the field mandatory.UI_GROUP: Groups attributes together.UI_HIDDEN: Hides the attribute from the UI but keeps it in the user profile.
Making Attributes Mandatory/Optional, Editable
Using the "Annotations" section of the User Profile configuration, you can precisely control each custom attribute: * Mandatory: Add the required validator and mark UI_REQUIRED=true to ensure the user must provide a value. * Optional: Simply omit the UI_REQUIRED annotation. * Editable by User: By default, if an attribute is displayed, it's editable. You can make it read-only for users by setting UI_READ_ONLY=true.
Impact on the Registration Form
Once configured in the User Profile, Keycloak automatically adds these custom attributes to the self-registration form (register.ftl) if they are marked as visible and not read-only. This dynamic rendering simplifies the process of extending the form.
Customizing the Registration Form
While the User Profile SPI adds fields, you might need finer control over the HTML rendering, field placement, or surrounding text. This requires direct modification of register.ftl.
Modifying register.ftl to Include Custom Attributes
To integrate custom attributes visually and functionally:
- Retrieve Attribute Data: Keycloak passes a
kc.profile.attributesobject to the FreeMarker template, containing all configured User Profile attributes. You can iterate over this or access specific attributes by name. - Render Input Fields: For each custom attribute you want to display, create appropriate HTML input elements (text, number, checkbox, etc.) within
register.ftl.html <div class="form-group"> <div class="${properties.kcFormGroupClass!}"> <label for="user.attributes.phoneNumber" class="${properties.kcLabelClass!}"> ${msg("phoneNumber")}</label> <div class="${properties.kcInputWrapperClass!}"> <input type="text" id="user.attributes.phoneNumber" class="${properties.kcInputClass!}" name="user.attributes.phoneNumber" value="${(register.formData.attributes.phoneNumber!'')}" pattern="[0-9]{3}[0-9]{3}[0-9]{4}" title="Please enter a 10-digit phone number"/techblog/en/> </div> </div> </div>Notice thename="user.attributes.phoneNumber"pattern. Keycloak expects custom attribute values to be submitted underuser.attributes.<attributeName>. Thevalueattribute ensures that if the form submission fails and the user is redirected, their previous input is retained. - Localization: Use
msg("attributeName")to display localized labels for your custom attributes, leveraging Keycloak's message bundles (messages.propertiesfiles in your theme).
Frontend Validation for Custom Fields
While Keycloak's User Profile SPI provides server-side validation, adding client-side (JavaScript) validation in your custom.js can offer immediate feedback to the user, improving the experience. This prevents unnecessary round trips to the server for common input errors. You can use standard HTML5 pattern attributes, or more complex JavaScript validation libraries if needed.
Customizing Email Templates
Email templates are critical for communications like account verification, password resets, and administrative notifications. Keycloak allows full customization of these templates.
- Location: Email templates are found in
themes/my-custom-theme/email/templates/. Common ones includeemail-verification.ftl,password-reset.ftl,user-created.ftl. - FreeMarker Variables: Keycloak passes various context variables to email templates, such as
user(details about the user),realm(realm information),link(verification/reset link), andkc.realm.displayName. You can use these to personalize emails. - Branding: Embed your organization's logo, adjust colors, fonts, and layout to ensure emails are consistent with your overall brand identity.
- Localization: Emails are also localized using
messages.propertiesfiles within the email theme.
By carefully customizing themes, user attributes, and email templates, organizations can craft a self-registration experience that is not only functional but also deeply integrated with their brand and business requirements, forming a welcoming entry point to their Open Platform.
APIPark is a high-performance AI gateway that allows you to securely access the most comprehensive LLM APIs globally on the APIPark platform, including OpenAI, Anthropic, Mistral, Llama2, Google Gemini, and more.Try APIPark now! 👇👇👇
Chapter 5: Advanced Scenarios and Integration Patterns
Beyond basic setup and visual customization, Keycloak's extensibility allows for highly sophisticated self-registration workflows and seamless integration with other systems. This chapter explores these advanced capabilities, including Keycloak's powerful SPIs and its role in an Open Platform facilitated by an API Gateway.
Custom Registration Logic with SPIs (Service Provider Interfaces)
Keycloak's Service Provider Interface (SPI) mechanism is its most powerful extensibility feature. SPIs allow developers to extend or replace core Keycloak functionality without modifying the Keycloak source code itself. For self-registration, SPIs enable complex logic such as custom validation, post-registration actions, or multi-step approval processes.
Overview of Keycloak SPIs
Keycloak provides a wide array of SPIs for various components: * Authenticators: Customize authentication flows (e.g., add new steps like CAPTCHA, MFA, or approval). * Event Listeners: React to events within Keycloak (e.g., user creation, login, password change). * User Storage Providers: Integrate with external user directories. * Required Actions: Define actions users must perform before being granted full access (e.g., update profile, verify email). * And many more...
Developing an SPI involves writing Java code, packaging it as a JAR, and deploying it to the Keycloak server.
Implementing a Custom EventListenerProvider for Post-Registration Hooks
A common requirement is to trigger external actions immediately after a user successfully registers. This could be adding the user to an external CRM, sending a welcome message via a notification service, or provisioning resources in another system. The EventListenerProvider SPI is perfect for this.
How it works: 1. Develop EventListenerProvider: Create a Java class that implements org.keycloak.events.EventListenerProvider. 2. Listen for Events: Override the onEvent method to listen for specific Keycloak events, such as EventType.REGISTER. 3. Execute Logic: Inside the onEvent method, when a REGISTER event is detected, retrieve user details from the event and perform your custom logic. This logic might involve making an API call to an external service. 4. Deploy: Package your provider as a JAR and place it in the Keycloak providers directory. Enable it in "Realm Settings" -> "Events" tab -> "Event Listeners."
Example Use Case: After a user self-registers, the EventListenerProvider could make an API call to a user management service to add the user to a default group or assign initial permissions within an external application. This ensures that the user is fully provisioned across the entire Open Platform ecosystem.
Developing a Custom Authenticator for Additional Steps in the Flow
Sometimes, the self-registration flow needs to incorporate additional interactive steps beyond the standard form and email verification. Examples include: * CAPTCHA Challenge: To prevent bot registrations. * Admin Approval: A manual review step for each new registration. * Custom Data Collection: A multi-page registration form.
This can be achieved by creating a custom Authenticator SPI.
How it works: 1. Develop Authenticator: Create a Java class implementing org.keycloak.authentication.Authenticator. 2. Define Flow: Override methods like authenticate, action, requiredActions to define the steps of your custom authentication/registration flow. 3. Integration: Create a new "Flow" in Keycloak's "Authentication" section, and add your custom authenticator as a step in the "Registration Flow." 4. Templating: You might need custom FreeMarker templates for your authenticator's UI.
For instance, a "Registration Approval" authenticator could present a page to the user informing them their account is pending approval. When an administrator approves the account in an external system (triggered perhaps by an EventListenerProvider), that system could use the Keycloak Admin REST API to update the user's status, allowing them to proceed with login.
Social Login Integration
Keycloak simplifies the integration of social identity providers (IdPs) like Google, GitHub, Facebook, and many others. This allows users to self-register and log in using their existing social accounts, significantly reducing friction and improving the user experience.
Configuration: 1. In the Admin Console, navigate to "Identity Providers." 2. Choose an identity provider (e.g., Google). 3. Configure the provider with the client ID and client secret obtained from the social IdP's developer console. 4. Enable the provider for your realm.
Once configured, the social login buttons will appear on the Keycloak login/registration page, offering an alternative to traditional username/password registration. Keycloak handles the federation, mapping social provider data to its internal user model, and can even link social accounts to existing Keycloak accounts.
Integrating with External Systems
Keycloak rarely operates in isolation. It forms a central component of an identity architecture that often needs to synchronize user data with various external systems.
- User Storage SPI: For existing user directories (LDAP, Active Directory), the User Storage SPI allows Keycloak to delegate authentication and query user attributes from these external sources.
- Keycloak Admin REST API: Keycloak exposes a comprehensive RESTful API for programmatic management of users, realms, clients, and other entities. External systems can use this API to:
- Create, update, or delete users.
- Assign roles and groups.
- Initiate password resets.
- Query user details. This API is crucial for automating administrative tasks and keeping Keycloak in sync with other systems like CRMs, HR systems, or custom application backends.
- Webhooks: While Keycloak doesn't have native webhook support for every event, an
EventListenerProvidercan easily be implemented to act as a webhook dispatcher, sending POST requests to external endpoints whenever specific events occur (e.g., user registration, profile update).
These integration points are essential for building a truly interconnected and responsive Open Platform where identity management is fluid and synchronized across the enterprise.
API Integration with an API Gateway: Leveraging APIPark for Security and Management
In a modern microservices architecture or a complex Open Platform, direct exposure of backend APIs, including Keycloak's Admin REST API and OIDC endpoints, is a significant security risk. This is where an API Gateway becomes indispensable. An API Gateway acts as a single entry point for all API calls, providing a layer of security, routing, traffic management, and observability.
An API Gateway sits in front of Keycloak, managing access to its identity-related APIs and ensuring they are consumed securely and efficiently by client applications and other backend services. This is particularly relevant when building an Open Platform where various components, both internal and external, need to interact with user identity data.
This is precisely where a solution like APIPark comes into play. APIPark is an Open Source AI Gateway & API Management Platform that provides comprehensive capabilities for managing, integrating, and deploying a wide array of services, including RESTful APIs like those exposed by Keycloak.
How APIPark enhances Keycloak's self-registration and overall API management:
- Unified Authentication and Authorization: While Keycloak handles user authentication, APIPark can manage the authentication and authorization for the clients consuming Keycloak's APIs. It provides a unified management system for API consumers, ensuring that only authorized applications can access Keycloak's Admin APIs or public OIDC endpoints for client registration/management.
- Rate Limiting and Throttling: The self-registration endpoint, in particular, is vulnerable to abuse (e.g., account enumeration, brute-force registration attempts). APIPark can implement granular rate limiting on Keycloak's registration APIs, preventing malicious actors from overwhelming the system or creating excessive spam accounts. This adds an external layer of defense beyond Keycloak's internal security features.
- Traffic Management and Load Balancing: For large-scale Open Platform deployments, Keycloak instances might run in a cluster. APIPark can intelligently route API traffic to the appropriate Keycloak instance, ensuring high availability and optimal performance. Its performance, rivaling Nginx with over 20,000 TPS on modest hardware, ensures that Keycloak's APIs are always responsive, even under heavy load.
- Detailed API Call Logging and Monitoring: APIPark provides comprehensive logging capabilities, recording every detail of each API call. This means that every interaction with Keycloak's APIs – from a client attempting to register itself, to an external service querying user data, or a new user completing self-registration – is logged and traceable. This feature allows businesses to quickly trace and troubleshoot issues in API calls, ensuring system stability and data security. It also enables powerful data analysis to display long-term trends and performance changes, helping with preventive maintenance.
- Simplified API Exposure and Discovery: APIPark acts as an API developer portal, centralizing the display of all API services, including Keycloak's. This makes it easy for different departments and teams within an organization to find and use the required API services securely. By abstracting the backend Keycloak APIs, APIPark presents a cleaner, more controlled interface to developers, simplifying integration efforts.
- Subscription Approval for API Access: For sensitive Keycloak APIs (e.g., those for creating/modifying users), APIPark allows for the activation of subscription approval features. Callers must subscribe to an API and await administrator approval before they can invoke it, preventing unauthorized API calls and potential data breaches. This is especially valuable in an Open Platform scenario where various partners or internal teams might require access to identity management functions.
By deploying APIPark in front of Keycloak, an organization can effectively transform its identity management capabilities into a highly secure, performant, and easily consumable set of APIs, essential for any robust Open Platform. It provides the necessary management layer to control, secure, and monitor the interactions between various services and Keycloak's core identity functions. You can learn more about APIPark and its capabilities at ApiPark.
Other Advanced Considerations
- Multi-Factor Authentication (MFA): While not part of self-registration, MFA is often enforced post-registration. Keycloak supports various MFA methods (TOTP, WebAuthn/FIDO2) and can make them required actions upon first login.
- Conditional Authentication: Keycloak allows for highly flexible authentication flows that can adapt based on user attributes, IP address, or other context, which can be extended to registration scenarios to apply different policies (e.g., stricter checks for certain regions).
These advanced features demonstrate Keycloak's power as a foundational element for sophisticated identity management, enabling organizations to build highly secure, adaptable, and integrated Open Platform solutions.
Chapter 6: Security Best Practices for Self-Registration
Enabling self-registration introduces specific security challenges that must be addressed proactively. While Keycloak provides robust features, implementing best practices is crucial to prevent abuse, protect user data, and maintain the integrity of your Open Platform.
Rate Limiting on Registration Endpoints
The self-registration endpoint is a prime target for malicious activities such as: * Account Enumeration: Attackers try to register common usernames or email addresses to determine if they already exist, gathering information about your user base. * Spam Account Creation: Bots automatically create numerous accounts for nefarious purposes (e.g., phishing, resource depletion). * Denial of Service (DoS): Flooding the registration endpoint with requests to overload your Keycloak instance.
Best Practices: * External Rate Limiting: Implement rate limiting at your API Gateway (like APIPark) or load balancer layer. This can limit the number of registration requests originating from a single IP address within a given time frame. For instance, allowing only 5 registration attempts per IP per hour. * Keycloak's Security Defenses: Keycloak itself has some built-in security defenses under "Realm Settings" -> "Security Defenses" -> "Brute Force Detection," which can block users (or IPs) after too many failed login attempts. While primarily for login, similar principles can be extended to registration attempts using custom SPIs if fine-grained control is needed. * CAPTCHA Integration: Combine rate limiting with CAPTCHA to add an additional layer of defense against automated registrations.
CAPTCHA Integration (Built-in reCAPTCHA, Custom Solutions)
CAPTCHA (Completely Automated Public Turing test to tell Computers and Humans Apart) is an effective tool against bot registrations.
Keycloak's Built-in reCAPTCHA: Keycloak offers out-of-the-box support for Google reCAPTCHA. 1. Obtain Keys: Get Site Key and Secret Key from the Google reCAPTCHA admin console. 2. Configure in Keycloak: In "Realm Settings" -> "Security Defenses" -> "CAPTCHA," enable reCAPTCHA and enter your Site Key and Secret Key. 3. Add to Flow: Enable the reCAPTCHA authenticator in your "Registration Flow" under the "Authentication" section.
When enabled, the reCAPTCHA widget will appear on the self-registration form, requiring users to pass the challenge before submitting.
Custom CAPTCHA Solutions: If Google reCAPTCHA is not suitable (e.g., due to privacy concerns or specific requirements), you can integrate other CAPTCHA services (like hCaptcha, Cloudflare Turnstile) or custom solutions using a custom Authenticator SPI. This would involve: 1. Adding the CAPTCHA widget's JavaScript to your register.ftl (via theme resources). 2. Implementing an Authenticator that verifies the CAPTCHA response with the CAPTCHA service's backend API before allowing registration to proceed.
Strong Password Policies and MFA Enforcement
These are fundamental security measures that should be enforced for all self-registered users.
- Password Policies: As discussed in Chapter 3, configure robust password policies (minimum length, complexity requirements, history, expiration) in "Realm Settings" -> "Security Defenses" -> "Password Policy."
- MFA (Multi-Factor Authentication): While not typically during self-registration, MFA should be enforced as a "Required Action" for new users upon their first login.
- In "Authentication" -> "Required Actions," enable and configure MFA options (e.g., "Configure OTP," "WebAuthn Register").
- Set these actions as "Default Actions" so new users are prompted to set them up.
MFA significantly reduces the risk of account compromise, even if passwords are stolen, by requiring a second verification factor. This is a critical component for securing an Open Platform where user accounts might hold access to sensitive resources.
Email Verification and Account Deactivation Policies
- Always Require Email Verification: As highlighted earlier, this is a non-negotiable step to ensure legitimate user accounts and enable secure password recovery.
- Account Deactivation Policy: Define policies for inactive accounts. For example, accounts that remain unverified for a long period or accounts that have been inactive for an extended duration might be automatically disabled or deleted. This helps clean up stale or potentially abandoned accounts, reducing your attack surface.
- User Notifications: Inform users about deactivation policies in your terms of service and through automated email notifications before deactivation occurs.
Monitoring and Alerting for Suspicious Registration Activity
Proactive monitoring is essential to detect and respond to security threats related to self-registration.
- Keycloak Event Logs: Keycloak logs authentication events (
Realm Settings->Eventstab). Monitor forREGISTERevents, especially high volumes from unusual IP addresses, or a large number ofLOGIN_ERRORevents associated with registration attempts. - SIEM Integration: Integrate Keycloak event logs with a Security Information and Event Management (SIEM) system. This allows for centralized logging, correlation of events, and automated alerting for suspicious patterns.
- API Gateway Logs: If using an API Gateway like APIPark, leverage its detailed API call logging capabilities. APIPark records every API call, allowing you to monitor registration endpoint traffic, identify spikes, and detect potential abuse. Its powerful data analysis can highlight trends and anomalies in registration attempts, enabling proactive security measures.
- Application Logs: Your application's own logs should also capture registration attempts and flag any anomalies.
Alerts should be configured to notify administrators immediately of high-volume registration attempts, failed verification attempts, or unusual geographic origin of registrations.
Secure Deployment of Keycloak
The security of your self-registration flow is inherently linked to the security of your Keycloak deployment itself.
- Hardening Keycloak: Follow Keycloak's official security guides for hardening your instance (e.g., running with a non-root user, securing the database, encrypting sensitive data).
- Network Security: Place Keycloak behind a firewall and ensure it's only accessible from trusted networks or via your API Gateway.
- TLS/SSL: Always use HTTPS for all Keycloak endpoints (Admin Console, login page, APIs). This encrypts all traffic, protecting credentials and sensitive user data in transit.
- Regular Updates: Keep Keycloak updated to the latest stable version to benefit from security patches and bug fixes.
- Principle of Least Privilege: Ensure that the Keycloak instance, its database, and any integrated services operate with the minimum necessary permissions.
By diligently applying these security best practices, organizations can confidently offer self-registration, knowing that their Open Platform is protected against common threats and that user identities are managed securely.
Chapter 7: Managing Registered Users and Post-Registration Workflows
Self-registration is just the beginning of a user's lifecycle within Keycloak. Effective management of these registered users and the workflows that follow is crucial for maintaining a healthy and secure user base. This chapter covers the tools and processes for managing users once they are on board.
Admin Console User Management: Viewing, Editing, Disabling Users
The Keycloak Admin Console provides a comprehensive interface for managing users within a realm.
- Navigating to Users: In the left-hand navigation, click "Users."
- Searching and Filtering: You can search for users by username, email, first name, or last name. Filters allow you to narrow down the list (e.g., by enabled status, groups).
- Viewing User Details: Clicking on a user reveals their detailed profile, including:
- Details Tab: Username, email, first name, last name, creation timestamp, email verification status. You can enable/disable the user, trigger email verification, or delete the user from here.
- Credentials Tab: Manage passwords, reset credentials, configure OTP.
- Role Mappings Tab: Assign or revoke realm and client roles.
- Groups Tab: Add or remove the user from groups.
- Attributes Tab: View and edit custom user attributes.
- Sessions Tab: View active sessions for the user and log them out if necessary.
Administrators can perform actions such as manually verifying an email if a user is unable to click the verification link, enabling a disabled account, or updating a user's profile information. This direct control is vital for support scenarios and maintaining data accuracy.
Password Reset and Account Recovery Flows
Even with robust self-registration, users will inevitably forget their passwords. Keycloak provides secure and user-friendly password reset and account recovery mechanisms.
- Forgot Password Link: The Keycloak login page includes a "Forgot Password?" link. Clicking this initiates a flow where the user provides their username or email.
- Email-Based Reset: Keycloak sends a password reset link to the user's registered email address. This link is time-limited and single-use for security.
- Security Questions/MFA: For more advanced recovery, Keycloak can be configured with security questions or require MFA to prove identity during recovery, though this usually requires custom authenticators.
- Administrator Reset: Administrators can also manually reset a user's password via the "Credentials" tab in the Admin Console.
It's crucial to ensure that the email server (SMTP) configured for Keycloak is reliable for these recovery flows, as email is the primary channel for self-service account recovery.
User Lifecycle Management: Deactivation, Deletion
Managing the entire lifecycle of a user, from initial registration to eventual deactivation or deletion, is a key aspect of identity governance.
- Deactivation (Disabling): Instead of immediate deletion, accounts can be disabled. A disabled user cannot log in, but their data remains in Keycloak. This is useful for temporary suspension or for retaining historical data while denying access.
- Deletion: Permanently removes a user and all their associated data from Keycloak. This is often required for data privacy compliance (e.g., GDPR's "right to be forgotten").
- Automated Policies: For large user bases, policies can be implemented (via custom SPIs or external scripts interacting with the Admin REST API) to automatically deactivate or delete users based on inactivity periods, unverified emails, or other criteria.
Role and Group Assignment Post-Registration
Once a user has self-registered, they typically need to be assigned roles or added to groups to gain specific permissions within the Open Platform.
- Manual Assignment: Administrators can manually assign realm roles, client roles, and add users to groups via the Admin Console.
- Automated Assignment (via SPIs): For scale, automated assignment is preferred:
EventListenerProvider: After aREGISTERevent, your customEventListenerProvidercan programmatically assign default roles or add the user to a default group using Keycloak'sUserManageror Admin REST API.- Custom
Authenticator: A custom authenticator in the registration flow could prompt the user to choose roles or groups, or automatically assign them based on specific registration form data (e.g., if a user selects a "developer" role on the form, they are automatically added to the "developers" group and given relevant roles). - User Profile SPI: Can be used to collect information that then drives group or role assignments. For example, if a custom attribute captures a user's department, an SPI could use this to assign department-specific roles.
This automated provisioning ensures that users receive appropriate access rights immediately upon successful registration, streamlining their onboarding into the Open Platform.
Table: Common Keycloak Self-Registration Configuration Options
To consolidate some of the key configuration points discussed throughout this article, the following table summarizes common options and their significance for the self-registration user flow.
| Configuration Area | Setting/Feature | Location in Admin Console | Description | Impact on Self-Registration User Flow |
|---|---|---|---|---|
| Basic Enablement | User registration | Realm Settings -> Login | Toggle to enable or disable the "Register" link on the login page. | Enables/Disables the ability for users to create accounts themselves. |
| Email Verification | Require Email Verification | Realm Settings -> Login | Users must click a link in a confirmation email after registration before logging in. | Critical security step against spam/fake accounts; ensures valid email. |
| Email Server Config | SMTP Server | Realm Settings -> Email | Defines the SMTP server Keycloak uses to send transactional emails (verification, password reset). | Essential for verification/recovery emails to function. |
| Password Policy | Password Policy Constraints | Realm Settings -> Security Defenses | Enforces rules for new passwords (min length, complexity, history, etc.). | Enforces strong passwords for all self-registered users. |
| CAPTCHA Integration | CAPTCHA | Realm Settings -> Security Defenses | Integrates Google reCAPTCHA to prevent bot registrations. Also requires adding authenticator to registration flow. | Mitigates bot sign-ups and brute-force attempts. |
| Custom Attributes | User Profile Attributes | Realm Settings -> User Profile | Defines custom fields to collect additional user data during registration. Can be made mandatory, optional, or read-only. | Extends the registration form to gather specific business data. |
| Theme Customization | Login Theme | Realm Settings -> Login | Selects the visual theme for login, registration, and account pages. | Brands the registration experience to match application look and feel. |
| Social Login | Identity Providers | Identity Providers | Configures external identity providers (Google, Facebook, GitHub) for self-registration and SSO. | Simplifies registration by allowing users to use existing social accounts. |
| Post-Reg Actions | Required Actions | Authentication -> Required Actions | Defines actions users must perform (e.g., Configure OTP, Update Profile) upon first login after registration. | Enforces post-registration setup like MFA, complete profile. |
| Custom Logic | Event Listener Providers | Realm Settings -> Events | Custom Java code (SPI) to execute logic when Keycloak events (like REGISTER) occur, e.g., calling external APIs. | Automates integration with external systems post-registration. |
| Traffic Management | External API Gateway | (External - e.g., APIPark) | Provides rate limiting, traffic routing, unified authentication for Keycloak's APIs, and detailed logging. | Secures and manages access to Keycloak's identity APIs and registration flow. |
By mastering these configurations and leveraging Keycloak's powerful extensibility points, organizations can create a self-registration user flow that is not only robust and secure but also highly tailored to their specific needs, providing a truly seamless entry point to their Open Platform.
Conclusion
The journey through Keycloak's self-registration user flow reveals a sophisticated yet flexible system, capable of serving as the cornerstone of identity management for any modern Open Platform. From the initial activation of the feature to the intricate dance of theme customization, the power of User Profile SPIs for data collection, and the advanced integration patterns facilitated by Keycloak's SPIs and an API Gateway like APIPark, every aspect of self-registration can be meticulously crafted.
We have explored how a well-designed self-registration process is not merely a technical configuration but a strategic asset. It significantly enhances the user experience, making onboarding intuitive and frictionless. It underpins the scalability of an Open Platform by automating user provisioning, thereby reducing administrative overhead and freeing valuable resources for more critical tasks. Crucially, by adhering to stringent security best practices—implementing rate limiting, integrating CAPTCHA, enforcing strong password policies, and leveraging email verification—organizations can safeguard against common threats and maintain the integrity of their user base.
The ability to manage the entire user lifecycle, from the moment of self-registration through post-registration workflows, password resets, and eventual deactivation, underscores Keycloak's comprehensive capabilities. When combined with an API Gateway like APIPark, which secures, monitors, and optimizes access to Keycloak's essential APIs, the entire identity ecosystem becomes a formidable and resilient component of any digital offering.
In an era where digital identity is paramount, mastering Keycloak's self-registration user flow empowers organizations to build secure, scalable, and user-friendly Open Platforms. It ensures that the first interaction a user has with your system is a positive and secure one, laying a strong foundation for long-term engagement and trust. As the digital landscape continues to evolve, the principles of robust and adaptable identity management, as embodied by Keycloak, will remain indispensable for developers, architects, and business leaders alike.
Frequently Asked Questions (FAQs)
1. What is the primary benefit of enabling self-registration in Keycloak? The primary benefit is a significantly improved user experience, allowing users to create accounts independently and instantly, reducing friction and wait times. It also enhances operational scalability by automating user provisioning, drastically lowering administrative overhead for IT teams, making it ideal for rapidly growing Open Platforms.
2. How can I customize the appearance of the Keycloak self-registration page? You can customize the appearance by creating a custom Keycloak theme. This involves creating a new theme directory, copying and modifying FreeMarker templates (especially register.ftl), and adding custom CSS and JavaScript files. The custom theme is then selected in the "Realm Settings" -> "Login" tab of the Keycloak Admin Console.
3. Is email verification mandatory for self-registration in Keycloak? No, it is not mandatory by default, but it is highly recommended and can be enabled in "Realm Settings" -> "Login" tab by toggling "Require Email Verification" to "On." Email verification is a crucial security measure that confirms the user owns the email address, helps prevent spam accounts, and is essential for secure password recovery.
4. How can I add custom fields to the self-registration form beyond username, email, and name? Custom fields can be added using Keycloak's User Profile SPI. In the Admin Console, navigate to "Realm Settings" -> "User Profile," and add new attributes. You can define their display name, validation rules, and control their visibility and mandatory status on the registration form. For more complex rendering, you might also need to directly modify the register.ftl template within your custom theme.
5. How does an API Gateway like APIPark enhance the security and management of Keycloak's self-registration flow and APIs? An API Gateway like APIPark provides a critical layer of security and management by sitting in front of Keycloak. It can implement rate limiting on the registration endpoint to prevent bot attacks and account enumeration, offer unified authentication for API consumers, and ensure secure access to Keycloak's various APIs. Furthermore, APIPark provides detailed API call logging, monitoring, and analytics, allowing administrators to track registration traffic, detect anomalies, and troubleshoot issues, making the overall identity Open Platform more robust and manageable.
🚀You can securely and efficiently call the OpenAI API on APIPark in just two steps:
Step 1: Deploy the APIPark AI gateway in 5 minutes.
APIPark is developed based on Golang, offering strong product performance and low development and maintenance costs. You can deploy APIPark with a single command line.
curl -sSO https://download.apipark.com/install/quick-start.sh; bash quick-start.sh

In my experience, you can see the successful deployment interface within 5 to 10 minutes. Then, you can log in to APIPark using your account.

Step 2: Call the OpenAI API.

